If you have ever wanted to master authentic Russian dumplings at home, this Basic Russian Vareniki or Pelmeni Dough (Russian Pierogi) Recipe is your perfect starting point. These delicate dough pockets filled with a variety of sweet or savory fillings offer a comforting, hearty experience that will warm your soul. Whether you’re in the mood for soft potato and onion vareniki or succulent meat pelmeni, this dough serves as the essential foundation for those iconic tastes of traditional Russian cuisine, bringing you closer to an old-world feast with every bite.
Ingredients You’ll Need
The beauty of making this Basic Russian Vareniki or Pelmeni Dough (Russian Pierogi) Recipe lies in its simplicity. Each ingredient plays a vital role in creating the perfect dough texture—soft yet sturdy enough to hold your fillings without breaking.
- 1 large egg: Adds richness and helps bind the dough together for elasticity.
- 2 Tbsp sour cream: Keeps the dough tender while adding a subtle tang.
- 3/4 cup water: Provides hydration for the flour to develop gluten.
- 1 1/4 cup 2% or whole milk: Enriches the dough, adding softness and flavor depth.
- 5 cups all-purpose flour (plus about 1 cup more for dusting): The backbone of the dough—use best quality for ideal texture.
- Potato & onion: Classic savory filling for comforting vareniki.
- Blueberry: Perfect sweet filling for a fruity surprise.
- Cherry: Tart and juicy, ideal for dessert-style pierogi.
- Ground pork and turkey: Traditional pelmeni filling packed with flavor.
- Zazharka (sautéed bacon and onion in butter): A rich topping to drizzle over finished vareniki for extra indulgence.
- Melted butter: For serving, ensures each dumpling glistens and tastes heavenly.
- Vinegar or ketchup: Great dipping sauces that complement the savory varieties.
- Sugar: Dust over sweet dumplings to prevent sticking and add a touch of sweetness.
- Sour cream: The traditional accompaniment that adds cool, creamy contrast.
How to Make Basic Russian Vareniki or Pelmeni Dough (Russian Pierogi) Recipe
Step 1: Combine Egg and Sour Cream
Start by whisking one large egg and two tablespoons of sour cream in a mixing bowl until they are completely combined and smooth. This mixture gives your dough a tender richness and a touch of tanginess that sets the foundation for that perfect pierogi texture.
Step 2: Add Milk and Water
Next, whisk in 1 1/4 cups of milk and 3/4 cup of water to the egg mixture. The combination of milk and water ensures your dough remains soft but not too heavy, allowing for pliability as you roll and shape.
Step 3: Incorporate Flour Gradually
Using a spatula, slowly mix five cups of all-purpose flour into the wet ingredients, adding one cup at a time. This gradual introduction of flour helps your dough develop just enough structure without becoming tough or dry.
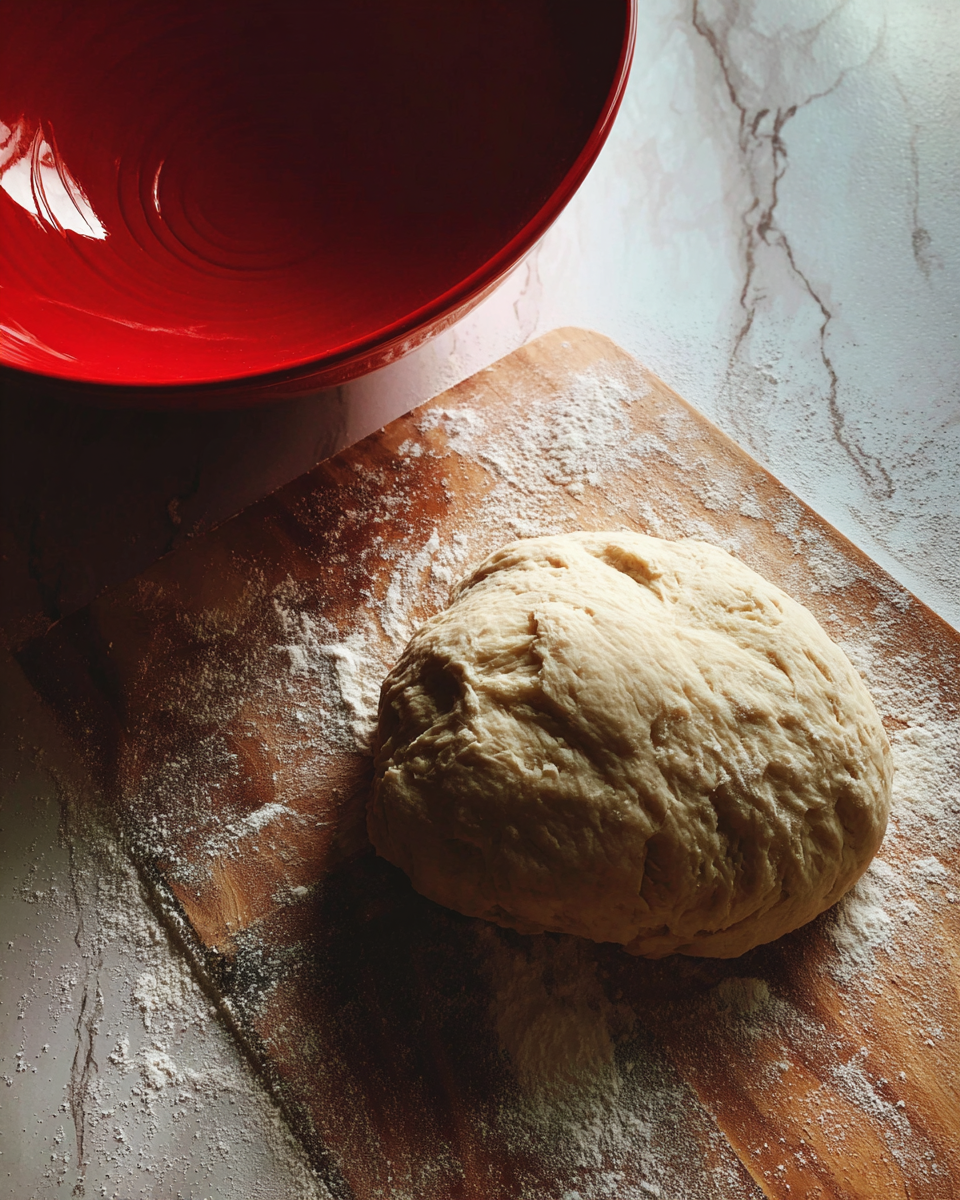
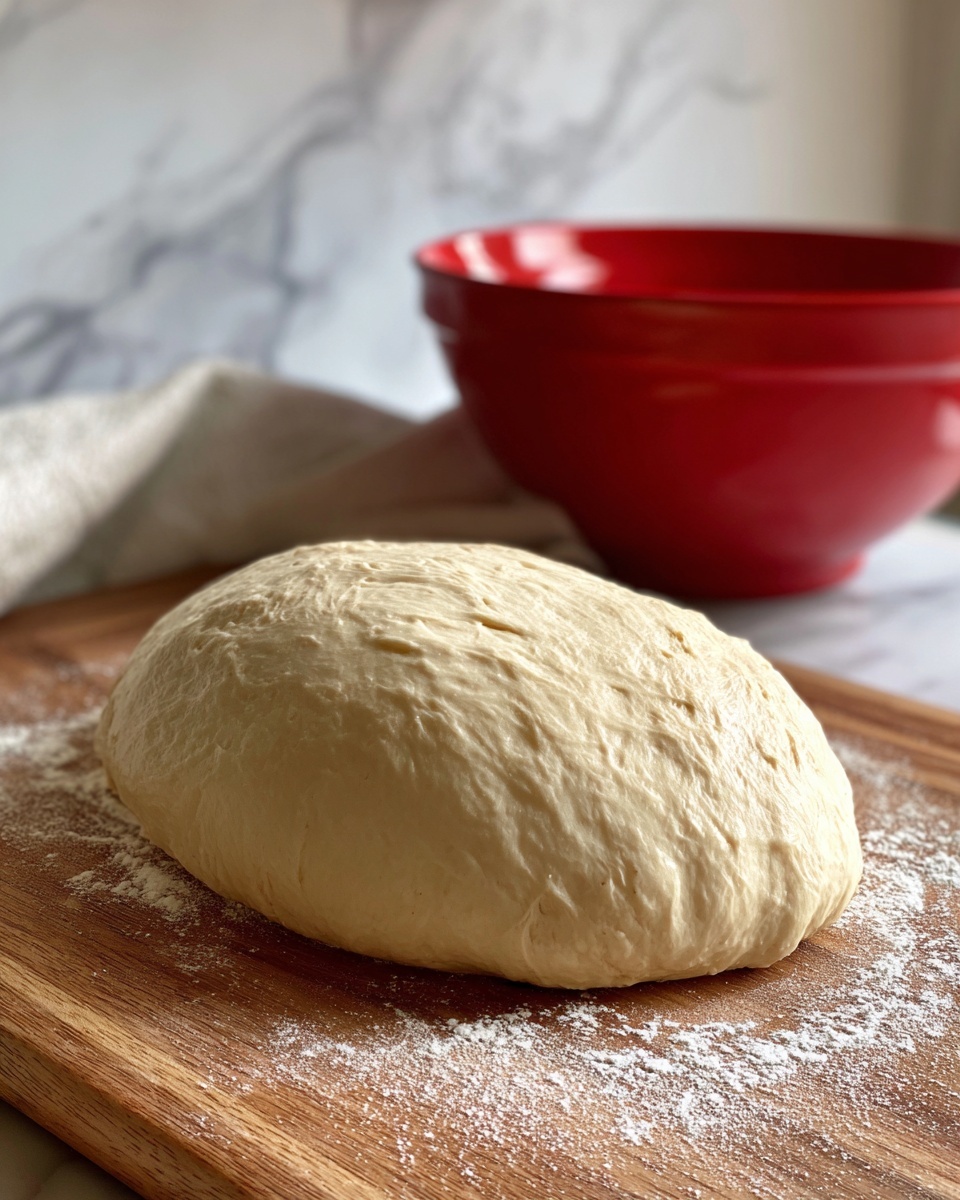
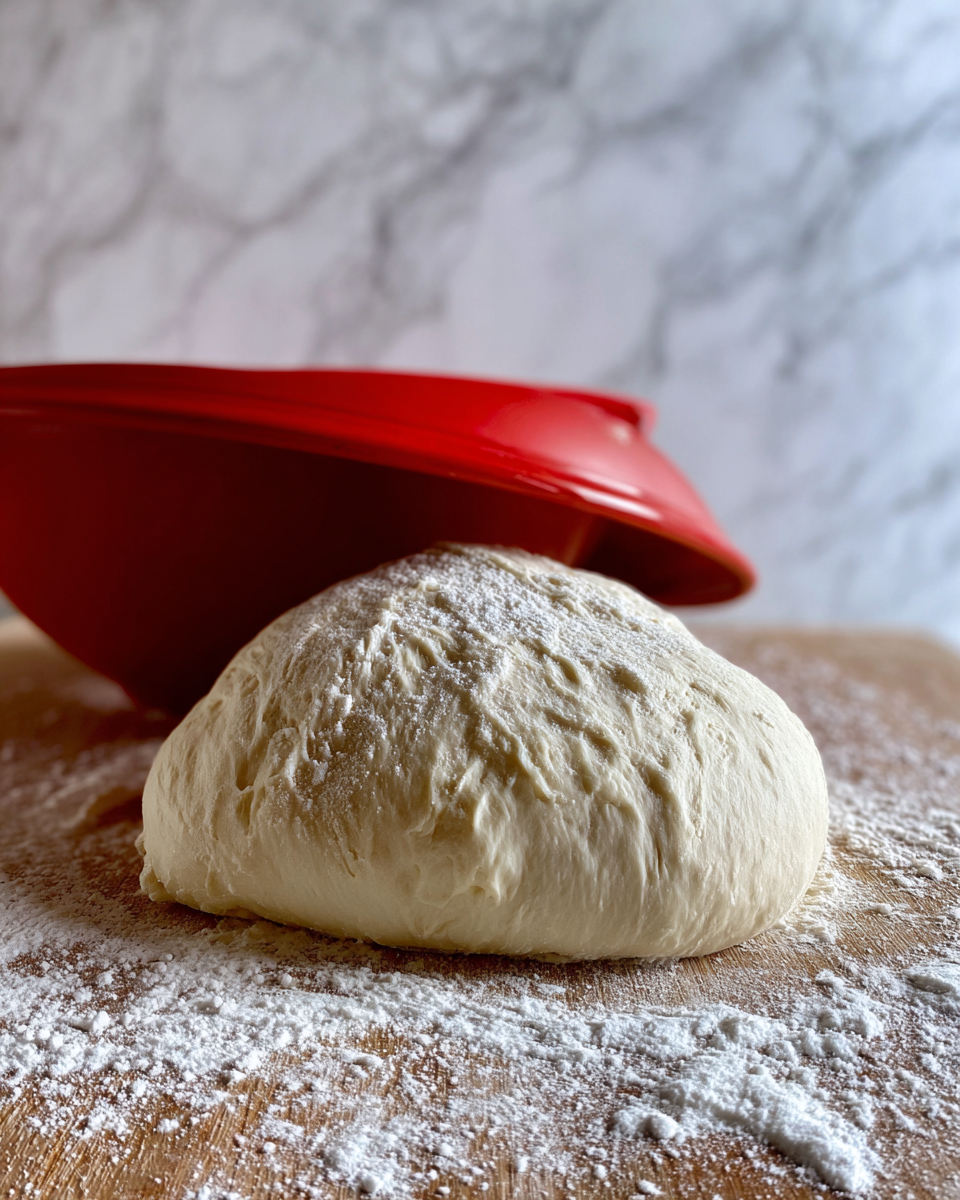
Step 4: Knead the Dough
Turn your dough out onto a floured surface and begin kneading using a food scraper or your hands by turning and folding. Dust with extra flour as needed, but be cautious not to add too much—you want the dough to be soft and slightly tacky, not stiff. Knead for about 6 to 8 minutes until smooth and elastic.
Step 5: Let the Dough Rest
Cover the dough with a bowl or cloth and let it sit at room temperature for approximately one hour. This resting period is crucial to relax the gluten, making the dough easier to roll out and shape effortlessly.
Step 6: Portion the Dough
Cut the rested dough into 4 to 6 pieces for manageable rolling. Keep the unused pieces covered with plastic wrap so they do not dry out during work.
Step 7: Roll and Cut
Take one piece of dough, roll it into a log shape, and slice off small portions about the size of a gumball. On a floured surface with a floured rolling pin, roll each piece into a roughly 3-inch diameter circle about 1/8 inch thick, perfect for filling.
Step 8: Fill and Seal Your Dumplings
Now for the fun part – adding your filling! Whether you choose potato, cherries, blueberries, or ground meat, place a spoonful in the center of each dough round. Fold over to create a crescent and press edges firmly to seal. For pelmeni, pinch the edges together to form the traditional “diaper” shape that’s unique and authentic. Place finished dumplings on a floured board to prevent sticking.
Step 9: Cook Your Pierogi or Pelmeni
Bring a large pot of salted water to a rolling boil. Drop your dumplings in batches, and once they float to the surface, cook about 2 to 3 minutes more to ensure they are done through. Use a slotted spoon to transfer them to a bowl and drizzle immediately with melted butter for mouthwatering richness.
Step 10: Repeat and Enjoy
Continue the rolling, filling, and boiling process with the remaining dough pieces until all your vareniki or pelmeni are cooked. Serve warm and savor each delightful bite.
How to Serve Basic Russian Vareniki or Pelmeni Dough (Russian Pierogi) Recipe
Garnishes
Enhance your freshly cooked dumplings with traditional garnishes like zazharka, a luscious topping made by sautéing bacon and onions in butter. This adds a smoky depth and irresistible aroma. A simple drizzle of melted butter works wonders for every bite, while a dollop of creamy sour cream brightens the flavors and lends cooling contrast. For sweeter varieties, a sprinkle of sugar prevents sticking and celebrates the dessert-like nature of berry fillings.
Side Dishes
Serve these Russian pierogi alongside crisp cucumber salads or tangy sauerkraut to balance the richness. Pickled vegetables bring a bite of acidity that pairs perfectly, while hearty soups such as borscht or mushroom broth complement and round out your meal beautifully. You can also offer a simple bowl of vinegar or ketchup as dipping sauces for a little more zing.
Creative Ways to Present
Get creative by pan-frying boiled pierogi gently in butter until golden and crispy on the edges for a delightful textural twist. Layer sweet vareniki with warm berry compote and a dollop of whipped cream for an impressive dessert. For entertaining, platter them with assorted fillings, allowing guests to explore a variety of savory and sweet options, making the meal interactive and fun.
Make Ahead and Storage
Storing Leftovers
If you end up with extra vareniki or pelmeni, fear not! Store cooked dumplings in an airtight container in the refrigerator for up to three days. To prevent them from sticking together, layer between parchment paper or lightly toss with melted butter before refrigerating.
Freezing
You can freeze uncooked dumplings on a baking sheet lined with parchment paper, making sure they don’t touch. Once frozen solid, transfer them to a freezer bag for up to three months. This method lets you enjoy the Basic Russian Vareniki or Pelmeni Dough (Russian Pierogi) Recipe any time with minimal effort.
Reheating
Reheat boiled dumplings in simmering salted water for a few minutes until warmed through. For pan-fried leftovers, gently warm in a skillet with butter to revive their crispness. Avoid microwaving as it can make the dough tough or gummy.
FAQs
Can I substitute sour cream with something else?
Yes, you can substitute sour cream with plain yogurt or crème fraîche. They offer similar acidity and fat content, which help keep the dough tender and flavorful.
Do I need to rest the dough before rolling it out?
Absolutely! Resting the dough for about an hour relaxes the gluten, making it much easier to roll and shaping smoother, resulting in tender dumplings rather than tough or chewy ones.
Can I make this dough gluten-free?
Traditional recipes rely on gluten-containing flour for structure, but you can experiment with a gluten-free flour blend combined with xanthan gum. Keep in mind the texture will differ significantly.
What fillings work best with this dough?
This dough is wonderfully versatile. Classic fillings include mashed potatoes with sautéed onions, ground meat mixtures, fresh berries like blueberries or cherries, or even sweetened farmer’s cheese for a delicately sweet treat.
How can I tell when vareniki or pelmeni are cooked?
They are ready when they float to the water’s surface and cook for an additional 2 to 3 minutes. The floating indicates the dough is cooked through, but the extra time ensures the fillings are heated completely.
Final Thoughts
Making your own Basic Russian Vareniki or Pelmeni Dough (Russian Pierogi) Recipe at home is an incredibly rewarding experience that beautifully connects you with Russian culinary roots. With simple ingredients and straightforward steps, you can create a dish that evokes warmth, family traditions, and joy. Whether you choose savory or sweet fillings, each bite brings a bit of comfort and a lot of happiness. So roll up your sleeves, grab that rolling pin, and dive into this delicious adventure—you won’t regret it!
Print
Basic Russian Vareniki or Pelmeni Dough (Russian Pierogi) Recipe
- Prep Time: 120 minutes
- Cook Time: 10 minutes
- Total Time: 130 minutes
- Yield: Approximately 10 servings (10+ pierogies)
- Category: Dumplings
- Method: Stovetop
- Cuisine: Russian
Description
This recipe guides you through making basic Russian Vareniki or Pelmeni dough, perfect for creating traditional Russian pierogies filled with various fillings such as potato and onion, blueberry, cherry, or ground meats. The dough is soft and pliable, and the cooking method involves boiling followed by a butter drizzle or serving with traditional toppings like sautéed bacon and onions (zazharka).
Ingredients
Dough Ingredients
- 1 large egg
- 2 Tbsp sour cream
- 3/4 cup water
- 1 1/4 cup 2% or whole milk
- 5 cups all-purpose flour (plus about 1 cup more for dusting)
Fillings
- Potato & onion
- Blueberry
- Cherry
- Ground pork and turkey
Toppings & Extras
- Zazharka: sauté bacon and onion in butter and drizzle over finished vareniki/pierogies
- Melted butter for drizzling
- Sour cream for dipping
- Sugar for dusting to prevent sticking
- Vinegar or ketchup as optional dipping sauces
Instructions
- Mix egg and sour cream: Whisk together the egg and sour cream until the mixture is well combined and smooth.
- Add milk and water: Whisk in 1 1/4 cups of milk along with 3/4 cup water to the egg mixture, blending them thoroughly.
- Add flour gradually: Using a spatula, incorporate flour into the liquid ingredients a cup at a time until partially combined.
- Knead the dough: Transfer the dough onto a floured surface and knead it by turning and folding with a food scraper. Dust with additional flour as needed until the dough becomes soft and non-sticky, kneading for about 6 to 8 minutes. Be careful not to add too much flour to avoid a tough dough.
- Rest the dough: Cover the dough with a bowl and let it rest at room temperature for about 1 hour to relax the gluten and improve elasticity.
- Divide the dough: Cut the rested dough into 4 to 6 pieces. Work with one portion at a time, keeping the others covered with plastic wrap to prevent drying out.
- Shape dough pieces: Form each chunk into a log and cut into small pieces roughly the size of a gumball. Dust your rolling pin and board with flour, then roll each piece into a 1/8-inch thick circle about 3 inches in diameter.
- Fill and seal: Place your choice of filling (potato, cherries, blueberries, or meat) onto each dough circle. Fold dough over to create a crescent shape and pinch edges firmly to seal. For pelmeni with meat filling, pinch the edges together to form a ‘diaper’ shape. Place finished pierogies on a floured board to prevent sticking.
- Boil the pierogies: Bring a large pot of salted water to a boil. Add pierogies in batches, cooking until they float to the surface plus an additional 2 to 3 minutes. Remove with a slotted spoon and transfer to a bowl.
- Finish and serve: Drizzle the cooked pierogies with melted butter. Optionally, top with sautéed bacon and onions (zazharka), dust with sugar to prevent sticking, and serve with sour cream or vinegar/ketchup for dipping. Repeat steps 7 through 9 with remaining dough.
Notes
- Do not add too much flour during kneading as it can make the dough tough.
- Resting the dough for an hour makes it easier to roll and prevents shrinkage when cooked.
- Use a food scraper to help knead the dough without sticking to your hands.
- Pelmeni are typically meat-filled and shaped differently from vareniki.
- Boil vareniki in salted water and cook until they float plus extra 2-3 minutes to ensure they are fully cooked.
- Zazharka (sautéed bacon and onions) adds a delicious savory topping, but melted butter and sour cream are traditional accompaniments as well.
- Dusting cooked pierogies with sugar helps keep them from sticking if stored or served later.


