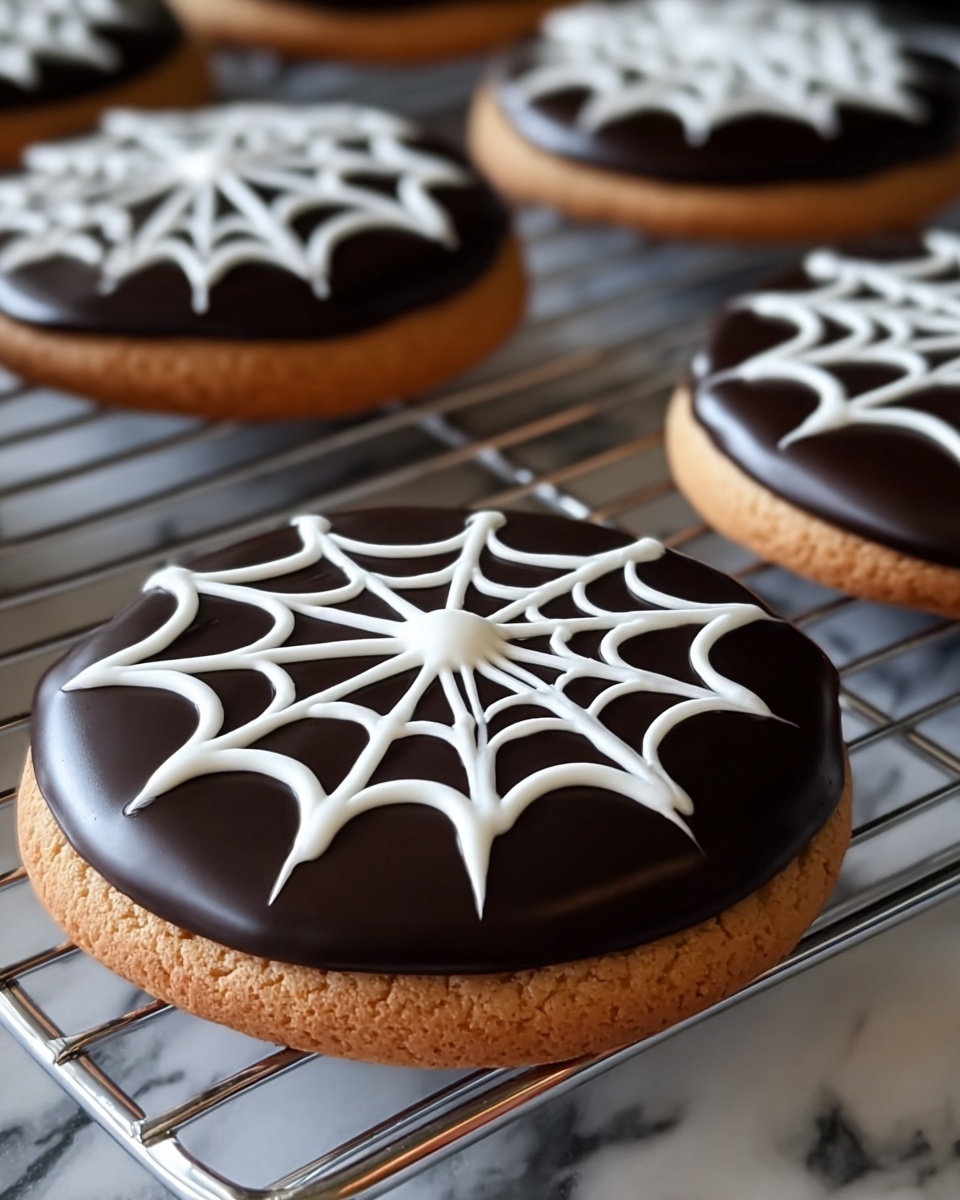
If you’re looking to wow your friends and family this spooky season with a treat that’s as fun to make as it is to eat, look no further than the Spiderweb Halloween Cookies Recipe. These charmingly eerie cookies combine a classic, buttery sugar cookie base with festive spiderweb icing that instantly turns your kitchen into a Halloween haven. Whether you’re baking them for a party, classroom celebration, or just to enjoy as a festive snack, this recipe offers simplicity, a touch of creativity, and that perfect balance of sweetness and texture that will keep everyone coming back for more.

Ingredients You’ll Need
Every ingredient in this Spiderweb Halloween Cookies Recipe plays a crucial role in crafting cookies that are tender, flavorful, and visually captivating. From the rich butter providing that melt-in-your-mouth softness, to the powdered sugar making icing smooth and sweet, these basics come together for a perfect Halloween treat.
- 1 cup unsalted butter (softened): Soft butter ensures a tender, rich cookie that’s not greasy but full of flavor.
- 1 cup granulated sugar: Adds the perfect sweetness and helps create that delicate crumb.
- 1 large egg: Binds the dough together while adding moisture and richness.
- 1½ teaspoons vanilla extract: Enhances overall flavor with a warm, comforting aroma.
- 2½ cups all-purpose flour: The main structure builder of the cookies, giving them that classic sugar-cookie texture.
- ½ teaspoon baking powder: Helps the cookies rise just a bit for a soft, airy bite.
- ½ teaspoon salt: Balances the sweetness and boosts all the other flavors.
- 2 cups powdered sugar (for icing): Provides smooth sweetness necessary for that classic spiderweb glaze.
- 2–3 tablespoons milk: Adjusts icing to the right consistency for spreading and piping.
- 1 teaspoon vanilla extract (for icing): Adds subtle depth to the glaze’s flavor.
- Black gel food coloring: Creates the striking black lines of the spiderweb, making the design truly pop.
How to Make Spiderweb Halloween Cookies Recipe
Step 1: Preparing the Dough
Start by preheating your oven to 350°F (175°C) and lining two baking sheets with parchment paper; this prevents sticking and makes clean-up easier. In a large bowl, cream your softened butter with the granulated sugar until the mixture is light and fluffy—this step is key for tender, melt-in-your-mouth cookies. Next, add the egg and vanilla extract; mix until everything is fully combined.
Step 2: Mixing Dry Ingredients and Forming the Dough
In a separate bowl, whisk together your flour, baking powder, and salt. Gradually add the dry ingredients into your wet mixture, mixing just until you have a soft dough. Avoid overworking the dough here as that can make your cookies tough.
Step 3: Shaping and Baking
On a lightly floured surface, roll the dough out to approximately ¼ inch thickness. Use a round cookie cutter to cut out fun circles—these will become your pumpkin canvases for spiderweb art. Place each circle onto your prepared baking sheets, leaving a little space between them. Bake for 8 to 10 minutes, or until the edges are just barely golden, then let your cookies cool completely on a wire rack before moving on to decorating.
Step 4: Crafting the Icing and Creating Spiderwebs
Mix your powdered sugar, milk, and vanilla extract together until you get a smooth, pipeable icing. Take a small portion and color it with black gel food coloring. Spread a thin, even layer of white icing over each cooled cookie. Then, pipe three black concentric circles right on top of the white base. While the icing is still wet, drag a toothpick or skewer from the center to the edge through the circles multiple times to create that classic spiderweb effect. Let the icing set completely before serving or storing your spooky masterpieces.
How to Serve Spiderweb Halloween Cookies Recipe

Garnishes
Add an extra pinch of spooky fun by decorating your cookies with candy spiders or colorful sprinkles. These not only bring visual appeal but add delightful textures that surprise the bite. You could even sprinkle edible glitter for a magical touch that sparkles in the light.
Side Dishes
Pair your Spiderweb Halloween Cookies with a cold glass of milk, a warm cup of chai latte, or even a spooky-themed punch. These combinations balance the sweetness and make your Halloween celebration extra cozy.
Creative Ways to Present
Arrange your cookies on a black or themed platter to make the white and black spiderweb design really pop. Place them alongside mini pumpkins or flickering LED candles to set a hauntingly delightful mood. For parties, package the cookies individually in clear bags tied with orange and black ribbons for a festive take-home treat.
Make Ahead and Storage
Storing Leftovers
Your Spiderweb Halloween Cookies Recipe yields enough to enjoy over several days, and they store beautifully in an airtight container at room temperature for up to 5 days. This keeps the icing firm and cookies fresh without losing any flavor or charm.
Freezing
If you want to prepare in advance, freeze the baked and cooled cookies without icing by placing them between parchment sheets in an airtight container. When ready, thaw completely before decorating to preserve that perfect texture and crisp detail of the spiderweb icing.
Reheating
Generally, these cookies are best enjoyed at room temperature, but if you prefer a warm bite, pop them in the microwave for 10 seconds. Be careful not to heat too long, or the icing may soften too much and lose the spiderweb design’s precision.
FAQs
Can I use store-bought cookie dough for this recipe?
Absolutely! Using store-bought sugar cookie dough is a fantastic shortcut. Just focus your creative energy on the spiderweb icing for a quick and impressive Halloween treat.
What if I don’t have black gel food coloring?
You can substitute with black liquid food coloring, but gel coloring is preferred as it provides more concentrated color without thinning the icing. Another option is to mix cocoa powder into the black portion of the icing to deepen the shade naturally.
How can I make the icing less runny?
If your icing feels too thin, add a little more powdered sugar until it reaches the right spreading and piping consistency. The perfect icing should hold its shape when piped but also spread smoothly.
Can these cookies be made in advance for a party?
Yes! The dough can be made ahead and refrigerated for up to 24 hours before baking. You can also bake and freeze undecorated cookies, decorating them fresh on the day of your party.
Are these cookies suitable for kids to decorate?
Definitely. The decorating process is fun and simple enough for kids to join in with supervision, especially when creating the spiderweb design with a toothpick. It’s a wonderful way to get the whole family involved in Halloween festivities.
Final Thoughts
The Spiderweb Halloween Cookies Recipe is more than just a dessert; it’s an experience that brings out the kid in all of us, especially during the most playful time of the year. I hope you enjoy every step of making and sharing these charming, spooky cookies, and that they become a beloved part of your seasonal celebrations. From the buttery cookie base to the mesmerizing spiderweb icing, this recipe is sure to impress and satisfy all your Halloween sweet cravings. Happy baking!
Print
Spiderweb Halloween Cookies Recipe
- Prep Time: 20 minutes
- Cook Time: 10 minutes
- Total Time: 30 minutes
- Yield: 24 cookies
- Category: Dessert
- Method: Baking
- Cuisine: American
- Diet: Vegetarian
Description
These Spiderweb Halloween Cookies are festive, fun, and perfect for celebrating the spooky season. Soft sugar cookies are topped with smooth white icing and decorated with intricate black spiderweb patterns, making them an eye-catching treat for Halloween parties or trick-or-treaters. Easy to bake and even easier to decorate, these cookies combine classic flavors with creative presentation.
Ingredients
For the Cookies
- 1 cup unsalted butter (softened)
- 1 cup granulated sugar
- 1 large egg
- 1½ teaspoons vanilla extract
- 2½ cups all-purpose flour
- ½ teaspoon baking powder
- ½ teaspoon salt
For the Icing
- 2 cups powdered sugar
- 2–3 tablespoons milk
- 1 teaspoon vanilla extract
- Black gel food coloring
Instructions
- Preheat and Prepare Pans: Preheat your oven to 350°F (175°C) and line two baking sheets with parchment paper to prevent sticking and ensure even baking.
- Cream Butter and Sugar: In a large bowl, cream the softened butter and granulated sugar together using a mixer or by hand until the mixture is light and fluffy, which typically takes about 3-5 minutes.
- Add Egg and Vanilla: Beat in the egg and vanilla extract fully until the wet ingredients are well combined and smooth.
- Mix Dry Ingredients: In a separate bowl, whisk together the all-purpose flour, baking powder, and salt to evenly distribute the leavening agent and seasoning.
- Combine Wet and Dry Ingredients: Gradually add the dry ingredients into the wet ingredients, stirring gently until a soft dough forms. Avoid overmixing to keep cookies tender.
- Roll and Cut Dough: Lightly flour a clean surface and roll the dough out to about ¼ inch thickness. Use a round cookie cutter to cut out circles and arrange them on the prepared baking sheets, spacing them evenly.
- Bake the Cookies: Bake in the preheated oven for 8–10 minutes, or until the edges just start to turn golden brown, indicating they are cooked but still soft.
- Cool the Cookies: Remove the baked cookies from the oven and transfer them to a wire rack to cool completely, which is essential to prevent the icing from melting.
- Make the Icing: Whisk together powdered sugar, milk, and vanilla extract until you achieve a smooth, pipeable consistency. Adjust milk quantity as needed to get the right thickness.
- Color the Icing: Set aside a small portion of the white icing and color it black using gel food coloring, mixing thoroughly for an even shade.
- Decorate the Cookies: Spread a thin layer of white icing on the cooled cookies. Using a piping bag or small plastic bag with a fine tip, pipe three black concentric circles on top of the white icing.
- Create the Spiderweb Effect: While the black icing is still wet, drag a toothpick or skewer from the center of each cookie outward through the icing circles. Repeat this 5–6 times evenly around the cookie to form the spiderweb patterns.
- Set the Icing: Allow the decorated cookies to sit undisturbed until the icing sets completely, ensuring the design stays intact before serving or storing.
Notes
- Add candy spiders or Halloween-themed sprinkles for an extra festive touch and to enhance the spooky look.
- For a quicker preparation, use store-bought sugar cookie dough and focus on decorating the cookies yourself.
- These cookies can be stored in an airtight container at room temperature for up to 5 days.
- This recipe is excellent for baking with kids as the decorating step allows for creativity.

