
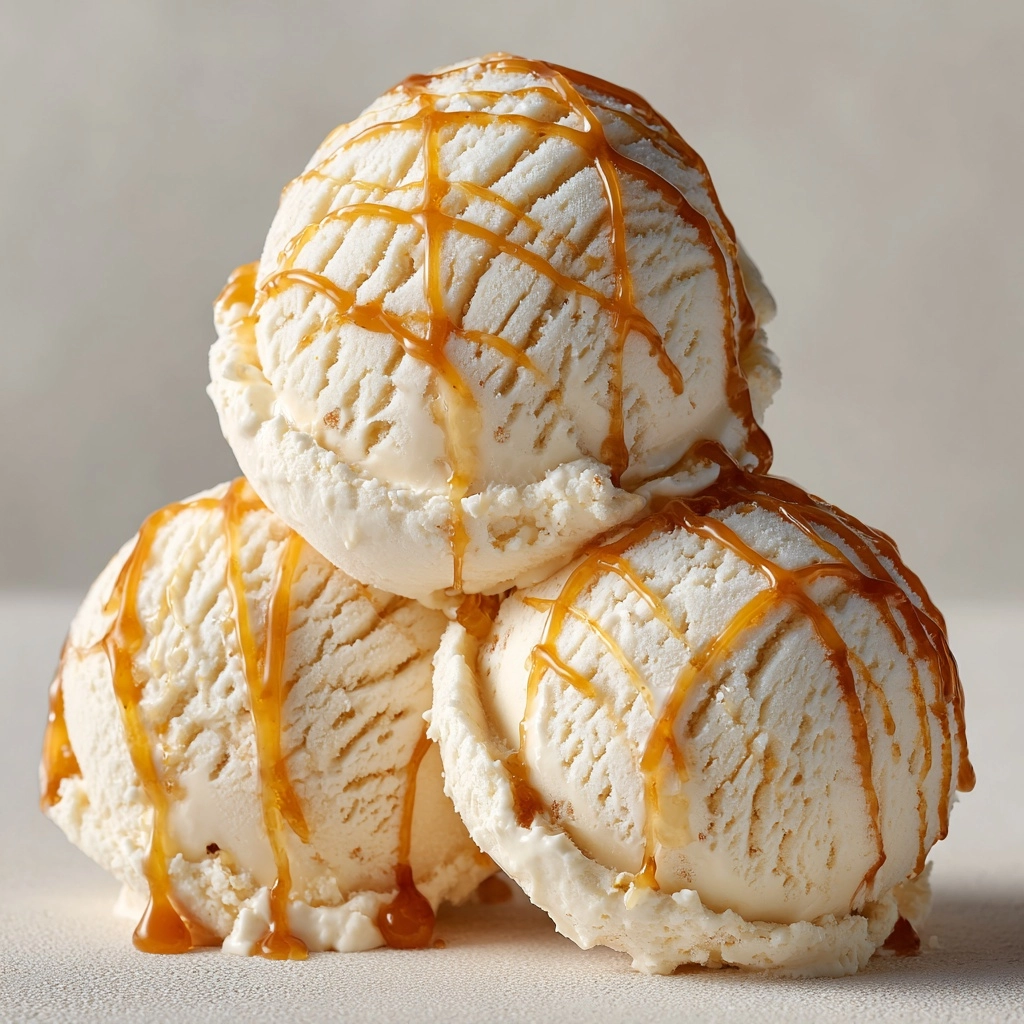
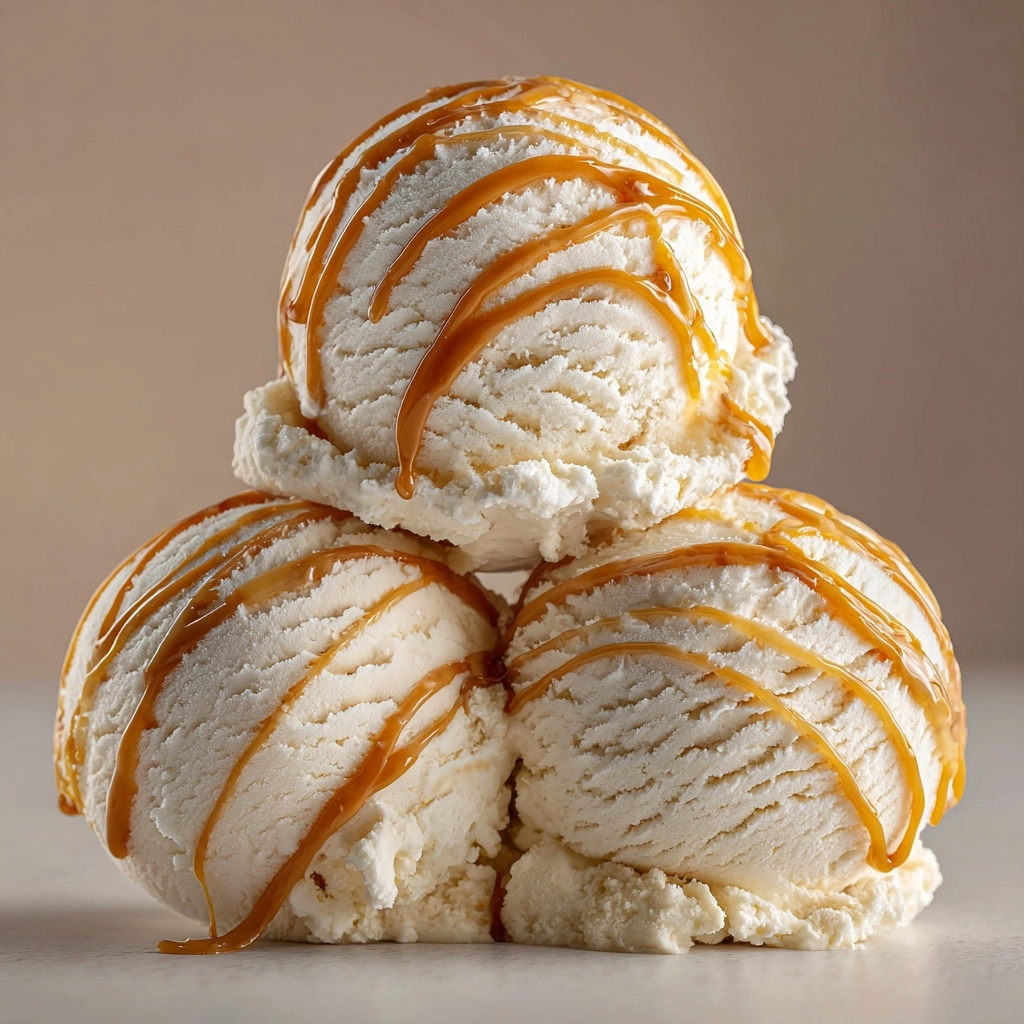
If there’s one treat that deserves a spot on your summer bucket list (or frankly, your year-round dessert menu), it’s Homemade Salted Caramel Ice Cream. Silky, creamy, and swirling with ribbons of rich caramel, each bite is a perfectly balanced blend of sweet, salty, and that irresistible buttery nuance you crave. Transforming simple pantry staples into a show-stopping frozen dessert, this recipe is pure comfort with a hint of sophistication—ideal for serving at gatherings or indulging solo on a cozy evening.
Ingredients You’ll Need
Every ingredient here is chosen for a reason—each one plays a starring role in flavor, texture, or color. This Homemade Salted Caramel Ice Cream comes together with pantry essentials that shine when brought to life with care and patience.
- Granulated Sugar: The backbone of that golden caramel, it melts into a syrupy base that’s rich, sweet, and slightly nutty.
- Unsalted Butter: Adds a creamy, luxurious mouthfeel and deepens the caramel flavor, so use the good stuff!
- Sea Salt: Just a hint balances the sweet, highlighting both the caramel and cream—don’t skip it!
- Heavy Cream (divided): Provides a custard-like texture and plenty of richness; dividing it ensures perfectly smooth caramel as well as a luscious ice cream base.
- Whole Milk: Lightens the base just enough to keep it scoopable straight from the freezer.
- Large Egg Yolks: The secret to an ultra-smooth, creamy custard that churns into velvety ice cream.
- Vanilla Extract: Adds background warmth and rounds out the finished flavor of the ice cream beautifully.
How to Make Homemade Salted Caramel Ice Cream
Step 1: Make the Caramel
Grab your heaviest saucepan and sprinkle in the granulated sugar. Set it over medium heat, and keep stirring with a heatproof spatula. The sugar will look clumpy before it melts into a clear syrup, then start to transform into a deep amber color—this is where the magic happens! Patience is key here, as caramel can go from perfect to burnt in seconds. As soon as it reaches the right shade, immediately add the butter and sea salt, stirring until everything is silky smooth. Be careful, as the mixture will bubble up energetically! Pour in 1 cup of heavy cream (it will hiss and sputter, but that’s normal), and keep stirring until you have a luscious caramel sauce. Remove it from the heat and let it cool slightly while you get started on your custard base.
Step 2: Warm the Cream and Milk
In a separate saucepan, combine the remaining cup of heavy cream and the whole milk. Warm the mixture over medium heat until it’s just steaming, not boiling. This gentle heat ensures your custard thickens beautifully later on, without risking curdled eggs. Give it a few gentle stirs to prevent a skin from forming on top.
Step 3: Temper the Egg Yolks
In a mixing bowl, whisk together the egg yolks until smooth. Now, the tempering: this step gently brings the yolks up to temperature so they don’t scramble when added to the hot liquid. Slowly pour about 1/2 cup of the warm milk mixture into the yolks, whisking constantly. Once integrated, gradually whisk the yolk mixture back into your saucepan with the rest of the milk and cream. Slow and steady wins the race for a silky, lump-free custard.
Step 4: Cook the Custard
Return the saucepan with your now-rich mixture to the stove over medium-low heat. Stir constantly with a wooden spoon or spatula, being sure to scrape the bottom and sides, until the custard thickens enough to coat the back of a spoon—if you run your finger through, it should leave a clear line. Keep an eye on the temperature if you have a thermometer: you want it to hit about 170–175°F (not higher, or your eggs might curdle!).
Step 5: Blend with Caramel and Strain
Take the pan off the heat and immediately stir in all of your caramel sauce and the vanilla extract. Now, for a truly velvety texture, pour the custard through a fine-mesh sieve into a clean bowl. This step catches any little cooked bits of egg and ensures your Homemade Salted Caramel Ice Cream will be impeccably smooth.
Step 6: Chill the Base
Cover the bowl and transfer it to the refrigerator. Let the custard chill for at least four hours, or overnight if your schedule allows. Cold custard churns into ice cream much more easily and with a better, creamier finish. Trust me, this patience pays off.
Step 7: Churn and Freeze
When you’re ready to churn, give the mixture a quick stir, then pour it into your ice cream maker. Follow your machine’s manufacturer instructions—usually 20–25 minutes will do the trick for a batch this size. Once churned, scrape the soft ice cream into a freezer-safe container. For an extra-special touch, swirl in a bit more homemade caramel before sealing. Freeze for at least four more hours, or until beautifully scoopable.
How to Serve Homemade Salted Caramel Ice Cream
Garnishes
Dressing up your ice cream is half the fun! Try a sprinkle of flaky sea salt, a drizzle of warm caramel, or a handful of toasted chopped pecans for crunch. If you’re feeling whimsical, shards of dark chocolate or a dusting of crushed cookies can elevate every scoop into something restaurant-worthy. Remember, with Homemade Salted Caramel Ice Cream, you only need a little sparkle for a big impression.
Side Dishes
This ice cream pairs marvelously with so many desserts. Tuck a generous scoop alongside apple pie, spoon it over fudgy brownies, or serve it with poached pears for a truly elegant finale. On summer days, sandwich it between two homemade cookies, or simply enjoy it in a crisp waffle cone—you’ll never look at store-bought the same way again.
Creative Ways to Present
If you want to dazzle, try layering this ice cream into a parfait glass with caramel sauce, whipped cream, and candied nuts. Or scoop small balls onto sweet tart shells for a unique twist on classic tartlets. For gatherings, fill mini mason jars and garnish with tiny caramel squares—guests will swoon over the presentation before the first bite.
Make Ahead and Storage
Storing Leftovers
Keep your leftover Homemade Salted Caramel Ice Cream in an airtight, freezer-safe container. To help prevent ice crystals from forming, press a piece of parchment or wax paper gently against the surface before sealing with a lid. Properly stored, it will stay creamy and delicious for up to two weeks—if it lasts that long!
Freezing
This recipe is designed for optimal freezing, staying scoopable thanks to the perfect balance of cream, milk, and caramel. After churning, be sure to freeze the ice cream for at least four hours to firm up. For longer-term storage, always keep the lid tightly closed and avoid repeated thawing and refreezing.
Reheating
If your ice cream becomes too hard in the freezer, just let the container sit at room temperature for 5–10 minutes before scooping. Don’t heat the ice cream in the microwave, as this will ruin its lovely custard texture. A little patience here ensures every scoop is just as creamy as the first.
FAQs
Can I make Homemade Salted Caramel Ice Cream without an ice cream maker?
Yes! After chilling the custard, you can pour it into a shallow dish and freeze. Every 30 minutes, stir vigorously with a fork to break up ice crystals until creamy. While not quite as fluffy as churned, it’s still deliciously rich.
What’s the best kind of salt for this caramel ice cream?
Flaky sea salt is the gold standard—it dissolves easily and offers pop-in-your-mouth surprises. If you only have fine sea salt, use a light hand, as the crystals are smaller and more concentrated.
Can I use store-bought caramel sauce in a pinch?
Homemade caramel makes all the difference (and is easier than you think), but you can substitute a high-quality store-bought version in a time crunch. Just be sure to pick one with real butter and no artificial flavors for best results.
Is it possible to make this recipe dairy-free?
You can swap the milk and cream for full-fat coconut milk and use a dairy-free butter alternative, but keep in mind the flavor and texture will change. The result will be luscious and creamy, with a subtle coconut undertone.
How do I get a beautiful caramel swirl in my ice cream?
After churning, layer half the ice cream in your container, drizzle with extra cooled caramel, then repeat with the remaining ice cream and more caramel. Use a butter knife to gently swirl for that dreamy ripple effect.
Final Thoughts
There’s a genuine joy in turning everyday ingredients into Homemade Salted Caramel Ice Cream—it’s easier than you might expect and always earns rave reviews. I hope you’ll give this dreamy dessert a try soon and make it the star of your next celebration (or quiet night in). It’s one you’ll come back to again and again, no special occasion required!
Print
Homemade Salted Caramel Ice Cream Recipe
- Prep Time: 25 minutes
- Cook Time: 20 minutes
- Total Time: 45 minutes (plus chilling and freezing time)
- Yield: 1 quart (about 8 servings)
- Category: Dessert
- Method: Churned
- Cuisine: American
- Diet: Vegetarian
Description
Indulge in the creamy richness of homemade salted caramel ice cream with this easy-to-follow recipe. Perfect for satisfying your sweet cravings!
Ingredients
Caramel Sauce:
- 1 cup granulated sugar
- 6 tablespoons unsalted butter, cut into pieces
- 1/2 teaspoon sea salt
- 1 cup heavy cream (divided)
Ice Cream Base:
- 2 cups heavy cream
- 1 cup whole milk
- 4 large egg yolks
- 1 teaspoon vanilla extract
Instructions
- Caramel Sauce: In a saucepan, melt sugar until amber. Add butter, salt, and 1 cup cream. Stir until smooth. Set aside.
- Ice Cream Base: Heat milk and 1 cup cream. Whisk yolks and temper with milk. Cook until thickened. Add caramel and vanilla. Chill, churn, freeze.
Notes
- Use dark brown sugar for deeper flavor.
- Add extra salted caramel for a ripple effect.
Nutrition
- Serving Size: 1/2 cup
- Calories: 310
- Sugar: 25 g
- Sodium: 160 mg
- Fat: 22 g
- Saturated Fat: 13 g
- Unsaturated Fat: 7 g
- Trans Fat: 0 g
- Carbohydrates: 27 g
- Fiber: 0 g
- Protein: 4 g
- Cholesterol: 145 mg
