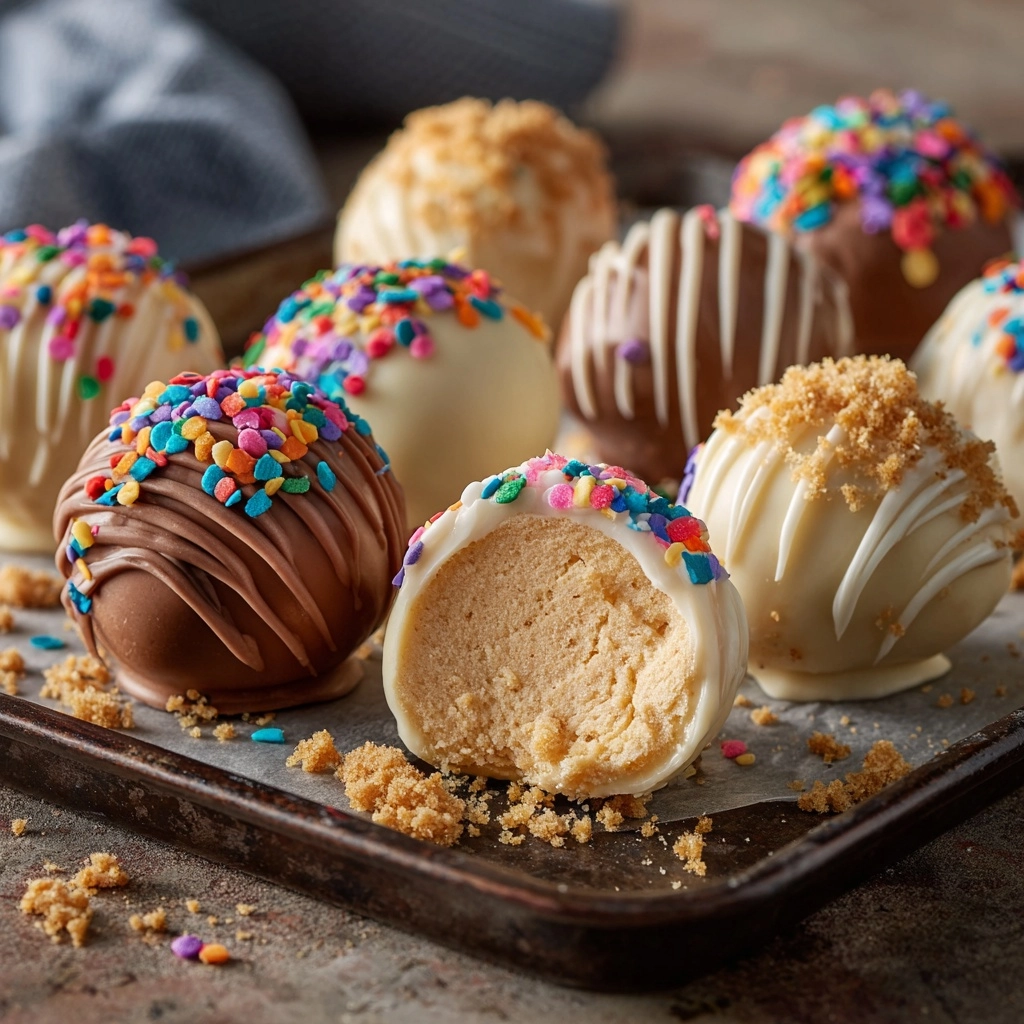
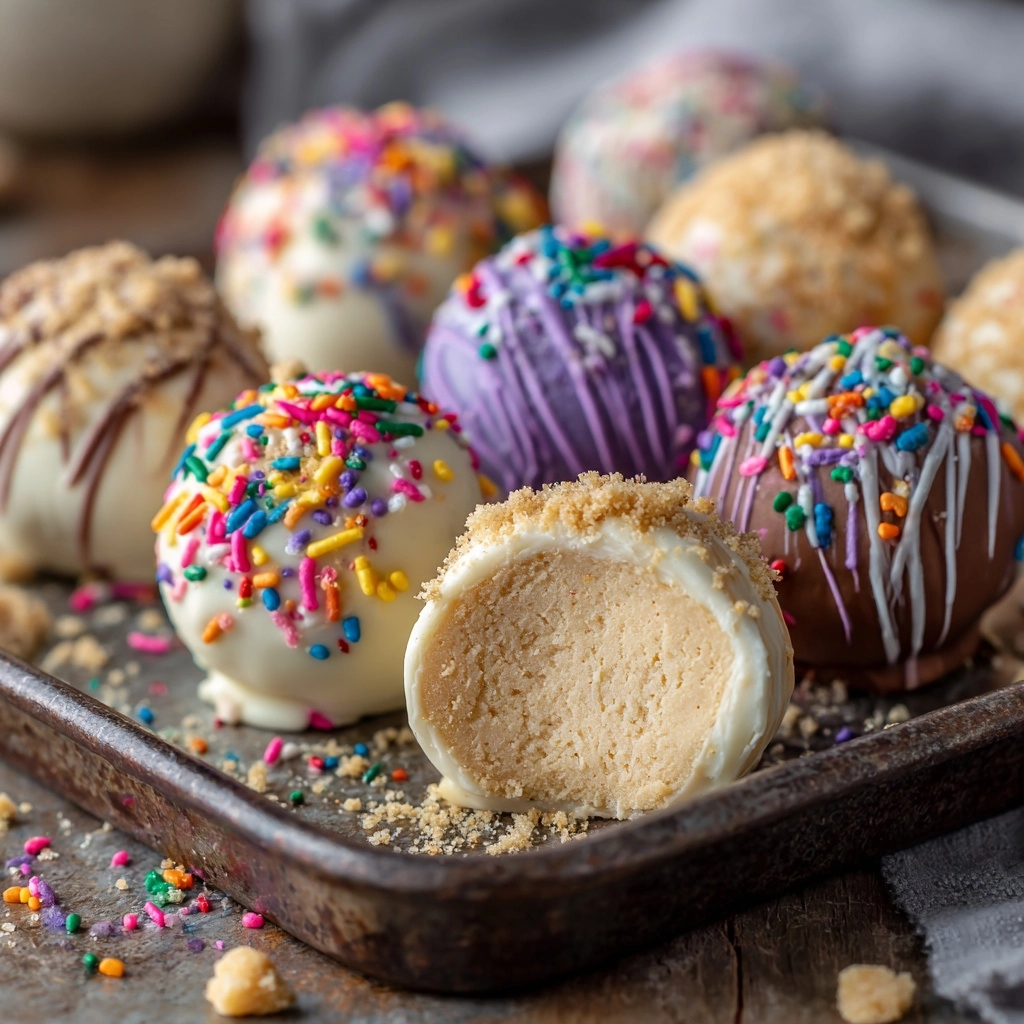
If you’re looking for a creamy, bite-sized treat that’s as fun to make as it is delicious to eat, Cheesecake Balls are destined to become your next favorite dessert obsession. With their soft and luscious interior coated in crunchy graham crumbs or drizzled with silky chocolate, these dreamy no-bake bites bring all the nostalgia of classic cheesecake into one portable, irresistibly poppable package. Whether you serve them at parties, share with friends, or simply enjoy a couple after dinner, Cheesecake Balls always steal the show with their delightful flavor and playful presentation.
Ingredients You’ll Need
Let’s take a closer look at how just a handful of staple ingredients come together to create pure dessert magic. Each one plays a special part, from creamy texture to sweet crunch, making these Cheesecake Balls taste like a tiny slice of cheesecake in every bite.
- Cream Cheese (8 ounces, softened): The foundation of cheesecake flavor and creaminess, so be sure it’s fully softened for perfect, smooth blending.
- Powdered Sugar (1/2 cup): Adds delicate sweetness and a melt-in-your-mouth finish that you just don’t get from granulated sugar.
- Vanilla Extract (1 teaspoon): Brings that lovely aromatic depth and signature cheesecake warmth.
- Graham Cracker Crumbs (1/2 cup, plus more for coating): Adds a nostalgic hint of classic cheesecake “crust” and a satisfying, subtle crunch on the outside.
- White Chocolate Chips (1/2 cup, melted): Infuses each ball with rich, velvety sweetness and helps hold everything together.
- Salt (a pinch): Just enough to heighten all the creamy, tangy flavors without being noticeable.
- Optional Toppings: Melted chocolate for drizzling, sprinkles, crushed nuts, or your favorite cookie crumbs let you fully customize each batch.
How to Make Cheesecake Balls
Step 1: Blend the Cream Cheese Base
Start by placing your softened cream cheese in a medium mixing bowl. Using a handheld mixer or sturdy spatula, beat it until completely creamy and free of lumps. This step sets the stage for the ultra-smooth texture that makes Cheesecake Balls so dreamy—you want that cream cheese perfectly silky before adding anything else.
Step 2: Mix in the Flavors and Binders
Add the powdered sugar, vanilla extract, graham cracker crumbs, melted white chocolate chips, and a generous pinch of salt to the bowl. Continue mixing until everything is evenly combined and the mixture is smooth, thick, and lightly golden from those graham crumbs. This hard-to-resist batter is what will ultimately form the heart of your Cheesecake Balls.
Step 3: Chill for Easy Rolling
Cover your mixing bowl tightly with plastic wrap or a lid, and refrigerate the mixture for about an hour. This quick chill firms up the dough, making it much easier to roll into neat balls later. Don’t skip this step—it’s the secret to perfectly shaped bites!
Step 4: Roll into Cheesecake Balls
Once chilled, use a small cookie scoop or a spoon to portion the mixture into roughly 1-inch balls. Roll each one between your palms for a smooth, round finish. This is the moment they start looking like irresistible little truffles, and the process is honestly so satisfying.
Step 5: Coat and Decorate
Roll each ball in extra graham cracker crumbs or your topping of choice. The classic crumb coating adds the taste of cheesecake “crust,” but don’t be afraid to get creative with melted chocolate, sprinkles, crushed nuts, or even cookie crumbs. Place the finished balls on a parchment-lined tray, ready for their next chill.
Step 6: Final Chill and Serve
Chill the finished Cheesecake Balls for at least 30 more minutes or until fully set. This final chill ensures they hold their shape and makes them extra refreshing, especially on a warm day. Now, they’re ready to impress—just one bite and you’ll see why these are such a beloved treat!
How to Serve Cheesecake Balls

Garnishes
Half the fun of serving Cheesecake Balls is dressing them up! Drizzle each one with melted chocolate for extra decadence, dust with powdered sugar for a snowy look, or add a handful of rainbow sprinkles to make them party-perfect. Crushed pistachios or toffee bits are fantastic for texture and color—you can easily tailor each batch to your mood or the occasion.
Side Dishes
Cheesecake Balls are amazing alongside a spread of fresh berries, which balance the richness with a refreshing pop. Arrange them on a dessert platter with chocolate-dipped pretzels, fruit skewers, or even mini cups of coffee for a chic sweet table. They’re perfect for pairing with after-dinner drinks or as part of a casual afternoon snack.
Creative Ways to Present
Turn Cheesecake Balls into an eye-catching centerpiece by displaying them on a tiered stand or serving tray. Try placing each ball in a mini cupcake liner for a bakery-style effect. For parties, skewer a few onto small sticks for “cheesecake pops” or tuck them into a fancy box as edible gifts. However you serve them, they always bring big smiles!
Make Ahead and Storage
Storing Leftovers
One of the best things about Cheesecake Balls is how well they keep. Simply transfer any leftovers to an airtight container and keep them in the refrigerator. They’ll stay creamy and delicious for up to five days, making them an ideal make-ahead treat for busy weeks or special occasions.
Freezing
If you’d like to store Cheesecake Balls for longer, freezing couldn’t be easier. Arrange the balls in a single layer on a baking sheet and freeze for about an hour, then transfer to a freezer-safe container or zip-top bag. They’ll keep their flavor and texture for up to two months. Let them thaw in the fridge for a few hours before serving, and they’re just as scrumptious as fresh.
Reheating
These sweet bites are meant to be enjoyed cold or at cool room temperature, so there’s no need to reheat. If you’ve frozen them, allow them to defrost gently in the refrigerator. Serve straight from the fridge for a refreshing, creamy treat that’s always ready when you are.
FAQs
Can I use flavored cream cheese for Cheesecake Balls?
Absolutely! Flavored cream cheese—like strawberry, chocolate, or even pumpkin spice—can add a fun twist to your Cheesecake Balls. Just note that some varieties might be a little softer, so you may want to chill the mixture a bit longer before shaping.
What if I don’t have white chocolate chips?
No problem! You can substitute the melted white chocolate chips with an equal amount of melted milk or semi-sweet chocolate chips, or even use almond bark. This will change the flavor but still help bind the mixture beautifully.
Can I make Cheesecake Balls without graham cracker crumbs?
If you don’t have graham crackers, try crushed vanilla wafers, shortbread cookies, or digestives. Each will bring its own special flavor and texture to your Cheesecake Balls, so go with your favorite!
Are these safe for kids to make?
Definitely! Since they’re no-bake, Cheesecake Balls are a wonderful recipe for little chefs to help with—just keep an eye on the melted chocolate if kids are assisting. Rolling and decorating is always a big hit.
How can I make these gluten-free?
For gluten-free Cheesecake Balls, simply swap regular graham crackers for gluten-free graham-style cookies or gluten-free vanilla wafers. Double-check your other ingredients, and you’ll have a treat everyone can enjoy!
Final Thoughts
I can’t recommend trying these Cheesecake Balls enough—whether you’re a cheesecake fan or just love fun, make-ahead desserts, they never disappoint. Their creamy filling and endless topping options make them as delightful to share as they are to eat, so gather your ingredients and treat yourself (and your friends) to a batch soon!
Print
Cheesecake Balls Recipe
- Prep Time: 15 minutes
- Cook Time: 0 minutes
- Total Time: 1 hour 45 minutes (including chilling)
- Yield: 16 cheesecake balls
- Category: Dessert
- Method: No-Bake
- Cuisine: American
- Diet: Non-Vegetarian
Description
These Cheesecake Balls are a delightful bite-sized dessert that combines the creamy richness of cheesecake with the convenience of a truffle. Perfect for parties or as a sweet treat, these no-bake cheesecake bites are easy to make and even easier to eat!
Ingredients
Cheesecake Balls:
- 8 ounces cream cheese, softened
- 1/2 cup powdered sugar
- 1 teaspoon vanilla extract
- 1/2 cup graham cracker crumbs, plus more for coating
- 1/2 cup white chocolate chips, melted
- Pinch of salt
Optional Toppings:
- Melted chocolate for drizzling
- Sprinkles
- Crushed nuts
- Cookie crumbs
Instructions
- Prepare the Cheesecake Mixture: In a medium bowl, beat the softened cream cheese until smooth. Add powdered sugar, vanilla extract, graham cracker crumbs, melted white chocolate, and a pinch of salt. Mix until fully combined and smooth.
- Shape the Cheesecake Balls: Cover the mixture and refrigerate for 1 hour, or until firm enough to shape. Using a small cookie scoop or spoon, portion the mixture and roll into 1-inch balls. Roll each ball in additional graham cracker crumbs or your choice of coating.
- Chill and Serve: Place the finished balls on a parchment-lined tray and chill for at least 30 minutes before serving. Drizzle with melted chocolate or add sprinkles if desired.
Notes
- These can be made ahead and stored in the refrigerator for up to 5 days.
- For a flavor twist, add a splash of lemon juice or use flavored extracts like almond or coconut.
Nutrition
- Serving Size: 1 ball
- Calories: 120
- Sugar: 10g
- Sodium: 65mg
- Fat: 7g
- Saturated Fat: 4g
- Unsaturated Fat: 2.5g
- Trans Fat: 0g
- Carbohydrates: 13g
- Fiber: 0g
- Protein: 1g
- Cholesterol: 15mg

