
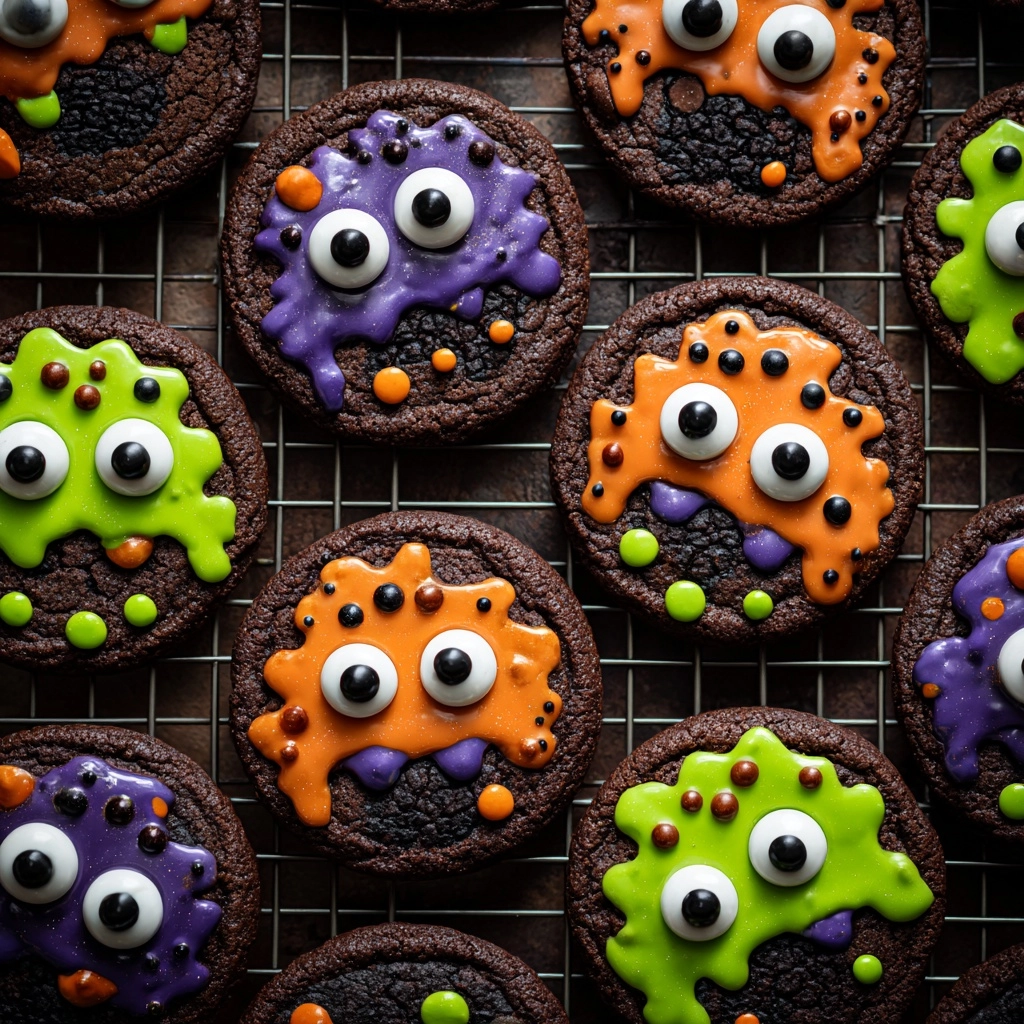
Get ready for the ultimate festive treat! There’s nothing quite like a big batch of Halloween Cookies to make your kitchen smell amazing and your friends and family smile from ear to ear. These classic, buttery cookies are delightfully crisp on the edges and soft in the center, just waiting to be dressed up in all their spooky glory with vibrant frosting, sprinkles, and, of course, some candy eyes! Whether you’re baking with your kids, prepping for a holiday party, or simply want an excuse to whip out your pumpkin- and ghost-shaped cookie cutters, this recipe is pure joy wrapped up in every bite. It’s time to channel your creativity, gather your ghoulish ingredients, and let’s make Halloween Cookies that will be remembered long after the last crumb disappears.
Ingredients You’ll Need
You’ll be amazed how a few pantry basics transform into these show-stopping Halloween Cookies. Each ingredient here brings its own essential magic—flavor, structure, or spooky color—so don’t skip the details!
- All-purpose flour: The backbone of the cookie, giving it that perfect soft-yet-sturdy texture that’s great for decorating.
- Baking soda: A little lift goes a long way, so your cookies aren’t too dense.
- Baking powder: Ensures a tender crumb and lovely rise in each bite.
- Salt: Just enough to balance out the sweetness and bring all the flavors to life.
- Unsalted butter (softened): Rich flavor and melt-in-your-mouth texture start right here.
- Granulated sugar: Sweetens the deal and helps those cookies brown beautifully in the oven.
- Large egg: Binds everything together and adds a subtle richness.
- Vanilla extract: Adds irresistible aroma and depth to the dough.
- Almond extract (optional): Truly optional, but it brings a bakery-style flair and a subtle nutty note.
- Orange and black food coloring: The secret to eye-popping, Halloween-worthy cookies!
- Halloween-themed sprinkles or candy eyes (optional): Amp up the fun factor and let your creativity run wild.
- Royal icing or colored frosting for decorating: For that picture-perfect finish and extra sweetness in every bite.
How to Make Halloween Cookies
Step 1: Prep Your Baking Sheets and Oven
Start by heating your oven to 350°F (175°C) and lining your baking sheets with parchment paper. This simple prep step ensures your Halloween Cookies bake evenly and release effortlessly—no sticking, no mess!
Step 2: Combine the Dry Ingredients
In a medium bowl, whisk together the flour, baking soda, baking powder, and salt. Giving these ingredients a quick mix not only distributes the leaveners evenly but also helps prevent any lumps, so your cookie dough blends up silky-smooth.
Step 3: Cream the Butter and Sugar
In a large mixing bowl, beat the softened butter and granulated sugar together until light and fluffy. This step is key for getting that irresistible cookie texture—creamy butter and sugar trap air to make your cookies soft and a little chewy in the very best way.
Step 4: Add the Egg and Flavorings
Crack in the egg, then pour in the vanilla extract and almond extract if you’re using it. Beat everything together until well combined. You’ll get a dough that smells absolutely amazing already!
Step 5: Mix in the Dry Ingredients
Gradually add your whisked dry ingredients to the wet mixture, mixing on low speed until a soft, cohesive dough forms. You want every bit fully incorporated, but don’t overmix—just until combined does the trick.
Step 6: Color the Dough
If you’re using food coloring, divide the dough into separate portions and knead in your chosen colors (orange and black are Halloween classics!). This is where you can get creative: marble them together, do bold solids, or even layer the dough for extra pizzazz.
Step 7: Shape the Cookies
Roll the dough into tablespoon-sized balls, or reach for those Halloween-themed cookie cutters to make shapes like pumpkins, ghosts, or bats. Place the cookies on your prepared baking sheets, leaving about two inches between them so they have room to spread.
Step 8: Bake
Slide your cookie sheets into the oven and bake for 8 to 10 minutes, until the edges are just set but not browned. For perfectly soft Halloween Cookies, keep a close eye on their color—slightly underbaked is the secret!
Step 9: Cool Completely
Let the cookies cool on their baking sheets for 5 minutes before transferring them to a wire rack. A little patience here keeps your cookies beautifully intact and ready for decorating.
Step 10: Decorate!
Once cooled, it’s time for the real fun. Use royal icing, vibrant colored frosting, halloween sprinkles, or candy eyes to create spooky and silly masterpiece Halloween Cookies. This is your moment to let your imagination shine!
How to Serve Halloween Cookies

Garnishes
Elevate your platter with festive toppings! Sprinkle on extra colored sugar, dot a few cookies with candy eyes, or add a final drizzle of black or orange icing. These little touches make each Halloween Cookie pop and delight everyone who stops by for a treat.
Side Dishes
Pair your Halloween Cookies with warm apple cider, rich hot chocolate, or even a glass of cold milk for a timeless match. For party spreads, serve alongside popcorn balls, caramel apples, or a bowl of seasonal fruit for a full-on Halloween dessert bar.
Creative Ways to Present
Take your presentation to frightfully fun heights! Place cookies in a “graveyard” scene on a serving board, arrange bat and pumpkin cookies around a cauldron of candy, or package a few in adorable cellophane bags tied with Halloween ribbon for a memorable party favor. The only rule: More spooky, more fun!
Make Ahead and Storage
Storing Leftovers
Keep your Halloween Cookies fresh by storing them in an airtight container at room temperature. They’ll stay soft and tasty for up to five days, making them perfect for snacking or sneaking into lunch boxes all week long.
Freezing
If you want to get a jump start, freeze baked and decorated cookies by layering them with parchment in a sturdy freezer container. For even better results, freeze unbaked cookie dough in portions, then simply thaw and bake fresh whenever the cookie craving hits!
Reheating
To bring day-old or chilled cookies back to life, pop them in the microwave for about 10 seconds or in a low oven for a few minutes. They’ll taste as if they just came out of the oven, warm and fragrant—a little Halloween Cookies magic.
FAQs
Can I make the cookie dough ahead of time?
Absolutely! The dough for these Halloween Cookies actually improves when it’s chilled, letting flavors meld and making it even easier to roll and cut. Prepare the dough a day in advance, wrap tightly, and refrigerate until you’re ready to bake.
How do I keep the colored dough from blending together?
To keep your orange and black colors bold and distinct, work each dough portion separately and clean your hands and work surface between colors. If you want marble-style cookies, gently swirl the doughs together without overmixing.
What’s the best way to decorate Halloween Cookies with kids?
Set up a decorating station with small bowls of frosting, sprinkles, and candies. Let kids use icing bottles or piping bags for more detailed designs, and don’t stress about perfection! The fun is in the making and the memories together.
Can I make these gluten-free?
Yes, you can substitute a good-quality 1:1 gluten-free baking flour for the all-purpose flour. Just make sure to check your other ingredients for hidden gluten, especially in extracts or food coloring.
How do I get the icing to set quickly?
For royal icing, allow decorated cookies to air dry uncovered for a few hours, or place them in front of a fan to speed up the process. If you’re in a real hurry, pop the cookies in the fridge for a short time to help the icing set.
Final Thoughts
There’s just something magical about baking and decorating Halloween Cookies—a joy that goes far beyond their sweet taste. Whether you’re sharing them at a big Halloween bash or enjoying them with family on a cozy night in, these cookies invite smiles and spark creativity. Give them a try, and let your kitchen become the happiest haunt on the block!
Print
Halloween Cookies Recipe
- Prep Time: 25 minutes
- Cook Time: 10 minutes
- Total Time: 35 minutes
- Yield: 24 cookies
- Category: Dessert
- Method: Baking
- Cuisine: American
- Diet: Vegetarian
Description
These Halloween cookies are the perfect treat for the spooky season. Easy to make and fun to decorate, they’re a hit with kids and adults alike. Whether you’re hosting a Halloween party or just want a festive sweet snack, these cookies are sure to delight.
Ingredients
Dry Ingredients:
- 2 3/4 cups all-purpose flour
- 1 teaspoon baking soda
- 1/2 teaspoon baking powder
- 1/2 teaspoon salt
Wet Ingredients:
- 1 cup unsalted butter, softened
- 1 1/2 cups granulated sugar
- 1 large egg
- 1 teaspoon vanilla extract
- 1/2 teaspoon almond extract (optional)
- Orange and black food coloring
- Halloween-themed sprinkles or candy eyes (optional)
- Royal icing or colored frosting for decorating
Instructions
- Preheat the oven: Preheat the oven to 350°F (175°C) and line baking sheets with parchment paper.
- Prepare dry ingredients: In a medium bowl, whisk together the flour, baking soda, baking powder, and salt.
- Combine wet ingredients: In a large bowl, beat the softened butter and sugar until light and fluffy. Add the egg, vanilla extract, and almond extract, if using, and mix until combined.
- Mix the dough: Gradually add the dry ingredients to the wet ingredients and mix until a soft dough forms.
- Add color: Divide the dough if using food coloring and knead in desired colors.
- Shape and bake: Roll the dough into balls or use cookie cutters to create shapes. Bake for 8 to 10 minutes.
- Cool and decorate: Let the cookies cool on the baking sheet before decorating with icing, frosting, or sprinkles.
Notes
- Perfect for decorating with kids
- Dough can be made a day ahead and refrigerated
- Add cocoa powder for a chocolate variation
Nutrition
- Serving Size: 1 cookie
- Calories: 150
- Sugar: 10g
- Sodium: 80mg
- Fat: 7g
- Saturated Fat: 4g
- Unsaturated Fat: 2g
- Trans Fat: 0g
- Carbohydrates: 20g
- Fiber: 0g
- Protein: 1g
- Cholesterol: 25mg


