
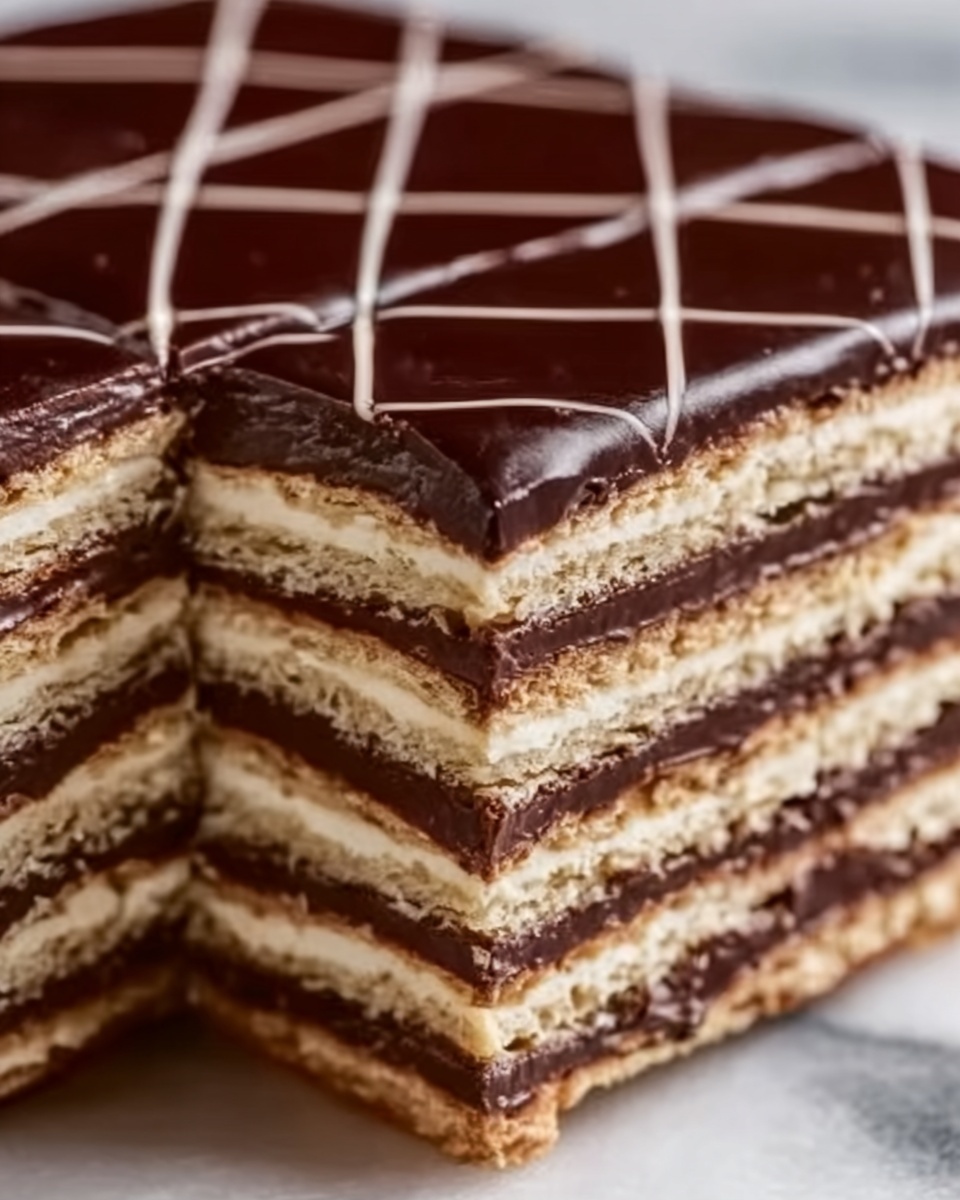
If you’re craving something indulgent but fuss-free, this No-Bake Chocolate Biscuit Cake Recipe is an absolute game changer. Imagine a luscious blend of rich, velvety chocolate enveloping crunchy biscuit chunks, all melded together with a touch of golden syrup for that perfect balance of sweet and sticky. It’s a dessert that feels special yet is astonishingly simple to put together—making it a fantastic treat for both everyday moments and celebratory occasions. Trust me, once you try this no-bake marvel, it’ll quickly become your go-to for satisfying chocolate cravings without turning on the oven.

Ingredients You’ll Need
This recipe calls for a handful of humble yet essential ingredients that come together like a dream. Each one brings its unique magic—whether it’s the crumbly texture of the biscuits or the silky smoothness of melted chocolate—making the whole cake a delight for your senses.
- Digestive biscuits (200g): Provides that satisfying crunch and structure to your cake.
- Dark chocolate (200g): The star player for rich, deep chocolate flavor; milk chocolate works if you prefer it sweeter.
- Unsalted butter (100g): Adds creamy richness and helps the mixture set firmly.
- Sugar (1/4 cup, optional): Boosts sweetness if your chocolate isn’t sweet enough.
- Golden syrup or honey (2 tbsp): Brings smooth sweetness and a lovely sticky texture that binds everything together.
- Vanilla extract (1 tsp, optional): Enhances aroma and depth of flavor.
- Chopped nuts (1/4 cup, optional): Introduces a crunchy contrast and nutty undertones.
- Dried fruit (1/4 cup, optional): Adds bursts of chewy sweetness and color.
- Sea salt (a pinch, optional): Amplifies the chocolate flavor and balances sweetness.
How to Make No-Bake Chocolate Biscuit Cake Recipe
Step 1: Prepare the Biscuits
Start by breaking your digestive biscuits into rough chunks—not too small, so they give texture, but not whole pieces either. These jagged biscuit bits are what lend this cake such a delightful crunch with every bite. Toss them into a spacious bowl and get ready for the next step.
Step 2: Melt the Chocolate Mixture
Next, combine your dark chocolate, unsalted butter, sugar, and golden syrup (or honey) in a heatproof bowl. Gently melt this either in short bursts in the microwave or over a double boiler on the stove, stirring often until you achieve a glossy, smooth mixture. This luscious chocolate blend is what will transform your biscuits into a rich, fudgy delight.
Step 3: Combine the Chocolate and Biscuits
Pour the velvety chocolate mixture over your biscuit chunks and fold gently until every piece is fully coated in chocolate magic. Now’s the time to stir in any optional chopped nuts or dried fruit for added texture, burst of flavor, and a little visual pop. This union is where the magic happens—bitterness meets sweetness, crunch meets creaminess.
Step 4: Set the Cake
Transfer your chocolatey biscuit blend into a lined or greased cake pan or rectangular dish. Press it down firmly and evenly using the back of a spoon to ensure it sets in a neat, compact shape. Don’t be shy with the pressure—you want a cake that holds together beautifully but is still inviting to cut into.
Step 5: Chill to Set
Pop your cake into the refrigerator for at least 2 to 3 hours—or overnight if you’re prepping ahead—to firm up. This chilling step is key as it allows the butter and chocolate to solidify, bringing the cake together into a perfectly sliceable treat that still melts delightfully on the tongue.
Step 6: Serve and Enjoy
Once your cake is set, slice it into generous squares or elegant rectangular slices. For an extra touch, drizzle with melted chocolate or dust with powdered sugar to make it visually irresistible. This cake shines on its own, but a little garnish can elevate the presentation for guests or special moments.
How to Serve No-Bake Chocolate Biscuit Cake Recipe
Garnishes
Simple garnishes like a dusting of powdered sugar, a sprinkle of cocoa powder, or some chopped nuts can add elegant detail and texture contrasts. Fresh berries or a dollop of whipped cream also complement the rich chocolate tones beautifully, giving every bite a fresh burst of flavor.
Side Dishes
This cake pairs wonderfully with a scoop of vanilla ice cream or a drizzle of salted caramel sauce to contrast its dense, fudgy texture. For a lighter touch, serve alongside fresh fruit slices or a cup of robust coffee or tea to balance sweetness and cleanse the palate.
Creative Ways to Present
Try layering the biscuit cake in a clear glass trifle bowl with whipped cream and chopped nuts for an eye-catching dessert parfait. Alternatively, cut into small bite-sized squares and arrange them on a dessert platter with colorful garnishes for a party-ready display that’s as pleasing to the eye as it is to the appetite.
Make Ahead and Storage
Storing Leftovers
Your leftover No-Bake Chocolate Biscuit Cake should be stored in an airtight container in the refrigerator. It will keep wonderfully fresh for 4 to 5 days, making it an easy choice for a make-ahead dessert you can nibble on throughout the week.
Freezing
If you want to keep it longer, this cake freezes beautifully. Wrap tightly in plastic wrap and place in a freezer-safe container for up to 3 months. When you’re ready to enjoy, thaw it overnight in the fridge for best texture and flavor.
Reheating
No-bake chocolate biscuit cake is best served chilled, so reheating isn’t usually necessary. However, if you prefer it slightly softer, let the slices sit at room temperature for 10 to 15 minutes before serving. This subtle warming makes the chocolate just tender enough to melt in your mouth.
FAQs
Can I use different types of biscuits for this recipe?
Absolutely! The recipe is very flexible—you can use plain tea biscuits, graham crackers, or any neutral-flavored cookies you have on hand. Just choose something that offers a nice crunch without overpowering the chocolate.
Is it possible to make this recipe vegan?
Yes, simply swap the butter for a plant-based alternative, use dark chocolate that’s dairy-free, and choose a syrup like maple instead of honey. The rest of the ingredients are naturally vegan-friendly.
How long does the cake need to chill for best results?
Chilling for at least 2 to 3 hours is essential to let everything set properly, but overnight chilling is ideal if you want the firmest texture and easiest slicing.
Can I add extra flavors to customize the cake?
Definitely! Adding a splash of coffee, orange zest, or a pinch of cinnamon can elevate the flavor profile. Just mix these into the melted chocolate before combining with the biscuits.
What’s the best way to cut the cake without it crumbling?
Use a sharp knife warmed under hot water and wiped dry before slicing. Make clean, confident cuts to prevent the cake from breaking apart and get neat, beautiful slices every time.
Final Thoughts
If you’re looking for an easy yet utterly indulgent dessert, this No-Bake Chocolate Biscuit Cake Recipe will quickly win your heart. It’s a perfect blend of textures and tastes that requires minimal effort but offers maximum satisfaction. Do yourself a favor and whip up a batch—you’ll be amazed at how quickly this humble cake disappears from the plate! Enjoy every delicious bite.
Print
No-Bake Chocolate Biscuit Cake Recipe
- Prep Time: 15 minutes
- Cook Time: 10 minutes (melting and mixing)
- Total Time: 3 hours 25 minutes (including chilling time)
- Yield: 12 servings
- Category: Dessert
- Method: No-Cook
- Cuisine: British
- Diet: Vegetarian
Description
This No-Bake Chocolate Biscuit Cake is a quick and indulgent dessert that combines crunchy biscuits with rich melted chocolate, butter, and a touch of sweetness from golden syrup. With optional nuts and dried fruits for added texture and flavor, this cake requires no baking and sets beautifully in the fridge, making it an easy treat perfect for any occasion.
Ingredients
Base Ingredients
- 200g (about 7 oz) digestive biscuits (or any plain biscuits/cookies)
- 200g (about 7 oz) dark chocolate (or milk chocolate for a sweeter taste)
- 100g (about 1/2 cup) unsalted butter
- 1/4 cup sugar (optional, depending on your chocolate sweetness)
- 2 tablespoons golden syrup or honey (for sweetness and texture)
- 1 teaspoon vanilla extract (optional)
Optional Add-ins
- 1/4 cup chopped nuts (optional, for crunch)
- 1/4 cup dried fruit (optional, like raisins or cranberries)
- A pinch of sea salt (optional, to enhance the flavor)
Instructions
- Prepare the biscuits: Break the biscuits into small rough pieces, avoiding crushing them into crumbs. Place these broken pieces in a large mixing bowl and set aside.
- Melt the chocolate mixture: In a heatproof bowl, combine dark chocolate, unsalted butter, sugar (if using), and golden syrup or honey. Melt the mixture gently either using short bursts in the microwave—stirring frequently to avoid burning—or over a double boiler on the stove until the mixture is smooth and fully combined. Add the vanilla extract at this stage if using.
- Combine the chocolate and biscuits: Pour the melted chocolate mixture over the broken biscuits. Gently fold and stir until all biscuit pieces are thoroughly coated in chocolate. If desired, mix in chopped nuts and dried fruits now to distribute them evenly for added flavor and texture.
- Set the cake: Transfer the chocolate and biscuit mixture into a lined or greased cake pan or rectangular dish. Press down firmly and evenly using the back of a spoon to compact the cake and help it hold together once set.
- Chill to set: Place the cake in the refrigerator for a minimum of 2 to 3 hours, or preferably overnight, until the cake firms up and is fully set.
- Serve: Once the cake has set, cut it into squares or slices. Optionally, decorate by drizzling extra melted chocolate over the top or sprinkling with powdered sugar for an elegant presentation before serving.
Notes
- Use milk chocolate instead of dark chocolate if you prefer a sweeter taste.
- Golden syrup or honey adds both sweetness and a chewy texture, but you can adjust according to taste or omit if desired.
- Chilling time is essential to firm the cake; do not rush this step.
- Variations include adding different nuts like almonds or walnuts, or dried fruits such as apricots for varied texture and flavor.
- Store leftover cake covered in the refrigerator; it keeps well for up to 5 days.


