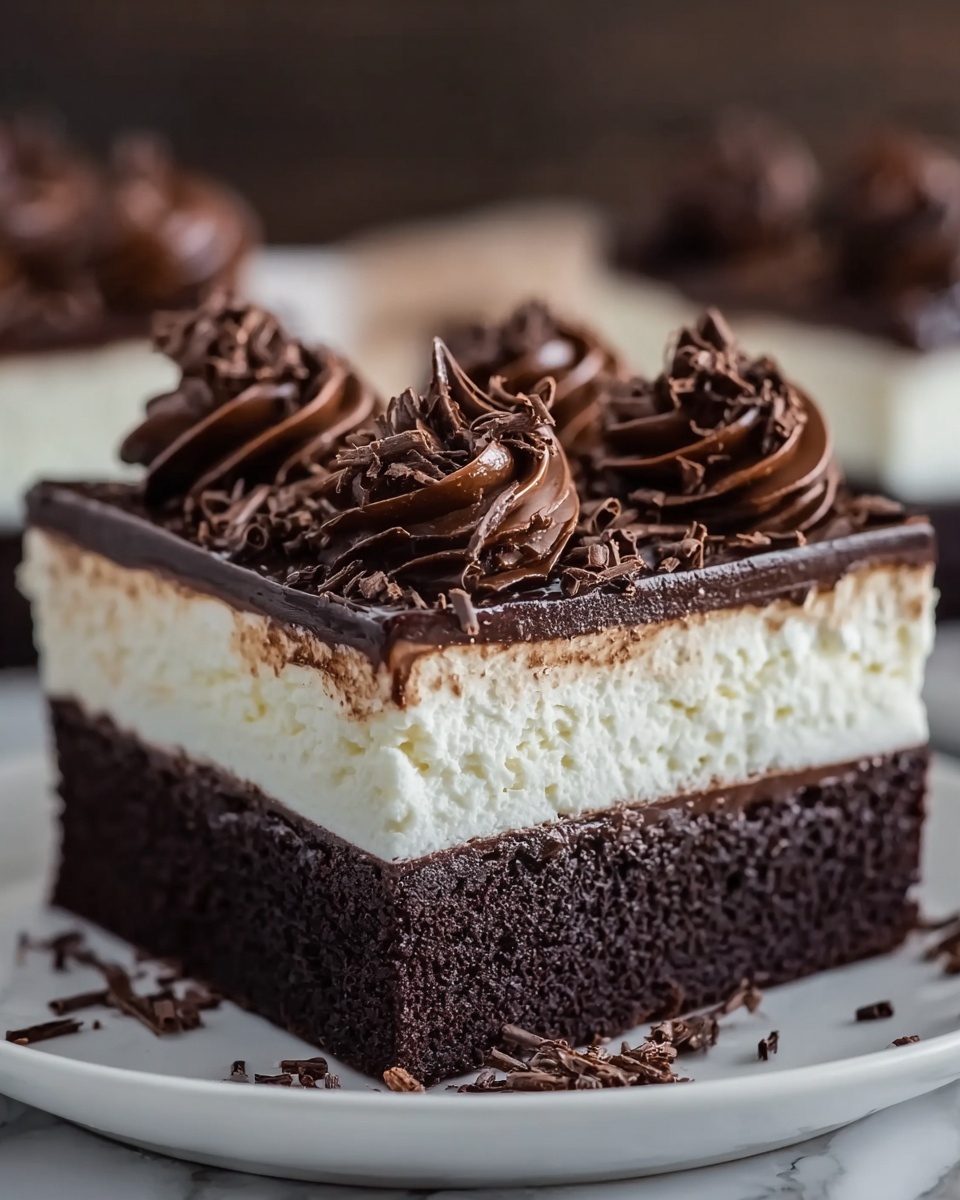
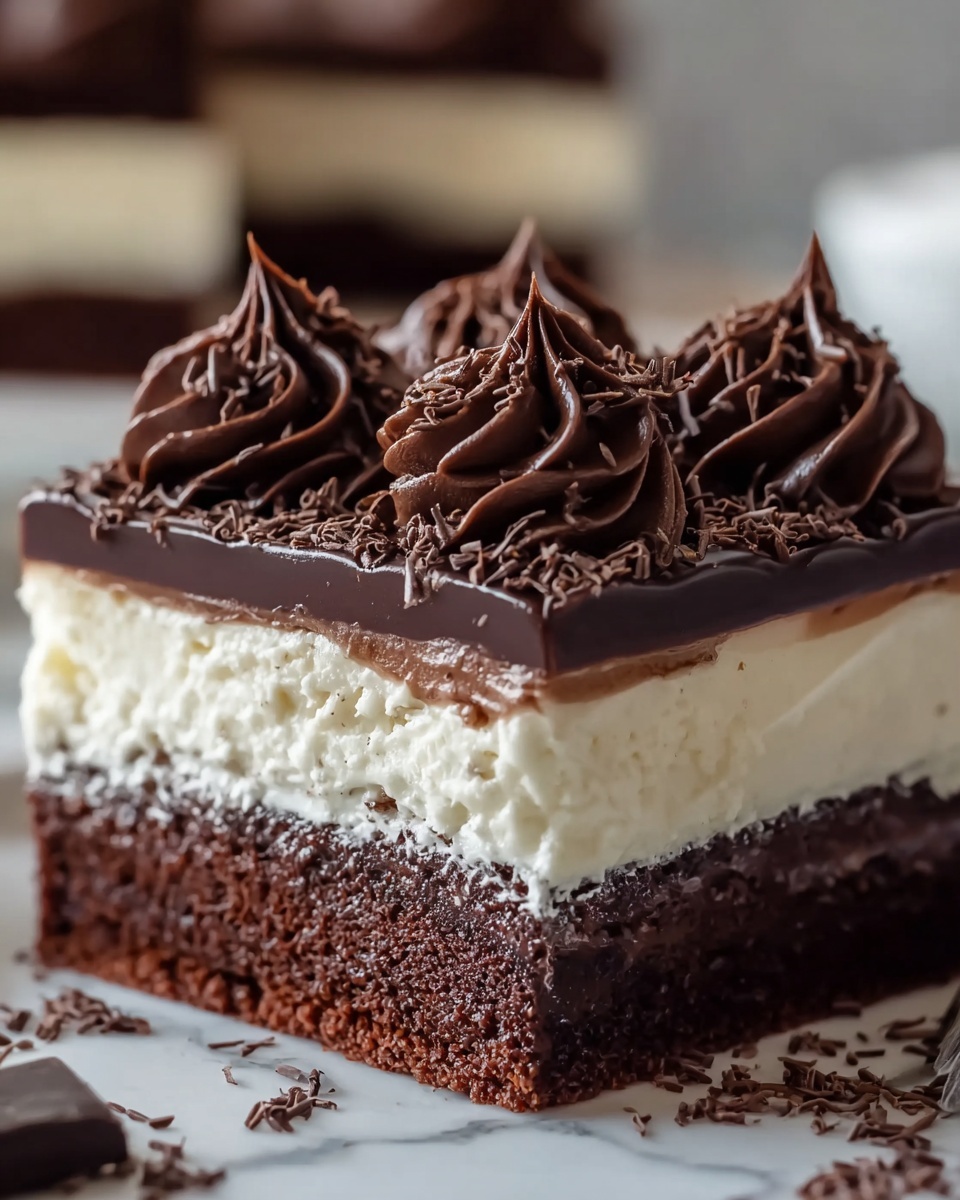
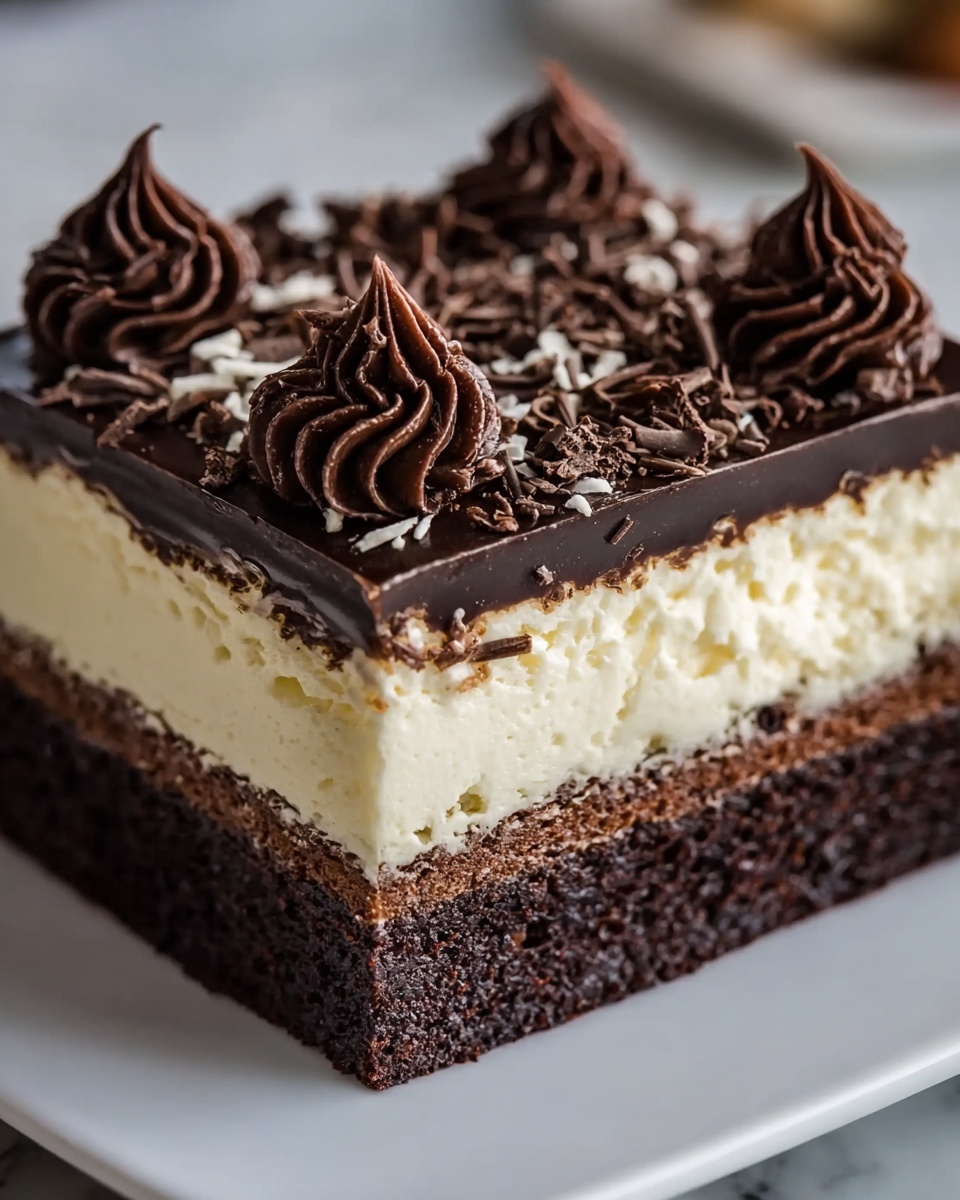
If you’re craving a dessert that brings rich chocolatey goodness and creamy dreamy layers together in one spectacular treat, look no further than this Brownie Refrigerator Cake Recipe. Imagine fudgy brownie chunks layered with luscious cream cheese filling, all topped with a silky chocolate drizzle. This no-bake refrigeration magic takes simple ingredients and effortlessly transforms them into a crowd-pleaser that’s perfect for any occasion, from casual family nights to festive celebrations. I promise, once you try this, it’ll become your go-to indulgence for days when you want something truly special yet surprisingly simple to make.
Ingredients You’ll Need
This Brownie Refrigerator Cake Recipe shines because of its straightforward, quality ingredients that each play a key role in texture and flavor. From the dense brownie base to the fluffy, sweetened cream cheese layer, every component is essential for creating that perfect balance of rich and light.
- Brownie mix: Use a box mix or homemade brownies for a fudgy and sturdy base that holds up well in the refrigerator.
- Chocolate chips (optional): Add a half cup into your brownie batter for extra bursts of melted chocolate throughout.
- Cream cheese, softened: Provides creamy tanginess and richness to the filling, making it irresistibly smooth.
- Powdered sugar: Sweetens the cream cheese perfectly without any graininess, ensuring a silky texture.
- Vanilla extract: Adds warmth and depth to the filling’s flavor.
- Heavy whipping cream (chilled): Whipped to stiff peaks, it lightens the cream cheese mixture and adds luscious body.
- Cocoa powder (optional): For those who want a more chocolate-forward filling, a tablespoon adds just the right hint.
- Chocolate chips (for melting): Used to make a glossy, decadent topping that crowns the cake.
- Heavy cream (for melting with chocolate): Makes the melted chocolate topping smooth and pourable.
How to Make Brownie Refrigerator Cake Recipe
Step 1: Prepare the Brownie Base
First up, bake your brownies according to the package directions or your favorite homemade recipe. If you’re a chocolate lover like me, stirring in 1/2 cup of chocolate chips before baking adds those gooey chocolate pockets that make each bite extra exciting. Once baked, let the brownies cool completely because warm brownies will ruin your creamy layers. Then cut into small squares or whatever shape you prefer—the size really is up to you!
Step 2: Make the Creamy Filling
While the brownies cool, start on the luscious filling. Beat the softened cream cheese until it’s perfectly smooth—no lumps allowed. Then add powdered sugar and vanilla extract and continue to beat until it’s all beautifully combined. In a separate bowl, whip the chilled heavy cream until stiff peaks form. Gently fold that fluffy whipped cream into the cream cheese mixture for a light yet rich texture. If you love chocolate, this is the moment to mix in the optional cocoa powder to amp up the flavor.
Step 3: Assemble the Cake Layers
Grab a 9×13-inch baking dish and start layering. Place half of your brownie squares on the bottom to form a dense and fudgy base. Spread half of your creamy filling evenly over the brownies, smoothing it out carefully with a spatula. Then repeat the process—another layer of brownies followed by the rest of the creamy filling. This layering is what transforms simple ingredients into a showstopping dessert.
Step 4: Prepare the Chocolate Topping
In a small saucepan, gently melt the chocolate chips together with 2 tablespoons of heavy cream, stirring continuously over low heat until you have a silky, smooth chocolate sauce. Allow the mixture to cool slightly before drizzling it carefully over the top layer of filling. This glossy drizzle not only adds visual appeal but also lends an extra layer of chocolate richness that ties everything together beautifully.
Step 5: Chill and Set
Now comes the hardest part—waiting! Refrigerate your masterpiece for at least 4 hours or, better yet, overnight. The chilling time allows the layers to firm up perfectly, making the cake easier to slice and intensifying every decadent flavor. The refrigerator works its magic, and soon you’ll have a dessert that’s cool and creamy with just the right balance of moist, fudgy brownies.
Step 6: Serve and Enjoy
Once set, slice your Brownie Refrigerator Cake into generous squares and watch it disappear quickly. This dessert is perfect for sharing, but be warned: it might be hard to save leftovers because everyone will want seconds!
How to Serve Brownie Refrigerator Cake Recipe
Garnishes
Elevate your presentation by sprinkling a few mini chocolate chips, shaved chocolate curls, or a dusting of cocoa powder on top just before serving. Fresh berries like raspberries or strawberries add a bright, fresh contrast and a pop of color that looks stunning against the dark chocolate layers.
Side Dishes
This indulgent cake pairs beautifully with a scoop of vanilla bean ice cream or a dollop of freshly whipped cream for added creaminess. For a more sophisticated touch, try serving alongside a cup of espresso or rich brewed coffee to cut through the sweetness and complement the chocolate notes.
Creative Ways to Present
Want to impress your guests? Serve individual portions in clear glass cups layered with brownie chunks, cream filling, and chocolate drizzle for an elegant parfait-style dessert. Or add edible gold leaf or a sprinkle of sea salt flakes on the chocolate topping to create a gourmet finish that’s sure to wow.
Make Ahead and Storage
Storing Leftovers
Your Brownie Refrigerator Cake Recipe keeps incredibly well in the fridge, tightly covered with plastic wrap or in an airtight container. The flavors actually develop and blend more after a day or two, making leftovers a delicious treat whenever you need a sweet pick-me-up.
Freezing
If you want to prepare the cake in advance or save some for a later date, freezing is an excellent option. Wrap the cake tightly in plastic wrap, then in aluminum foil, and store it in the freezer for up to 2 months. Thaw it overnight in the refrigerator before serving to preserve that luscious, creamy texture.
Reheating
This dessert is best enjoyed chilled and does not require reheating. In fact, warming it might cause the layers to lose their structure. Just bring it to room temperature a few minutes before serving if you prefer it less cold, and enjoy every creamy bite!
FAQs
Can I make this cake without cream cheese?
Cream cheese is essential in this recipe for creating the creamy texture and slight tang that balances the sweetness. Substituting it would change the overall flavor and texture significantly, so it’s best to follow the recipe as is for the most authentic result.
What if I don’t have heavy cream?
Heavy cream is key for whipping up stiff peaks and giving the filling its light, airy texture. If you can’t find heavy cream, you might try whipping chilled coconut cream as a dairy-free alternative, but the taste and texture will be different.
Can I use store-bought brownies instead of baking my own?
Absolutely! Using store-bought brownies is a huge time saver and still delicious. Just make sure they’re sturdy enough to hold up in layers and cut them into small pieces to fit the dish well.
How long will the cake keep in the fridge?
When properly stored, this Brownie Refrigerator Cake Recipe stays fresh for up to 4 days in the refrigerator. Beyond that, the texture and flavor may start to decline.
Is this recipe suitable for kids?
Yes! This is a family-friendly dessert that kids love because of the fudgy brownies and creamy filling. Just be mindful of any allergies to dairy or eggs present in the ingredients.
Final Thoughts
This Brownie Refrigerator Cake Recipe is one of those magic desserts that feels like a decadent treat but is surprisingly simple to pull together. With rich brownie layers, velvety cream cheese filling, and a smooth chocolate topping, it’s a delightful twist on classic favorites. Whether you’re serving it for a special occasion or just because you deserve something sweet, I can’t recommend this dessert enough—give it a try and prepare to become everyone’s new favorite baker!
Print
Brownie Refrigerator Cake Recipe
- Prep Time: 20 minutes
- Cook Time: 30 minutes (for baking brownies)
- Total Time: 4 hours 50 minutes (including chilling time)
- Yield: 12 servings
- Category: Dessert
- Method: Baking
- Cuisine: American
Description
This Brownie Refrigerator Cake is a rich and decadent no-bake layered dessert featuring a fudgy brownie base topped with a creamy, chocolate-infused filling and a luscious chocolate ganache drizzle. Perfect for chocolate lovers, this easy-to-make cake requires baking only the brownies and then assembling and chilling to set, resulting in a smooth, creamy treat that melts in your mouth.
Ingredients
Brownie Base
- 1 box (or homemade) brownie mix (prepared according to package directions, including eggs, oil, and water)
- 1/2 cup chocolate chips (optional, for added chocolatey goodness)
Creamy Filling
- 8 oz cream cheese, softened
- 1 cup powdered sugar
- 1 teaspoon vanilla extract
- 2 cups heavy whipping cream (chilled)
- 1 tablespoon cocoa powder (optional, for a chocolatey twist)
Chocolate Topping
- 1/2 cup chocolate chips (for melting)
- 2 tablespoons heavy cream (for melting with the chocolate chips)
Instructions
- Prepare the brownie base: Bake the brownies according to the instructions on the box or your homemade recipe. If you like extra chocolatey brownies, stir in 1/2 cup of chocolate chips before baking. Allow the brownies to cool completely, then cut them into small squares or desired pieces.
- Make the creamy filling: In a large mixing bowl, beat the softened cream cheese until smooth. Add the powdered sugar and vanilla extract, and continue to beat until fully combined. In a separate chilled bowl, whip the heavy cream until stiff peaks form. Gently fold the whipped cream into the cream cheese mixture, adding cocoa powder if desired for an extra chocolate flavor.
- Assemble the cake: In a 9×13-inch baking dish, layer half of the brownie squares as the base. Spread half of the creamy filling over the brownie layer, smoothing it evenly with a spatula. Repeat the layers with the remaining brownie squares and creamy filling.
- Prepare the chocolate topping: In a small saucepan, melt the chocolate chips and heavy cream over low heat, stirring until smooth and combined. Once melted, allow it to cool slightly before drizzling over the top of the cake.
- Chill: Refrigerate the cake for at least 4 hours or overnight. The cake will set and firm up as it chills, making it easier to slice and serve.
- Serve: Once chilled and set, slice the Brownie Refrigerator Cake into squares and serve. Enjoy this rich, creamy, and decadent dessert!
Notes
- For best results, ensure the brownies are completely cooled before assembling.
- You can substitute the cream cheese with mascarpone for a slightly different texture and flavor.
- Optional chocolate chips in the brownie base add extra bursts of chocolate but can be omitted if preferred.
- Refrigerate leftovers and consume within 3-4 days.
- If desired, add a pinch of salt to the chocolate topping to enhance flavor.


