
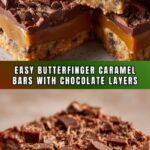
If you are searching for a truly indulgent treat, the Butterfinger Caramel Bars with Layers of Sweet Crunch and Chocolate Recipe is a must-try dessert that perfectly combines buttery crust, luscious caramel, rich chocolate, and that unmistakable crunch of Butterfinger candy. This bar is not just a dessert; it’s a delightful experience that brings layers of flavor and texture together in a way that will have you coming back for seconds, thirds, and maybe even fourths. Sweet, crunchy, smooth, and irresistible, these bars turn an ordinary snack into something remarkable that’s bound to impress everyone at your next gathering.

Ingredients You’ll Need
Gathering the ingredients for this recipe is simple, but each component plays a vital role in creating the unforgettable structure and flavor of the Butterfinger Caramel Bars with Layers of Sweet Crunch and Chocolate Recipe. From the soft butter that forms a tender crust to the semi-sweet chocolate chips that add richness, every ingredient counts.
- 1 cup unsalted butter (softened): This provides the buttery base for the crust that holds everything together and adds delicious richness.
- 1 cup brown sugar (packed): Adds a deep molasses sweetness and moisture that keeps the crust tender yet chewy.
- 2 cups all-purpose flour: The structure of the bars depends on this staple ingredient, balancing softness and sturdiness.
- 1/2 teaspoon salt: Enhances all the flavors and balances the sweetness perfectly.
- 1 (14-ounce) can sweetened condensed milk: Creates a creamy, luscious caramel layer that’s smooth and indulgent.
- 1/2 cup caramel sauce or bits (melted): Intensifies the caramel flavor throughout the bars for that gooey caramel goodness.
- 1 teaspoon vanilla extract: Adds warmth and depth to the caramel mixture.
- 1 1/2 cups semi-sweet chocolate chips: Melts into a rich, chocolatey layer that contrasts perfectly with the caramel and crunch.
- 1 cup chopped Butterfinger candy bars (about 4 regular bars): The star ingredient providing the signature sweet crunch and peanut buttery flavor.
- Optional: flaky sea salt for topping: Adds a sophisticated touch, bringing out the sweet and salty balance.
How to Make Butterfinger Caramel Bars with Layers of Sweet Crunch and Chocolate Recipe
Step 1: Prepare the Crust
Begin by preheating your oven to 350°F and lining a 9×13-inch pan with parchment paper for easy removal later. Cream the softened butter and brown sugar together until light and fluffy. This step is crucial for that perfect tender crust that will hold all the layers. Add the flour and salt and stir until the mixture forms a crumbly dough. Take about two-thirds of this dough and press it evenly into your pan. Bake this crust for 12 to 15 minutes until it turns a lovely light golden shade; this will give you a firm, flavorful base that supports the luscious layers to come.
Step 2: Make the Caramel Layer
While the crust bakes, whisk together the sweetened condensed milk, melted caramel bits or sauce, and vanilla extract in a bowl until you have a smooth, silky mixture. This homemade caramel layer is rich and sweet, perfectly complementing the crunchy texture of the crust and the Butterfinger pieces. Once the crust is out of the oven, pour this caramel mixture evenly over the still-hot crust. The heat helps the caramel set beautifully into the base.
Step 3: Add Chocolate and Top the Bars
Immediately sprinkle the semi-sweet chocolate chips evenly over the caramel layer. As the bars bake further, these chips will melt into a luscious chocolate blanket. Crumble the remaining one-third of the dough on top, creating a rustic, crumbly finish that adds a wonderful texture contrast. Bake again for 20 to 22 minutes, until the top is golden and bubbling with chocolate and caramel mingling delightfully.
Step 4: The Finishing Touch: Butterfinger Candy
Once you remove the bars from the oven, quickly sprinkle the chopped Butterfinger candy pieces over the hot surface. Lightly press them into the top so they stick without melting completely. This final step gives the bars their signature layers of sweet crunch and chocolate, elevating the recipe to a whole new level of decadence. Allow the bars to cool completely before slicing so all the layers set perfectly.
How to Serve Butterfinger Caramel Bars with Layers of Sweet Crunch and Chocolate Recipe

Garnishes
Sprinkle a little flaky sea salt on top right after baking to enhance the flavor profile by adding a subtle salty bite that complements the sweet and decadent layers. You could also dust the bars with a bit of powdered sugar if you prefer an extra touch of sweetness and elegance. Adding a few whole Butterfinger shards on top can make your presentation pop and show off the texture contrast clearly.
Side Dishes
These bars are rich, so serving them alongside fresh berries or a scoop of vanilla bean ice cream works beautifully to balance the sweetness. A dollop of whipped cream or even a drizzle of warm chocolate sauce elevates the experience further. For a gathering, pairing with coffee or a rich hot chocolate can be the perfect cozy combination that rounds out the dessert beautifully.
Creative Ways to Present
Cut the bars into bite-sized squares for a party platter or serve larger portions for an indulgent treat after dinner. Layer them in a clear glass trifle dish alternating with whipped cream and chopped nuts for a stunning dessert display. Wrapping individual bars in wax paper makes a charming homemade gift or party favor, sharing the joy of the Butterfinger Caramel Bars with Layers of Sweet Crunch and Chocolate Recipe with friends and family.
Make Ahead and Storage
Storing Leftovers
Store your bars in an airtight container at room temperature or in the refrigerator if you prefer them chilled. They will stay fresh for up to 5 days and maintain their marvelous texture and flavor. Just be sure to cover them well to prevent drying out or absorbing fragrances from other foods.
Freezing
To freeze, wrap individual bars tightly in plastic wrap and place them in a freezer-safe container or bag. They freeze well for up to 3 months, making them perfect for prepping ahead for holiday gatherings or busy weeks. Thaw at room temperature when ready to enjoy; the layers will come back to life beautifully.
Reheating
For a fresh-from-the-oven experience, warm the bars briefly in a microwave or oven. About 10-15 seconds in the microwave or 5 minutes at 300°F in the oven will soften the chocolate and caramel layers gently without melting the Butterfinger topping too much. Warmed bars taste like a cozy, sweet hug.
FAQs
Can I substitute the Butterfinger candy with another candy bar?
Absolutely! While Butterfinger is signature for its unique crunch and flavor, you can swap it for toffee bits, crushed pretzels, or even Heath bars for a different but equally delightful crunch and sweetness.
Is it necessary to use sweetened condensed milk?
Sweetened condensed milk is key for the creamy caramel layer in this recipe. It adds sweetness and the perfect chewy texture. Substituting could alter the taste and texture dramatically, so it is recommended to use the ingredient as listed.
Can these bars be made gluten-free?
Yes! Simply replace the all-purpose flour with a gluten-free baking blend that measures cup-for-cup. This swap won’t affect the flavor much but will ensure the bars are safe for gluten-sensitive guests.
What is the best way to cut the bars for clean slices?
For clean, neat cuts, chill the bars in the fridge for 1 to 2 hours before slicing. Use a sharp knife and wipe it clean between cuts to avoid messy edges and keep all the layers intact beautifully.
Can I make these bars vegan?
This particular recipe relies on butter, caramel, and sweetened condensed milk, so it’s not naturally vegan. However, you can experiment with plant-based butter, dairy-free caramel sauces, and vegan sweetened condensed milk alternatives to create a vegan-friendly version.
Final Thoughts
There is something truly magical about the Butterfinger Caramel Bars with Layers of Sweet Crunch and Chocolate Recipe. It’s a dessert that feels like a warm, sweet celebration in every bite. Whether you are making it for a special occasion or just to treat yourself on a quiet evening, these bars are bound to bring smiles and happy sighs. I encourage you to give this recipe a try—once you do, it will become one of those cherished go-to desserts that you love making again and again!
Print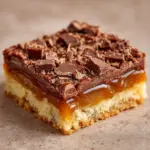
Butterfinger Caramel Bars with Layers of Sweet Crunch and Chocolate Recipe
- Prep Time: 15 minutes
- Cook Time: 35 minutes
- Total Time: 50 minutes
- Yield: 24 bars
- Category: Dessert
- Method: Baking
- Cuisine: American
- Diet: Vegetarian
Description
These Butterfinger Caramel Bars feature a deliciously layered dessert with a buttery crust, gooey caramel, rich chocolate chips, and crunchy Butterfinger candy pieces on top. Perfectly baked to golden perfection, these bars offer a sweet crunch and chocolatey delight in every bite.
Ingredients
Crust
- 1 cup unsalted butter (softened)
- 1 cup brown sugar (packed)
- 2 cups all-purpose flour
- 1/2 teaspoon salt
Caramel Layer
- 1 (14-ounce) can sweetened condensed milk
- 1/2 cup caramel sauce or bits (melted)
- 1 teaspoon vanilla extract
Toppings
- 1 1/2 cups semi-sweet chocolate chips
- 1 cup chopped Butterfinger candy bars (about 4 regular bars)
- Optional: flaky sea salt for topping
Instructions
- Prepare the crust: Preheat your oven to 350°F (175°C) and line a 9×13-inch baking pan with parchment paper to prevent sticking. In a large bowl, cream together the softened unsalted butter and packed brown sugar until the mixture is light and fluffy. Gradually mix in the all-purpose flour and salt until a crumbly dough forms.
- Form and bake crust: Press two-thirds of the crumbly dough evenly into the bottom of the prepared baking pan, forming the crust layer. Bake in the preheated oven for 12 to 15 minutes, or until the edges are lightly golden and the crust is set.
- Prepare caramel topping: While the crust is baking, stir together the sweetened condensed milk, melted caramel sauce or bits, and vanilla extract in a bowl until the mixture is smooth and fully combined.
- Add caramel layer: Once the crust comes out of the oven, immediately pour the caramel mixture over the hot crust and spread it evenly with a spatula to cover the surface completely.
- Add chocolate chips and crumbled dough: Sprinkle the semi-sweet chocolate chips evenly over the caramel layer. Then, crumble the remaining one-third of the dough mixture over the chocolate chips, distributing it as a topping.
- Bake assembled bars: Return the pan to the oven and bake for an additional 20 to 22 minutes, or until the top is golden brown and bubbly.
- Add Butterfinger topping: Remove the bars from the oven and immediately sprinkle the chopped Butterfinger candy bars evenly over the hot top layer. Press the candy pieces lightly so they stick to the bars.
- Cool and serve: Allow the bars to cool completely in the pan before slicing into 24 squares. For cleaner cuts, chill the bars in the refrigerator for 1 to 2 hours before slicing.
Notes
- For cleaner and neater cuts, chill the bars for 1 to 2 hours before slicing.
- To change up the crunchy topping, substitute Butterfinger candy pieces with toffee bits or crushed pretzels for a fun variation.
- Store the cooled bars in an airtight container at room temperature for up to 5 days to maintain freshness.
- Optional flaky sea salt sprinkled on top adds a subtle savory contrast to the sweet layers.