
If you’re on the hunt for a dessert that perfectly balances rich chocolatey goodness with a tender, melt-in-your-mouth texture, then you’re going to absolutely adore this Chocolate Sandwich Cookies Recipe. These homemade delights are not just your average cookies; they’re an ode to everything wonderful about chocolate, sandwiched with a luscious buttercream that elevates each bite to pure bliss. Whether you need a special treat for a gathering or just want to spoil yourself, this recipe is fun, straightforward, and incredibly rewarding to make.
Ingredients You’ll Need
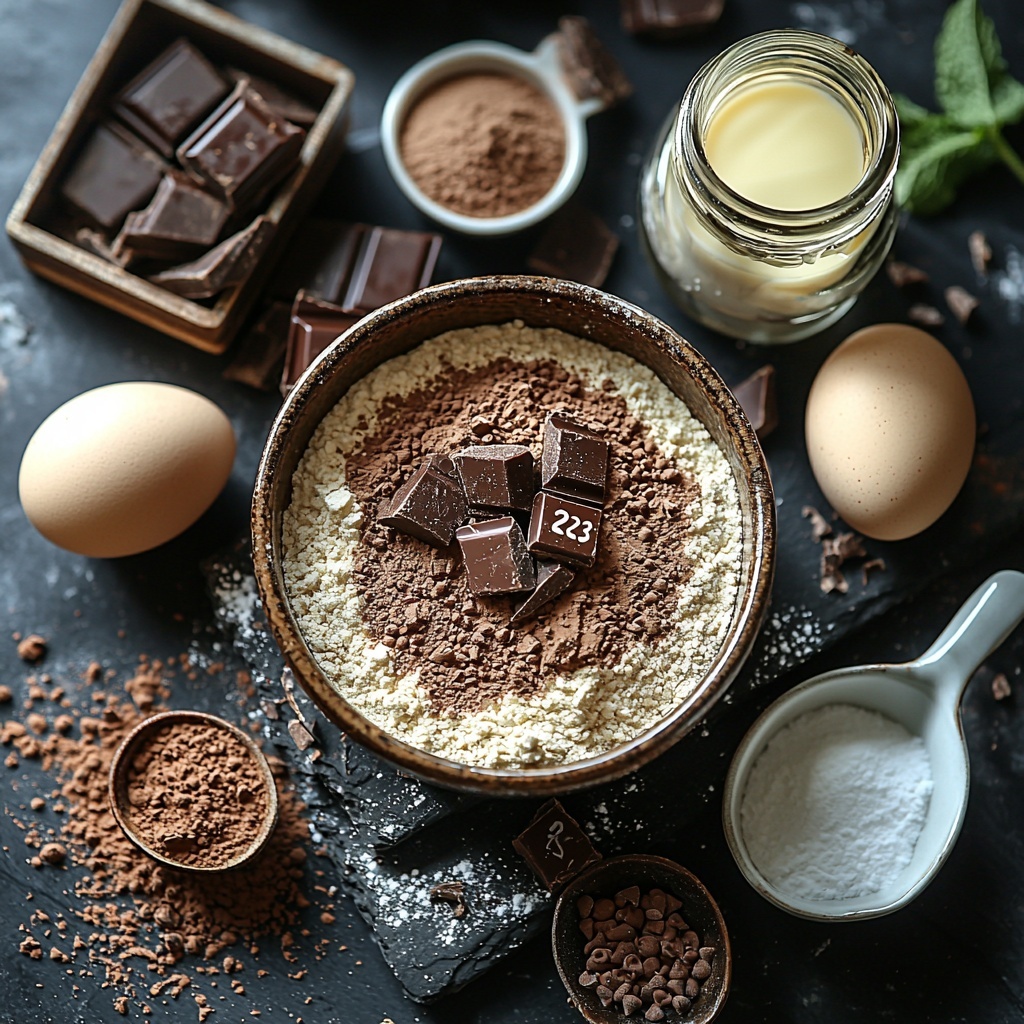
Gathering the right ingredients is the first step to baking these irresistible cookies. Each element plays a crucial role, from creating that perfectly cakey yet sturdy cookie base to the smooth and creamy filling that joins them together.
- All-purpose flour (1 ¾ cups): Provides the structure and a tender crumb to the cookies.
- Unsweetened cocoa powder (¾ cup): Packs in a deep, chocolate flavor and beautiful dark color.
- Baking soda (1 teaspoon): Helps the cookies rise gently, making them soft but not cakey.
- Salt (½ teaspoon): Enhances and balances the sweetness to perfection.
- Unsalted butter, softened (1 cup + ½ cup): Adds richness and a smooth texture to both cookie and filling.
- Brown sugar (¾ cup): Contributes moisture and caramel-like depth to the dough.
- Granulated sugar (½ cup): Adds subtle sweetness and helps with cookie crispness.
- Large eggs (2): Bind the dough while providing richness and structure.
- Vanilla extract (2 teaspoons + 1 teaspoon): Lifts all flavors with a warm, aromatic touch.
- Powdered sugar (2 cups): Essential for an ultra-smooth, sweet buttercream filling.
- Heavy cream (2 tablespoons): Creates a light, fluffy consistency in the buttercream.
- Chocolate sprinkles or shavings (¼ cup, optional): For that final decadent decorative touch.
How to Make Chocolate Sandwich Cookies Recipe
Step 1: Mix the Dry Ingredients
Start by whisking together your flour, cocoa powder, baking soda, and salt in a medium bowl. This combination ensures every bite of cookie is rich with chocolate flavor and has just the right texture.
Step 2: Cream Butter and Sugars
Next, in a large bowl, beat the softened butter with the brown and granulated sugars until the mixture looks light and fluffy. This step is important because it helps incorporate air, giving you tender cookies with a slightly crisp edge.
Step 3: Incorporate Eggs and Vanilla
Add the eggs one by one, beating well after each to make sure everything is perfectly mixed. Stir in the vanilla extract too—this little addition will brighten the chocolate notes beautifully.
Step 4: Combine Wet and Dry Ingredients
Gradually add your dry ingredient mix to the wet ingredients on low speed. Mix just until a soft dough comes together. Be careful not to overmix to keep the cookies tender and not tough.
Step 5: Chill the Dough
Wrap or cover your dough and chill it in the fridge for at least an hour. This not only makes it easier to handle but also helps the flavors meld and the dough firm up for more uniform baking.
Step 6: Prepare to Bake
Preheat your oven to 350°F (175°C), and line baking sheets with parchment paper so your cookies won’t stick and will bake evenly.
Step 7: Shape the Cookies
Scoop tablespoon-sized portions of dough and roll into balls. Flatten each slightly and place them 2 inches apart to give them room to spread and bake to perfection.
Step 8: Bake the Cookies
Bake for 8 to 10 minutes until the edges are set but the centers remain soft. This ensures you get a cookie with a slightly chewy center and crisp edges—pure delight in every bite.
Step 9: Cool Completely
Let the cookies cool on the baking sheet for 5 minutes before transferring them to a wire rack to cool completely. This step is crucial for allowing the cookies to firm up for sandwiching.
Step 10: Make the Buttercream Filling
Beat the softened butter until super smooth. Gradually add powdered sugar, followed by vanilla extract and heavy cream. Continue beating until the buttercream is fluffy and perfectly spreadable—this will be the delectable glue for your sandwich cookies.
Step 11: Assemble the Cookies
Spread or pipe the buttercream on the flat side of half the cookies, then gently press the remaining cookies on top to create sandwiches. This filling takes the cookie experience to a whole new level of indulgence.
Step 12: Add Optional Finishing Touches
If you want a little extra flair and a hint of texture, roll the cookie edges in chocolate sprinkles or shavings—simple, elegant, and delicious.
How to Serve Chocolate Sandwich Cookies Recipe
Garnishes
A sprinkle of chocolate shavings or a delicate dusting of cocoa powder adds an appealing finish to your chocolate sandwich cookies. These little touches not only enhance the look but also add nuanced layers of chocolate flavor that marry beautifully with the buttercream.
Side Dishes
These cookies pair wonderfully with a glass of cold milk or a cup of rich coffee or cocoa. The creamy drink perfectly offsets the intense chocolate, making every bite feel more indulgent.
Creative Ways to Present
For a party, arrange your Chocolate Sandwich Cookies Recipe on a tiered dessert tray surrounded by fresh berries or edible flowers. You can also wrap them individually in wax paper tied with pretty ribbon for charming homemade gifts.
Make Ahead and Storage
Storing Leftovers
Store leftover cookies in an airtight container at room temperature for up to 3 days. The cookies maintain their moist texture and the buttercream stays creamy and delicious without refrigeration for this short period.
Freezing
You can freeze the assembled cookies in a sealed container for up to 2 weeks. To avoid frost damage, freeze in a single layer separated by parchment paper. Thaw in the fridge overnight before serving to enjoy them at their best.
Reheating
These cookies are best enjoyed at room temperature. If you prefer them slightly warm, pop them into a preheated oven at 300°F for 3-5 minutes, but be careful not to melt the buttercream filling completely.
FAQs
Can I use Dutch-process cocoa powder instead of natural cocoa?
Absolutely! Dutch-process cocoa powder will give your cookies a smoother, less acidic taste and a slightly darker color. Just note the flavor might be a bit milder compared to natural cocoa.
Is it possible to make these cookies gluten-free?
Yes, you can substitute all-purpose flour with a gluten-free blend, but be sure it contains xanthan gum or a similar binder to keep the dough together. The texture may vary slightly but the chocolate flavor will still shine.
Can I substitute the buttercream filling for a different type of cream?
Definitely! You can replace the buttercream with a cream cheese frosting or even a marshmallow fluff for a different twist. Just make sure the filling is thick enough to hold the sandwich cookie together.
How long do these cookies stay fresh once assembled?
When kept in an airtight container at room temperature, they stay fresh for about 3 days. Beyond that, the buttercream may start to soften too much, so refrigeration is recommended if you want to keep them longer.
Can I make the cookie dough or filling in advance?
Yes! You can prepare the dough and chill it up to 24 hours before baking. The buttercream can also be made a day ahead and stored in the fridge; just bring it back to room temperature and whip it before assembling.
Final Thoughts
This Chocolate Sandwich Cookies Recipe is a true celebration of chocolate in cookie form, combining simplicity with mouthwatering flavor that’s sure to impress anyone lucky enough to get a taste. Whether you’re baking for loved ones or just satisfying your own sweet tooth, this recipe promises to bring joy and a little bit of magic to your kitchen. So grab your apron, dive in, and enjoy every delicious step of the way!
Print
Chocolate Sandwich Cookies Recipe
- Prep Time: 20 minutes
- Cook Time: 10 minutes
- Total Time: 30 minutes plus 1 hour chilling
- Yield: 16 sandwich cookies
- Category: Dessert
- Method: Baking
- Cuisine: American
Description
These Chocolate Sandwich Cookies feature rich, cocoa-infused cookie layers paired with a creamy vanilla buttercream filling. Perfectly soft in the center with slightly crisp edges, these homemade delights are great for any occasion and can be customized with chocolate sprinkles for extra indulgence.
Ingredients
Cookie Dough
- 1 ¾ cups all-purpose flour
- ¾ cup unsweetened cocoa powder
- 1 teaspoon baking soda
- ½ teaspoon salt
- 1 cup unsalted butter, softened
- ¾ cup brown sugar
- ½ cup granulated sugar
- 2 large eggs
- 2 teaspoons vanilla extract
Buttercream Filling
- ½ cup unsalted butter, softened
- 2 cups powdered sugar
- 1 teaspoon vanilla extract
- 2 tablespoons heavy cream
- ¼ cup chocolate sprinkles or shavings (optional)
Instructions
- Mix dry ingredients. In a medium bowl, whisk together the all-purpose flour, unsweetened cocoa powder, baking soda, and salt until evenly combined.
- Cream butter and sugars. In a large mixing bowl, beat the softened butter, brown sugar, and granulated sugar together until the mixture is light and fluffy, which should take about 2 to 3 minutes.
- Add eggs and vanilla. Incorporate the eggs one at a time into the creamed butter mixture, beating well after each addition, then mix in the vanilla extract for flavor.
- Combine wet and dry ingredients. Gradually add the dry ingredients into the wet ingredients using low speed on your mixer, mixing just until a soft dough forms to avoid overmixing.
- Chill the dough. Cover the dough and chill it in the refrigerator for at least 1 hour to firm up for easy portioning and better texture.
- Prepare to bake. Preheat the oven to 350°F (175°C) and line two baking sheets with parchment paper to prevent sticking.
- Shape cookies. Scoop one-tablespoon portions of dough, roll them into balls, then flatten slightly and place onto the prepared baking sheets about 2 inches apart to allow space for spreading.
- Bake. Bake cookies for 8 to 10 minutes until the edges are set but centers remain soft, ensuring a chewy texture.
- Cool cookies. Allow the cookies to cool on the baking sheet for 5 minutes before transferring them to a wire rack to cool completely.
- Make the buttercream. Beat the softened butter until smooth, then gradually add powdered sugar, followed by vanilla extract and heavy cream, and continue beating until the mixture is fluffy and spreadable.
- Assemble sandwich cookies. Spread or pipe the buttercream onto the flat side of half the cooled cookies, then top with the remaining cookies, pressing gently to adhere.
- Optional decoration. For added texture and flavor, roll the cookie edges in chocolate sprinkles or shavings to finish your sandwich cookies.
Notes
- Be sure not to overmix the dough to maintain tender cookies.
- Chilling the dough is crucial for easier handling and better cookie shape.
- Baking times may vary depending on your oven; watch closely to avoid overbaking.
- Butter and egg ingredients should be at room temperature for best mixing results.
- Optional chocolate sprinkles or shavings add visual appeal and texture but can be omitted if desired.
- Store cookies in an airtight container at room temperature for up to 3 days or refrigerate for longer freshness.


