
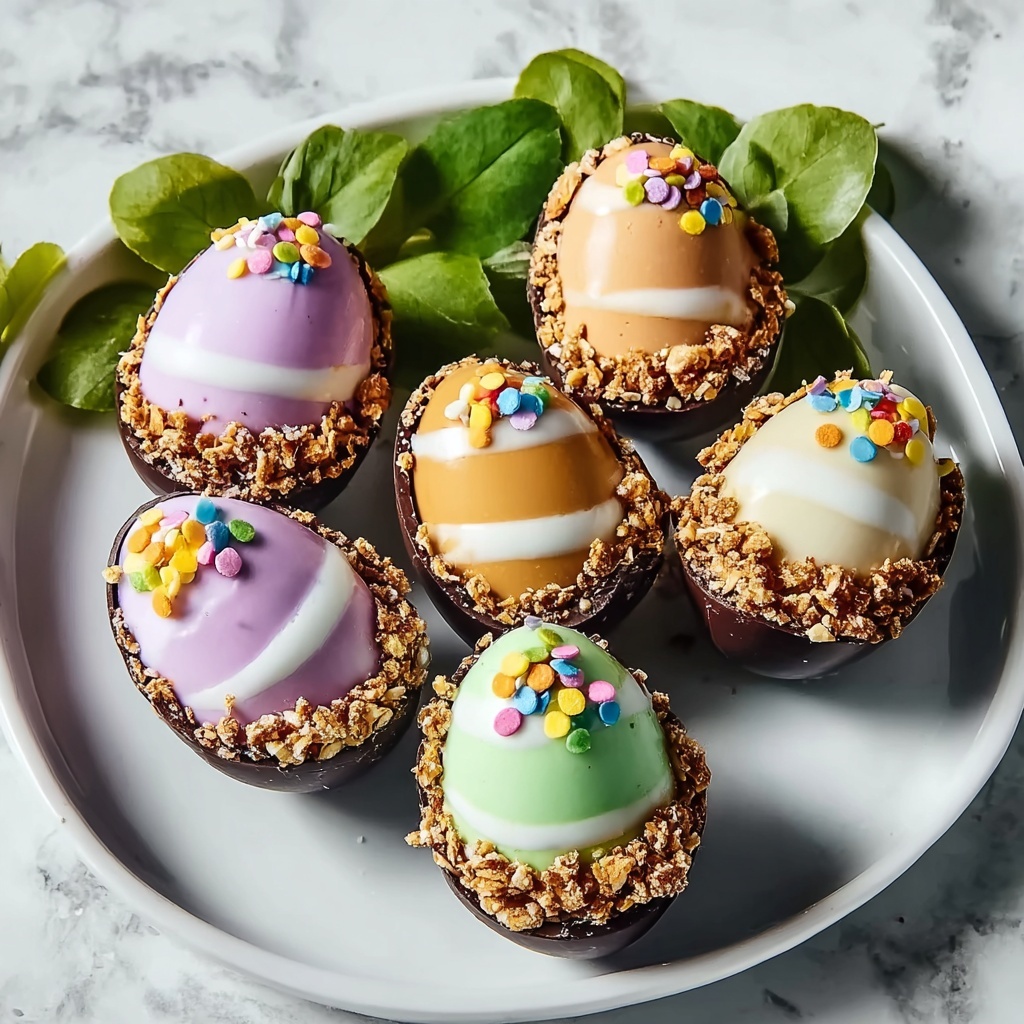
If you’re on the hunt for a fun, festive treat that’s as delightful to make as it is to eat, this Easter Egg Snacks Recipe will quickly become one of your new favorites. Imagine a sweet and crunchy bite that combines creamy white chocolate, colorful pastel candy-coated pieces, and a perfect hint of peanut butter and coconut. These bite-sized morsels aren’t just tasty—they’re a celebration of springtime joy and colors rolled into one, making them a fantastic addition to any Easter gathering or anytime you want a cheerful treat.

Ingredients You’ll Need
Getting these Easter Egg Snacks Recipe exactly right is all about simple, everyday ingredients that come together to create a symphony of tastes and textures. Each component plays its part—whether it’s the smoothness of the white chocolate or the satisfying crunch of pretzels—to make the final snack irresistibly good.
- White chocolate chips: The creamy, sweet base that holds everything together and adds a luscious texture.
- Pastel candy-coated chocolate pieces: For that perfect pop of color and a little crunchy surprise in every bite.
- Mini marshmallows: Adding chewy softness and a playful texture contrast.
- Shredded coconut: Brings a subtle tropical flavor and a hint of chew.
- Pretzel pieces: The salty crunch that balances the overall sweetness beautifully.
- Peanut butter: Smooth, nutty creaminess that deepens the flavor profile.
- Honey: Natural sweetness and a little sticky binding magic.
- Vanilla extract: Just a touch of warmth and aroma to round out the flavors perfectly.
How to Make Easter Egg Snacks Recipe
Step 1: Gather and Prep Your Ingredients
Start by pulling together all your ingredients: white chocolate chips, pastel candy-coated chocolates, mini marshmallows, shredded coconut, pretzel pieces, peanut butter, honey, and vanilla extract. Having everything ready before you begin keeps the process smooth and enjoyable.
Step 2: Melt the White Chocolate
Place the white chocolate chips into a microwave-safe bowl. Melt them slowly in 20 to 30-second intervals, stirring between each to ensure a silky smooth texture without burning the chocolate. Patience here means perfectly melted chocolate to coat everything.
Step 3: Mix in Peanut Butter, Honey, and Vanilla
Once the chocolate is perfectly melted, add in the peanut butter and stir until a glossy, creamy mixture forms. Follow with honey to add that gentle sweetness and a touch of stickiness, then finish with vanilla extract to deepen the flavor complexity.
Step 4: Combine the Crunch and Chew Ingredients
Break the pretzels into smaller pieces to fit comfortably into each bite, then carefully stir them into the chocolate mixture. Next, fold in the shredded coconut and mini marshmallows, distributing them evenly for that delightful varied texture.
Step 5: Add the Colorful Candy Pieces
Finally, gently mix in the pastel candy-coated chocolate pieces, being careful not to crush them. These add the joyful burst of color and a slight crunch that makes these snacks truly special.
Step 6: Shape and Set Your Easter Egg Snacks
Line a baking sheet with parchment paper or a silicone mat. Spoon small portions of the mixture onto the sheet, pressing each mound gently into a rounded shape that looks like tiny Easter treats. Let them chill at room temperature for about 30 minutes, or pop them in the fridge for 10-15 minutes to firm up faster.
Step 7: Ready to Enjoy
Once firm, your Easter Egg Snacks are ready to be enjoyed! Transfer them carefully from the baking sheet to a platter or storage container and treat yourself or your guests to these colorful, crunchy, sweet delights.
How to Serve Easter Egg Snacks Recipe
Garnishes
Sprinkle some extra shredded coconut or a few pastel candy pieces on top of each snack for an extra festive look. A light dusting of edible glitter or colored sugar can turn them into stunning table centerpieces too.
Side Dishes
Pair these Easter Egg Snacks with a fresh fruit platter, like juicy strawberries or tangy pineapple, to balance out the sweetness. A cup of hot tea or coffee makes a lovely companion for an afternoon snack break.
Creative Ways to Present
Try stacking these snacks in a clear jar for a colorful gift option, or place them in pastel cupcake liners for individual servings at a party. You can also arrange them alongside small Easter baskets for a charming holiday display that guests will adore.
Make Ahead and Storage
Storing Leftovers
These snacks keep beautifully for up to three days at room temperature when stored in an airtight container. This means you can make them ahead for your event without worrying about freshness.
Freezing
If you want to keep them longer, you can freeze the Easter Egg Snacks for up to a month. Just layer them with parchment paper in an airtight container to prevent sticking and freezer burn.
Reheating
Because they’re no-bake, reheating isn’t necessary. If you prefer them softer, let frozen snacks thaw at room temperature for about 30 minutes before serving, and they’ll be just as delicious as fresh.
FAQs
Can I use dark or milk chocolate instead of white chocolate?
Absolutely! While white chocolate provides a nice creamy sweetness that complements the pastel candies, substituting with dark or milk chocolate will change the flavor profile but still deliver a tasty snack. Just be mindful of melting time and consistency.
Are these snacks suitable for kids?
Yes, these Easter Egg Snacks are kid-friendly and make a fantastic, colorful treat for little ones. Just be cautious with any peanut allergies and consider substituting peanut butter with sunflower seed butter if needed.
Can I add other mix-ins?
Definitely! Feel free to get creative by adding chopped nuts, dried fruit, or even small candy pieces. The recipe is quite forgiving and perfect for personalizing.
How long do these snacks last?
Stored in an airtight container at room temperature, these treats stay fresh for about three days. After that, texture and flavor might start to decline, so it’s best to enjoy them sooner rather than later.
What if my snacks don’t set?
If your snacks remain soft, they might need more time in the fridge. Alternatively, check that the chocolate was fully melted and mixed properly. Sometimes a quicker set can be encouraged by refrigerating them as soon as they are shaped.
Final Thoughts
Making and sharing this Easter Egg Snacks Recipe is such a joyful way to celebrate spring and bright, happy flavors. These cheerful bites bring together a perfect blend of textures, colors, and sweetness that are sure to brighten any occasion. Give them a try—you might just find yourself making them year-round because they are that good!
Print
Easter Egg Snacks Recipe
- Prep Time: 0h 15m
- Cook Time: 0h 5m
- Total Time: 0h 50m
- Yield: Approximately 20 snack portions
- Category: Snack
- Method: No-Cook
- Cuisine: American
Description
Delightfully sweet and crunchy Easter Egg Snacks featuring melted white chocolate combined with peanut butter, honey, and vanilla, mixed with pastel candy-coated chocolates, mini marshmallows, shredded coconut, and pretzel pieces. These no-bake treats are perfect for festive gatherings or a fun snack to celebrate the holiday.
Ingredients
Chocolate Mixture
- 1 cup white chocolate chips
- 2 tablespoons peanut butter
- 1 tablespoon honey
- 1/2 teaspoon vanilla extract
Mix-ins
- 1/2 cup pastel candy-coated chocolate pieces
- 1/4 cup mini marshmallows
- 1/4 cup shredded coconut
- 1/4 cup pretzel pieces
Instructions
- Prepare Ingredients and Workspace: Gather all ingredients and set up your workspace for an efficient process.
- Choose Mixing Bowl: Select a medium-sized mixing bowl large enough for all ingredients.
- Melt White Chocolate: Place white chocolate chips in a microwave-safe bowl and microwave in 20-30 second increments, stirring between sessions until smooth and fully melted.
- Combine Peanut Butter: Add peanut butter to the melted white chocolate and stir until the mixture is smooth and well combined.
- Add Honey: Stir in honey thoroughly to integrate sweetness evenly.
- Incorporate Vanilla Extract: Pour in vanilla extract and stir to blend the flavor throughout the mixture.
- Add Pretzels: Break pretzel pieces into smaller bits and fold into the chocolate mixture, coating them gently.
- Add Coconut and Marshmallows: Mix in shredded coconut and mini marshmallows, distributing evenly.
- Fold in Candy-Coated Chocolates: Carefully fold in pastel candy-coated chocolate pieces to avoid breaking them.
- Prepare Baking Sheet: Line a baking sheet with parchment paper or a silicone baking mat for easy removal.
- Portion the Mixture: Use a spoon or cookie scoop to place small portions onto the prepared baking sheet.
- Shape the Snacks: Gently press each portion into a small mound or round shape.
- Set the Snacks: Allow to set at room temperature for 30 minutes or refrigerate for 10-15 minutes for faster firming.
- Transfer for Serving or Storage: Once firm, remove from parchment paper and place on a serving platter or storage container.
- Serve or Store: Serve immediately or store in an airtight container at room temperature for up to 3 days.
Notes
- You can speed up the setting process by refrigerating the snacks.
- If you prefer a nut-free version, substitute peanut butter with seed butter or omit it entirely.
- Make sure to break the pretzels into small pieces for easier mixing and better texture.
- Handle pastel candy-coated chocolates gently to keep them intact.
- Store in an airtight container to maintain freshness and prevent melting.


