
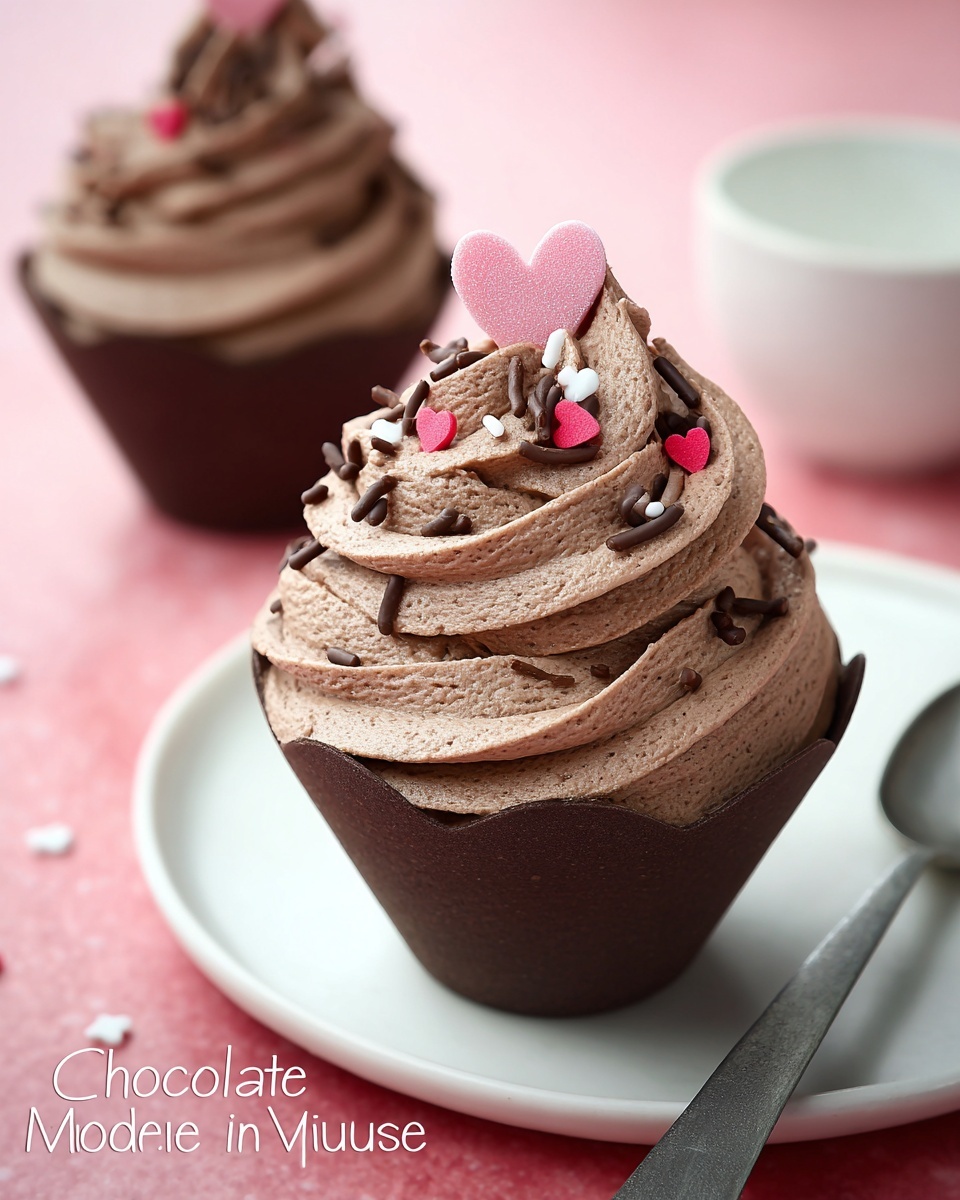
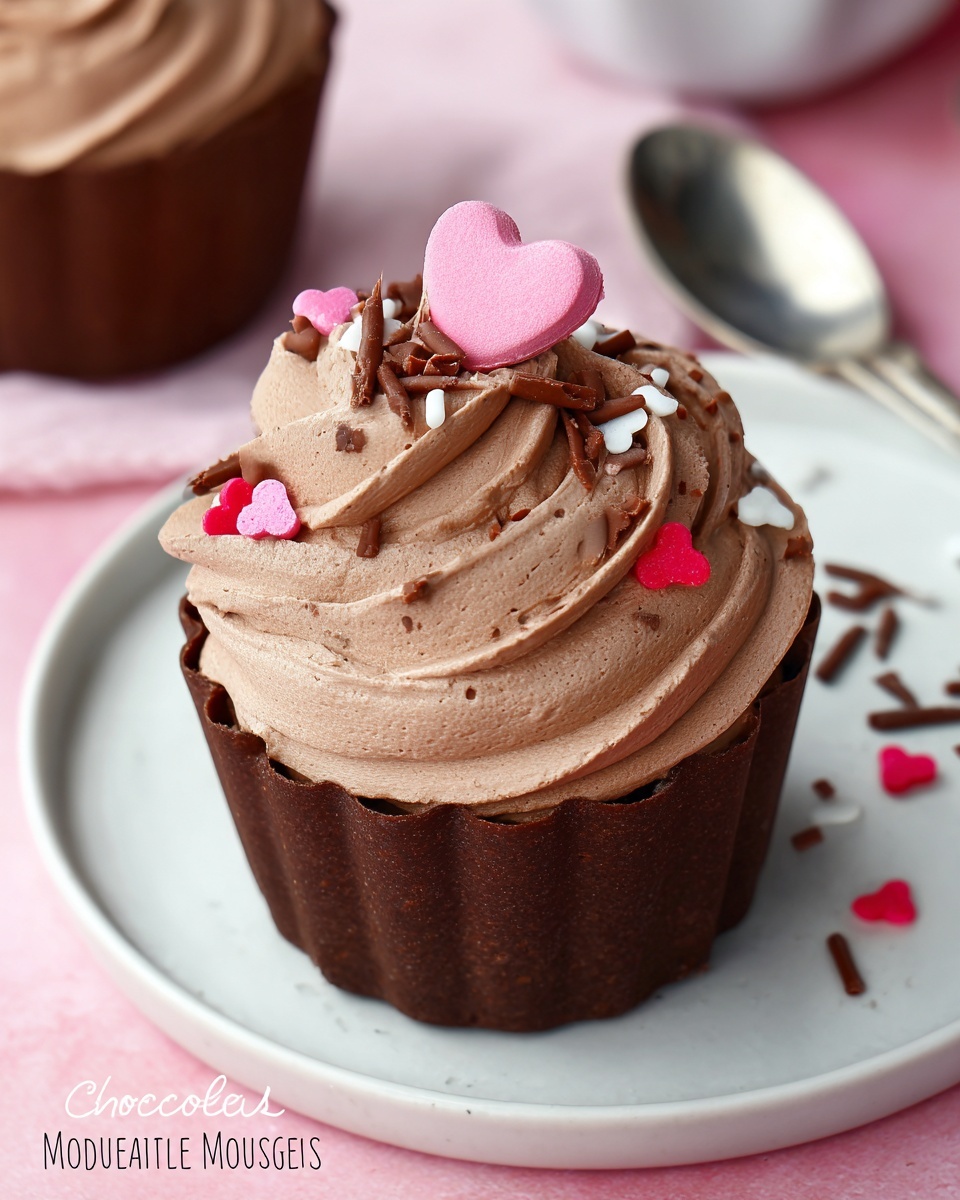
If you’re craving a dessert that feels luxurious but is incredibly simple to make, you’re in for a treat with this Easy Chocolate Mousse with Chocolate Cups Recipe. Imagine rich, creamy chocolate mousse perfectly nestled inside delicate chocolate cups that shatter slightly as you bite into them—pure bliss! This recipe balances silky textures with a beautiful presentation that’s sure to impress, whether it’s a weeknight indulgence or a special occasion showstopper.
Ingredients You’ll Need
The magic behind this Easy Chocolate Mousse with Chocolate Cups Recipe comes from a handful of straightforward ingredients, each playing its own delicious role. From the velvety heavy cream that creates that melt-in-your-mouth texture to the chocolate pudding mix that adds a deeper flavor and creamy consistency, every component pulls its weight to create a dreamy dessert.
- 2 cups Heavy Cream: Whipping this creates the airy, billowy base that makes the mousse so irresistible.
- ¼ cup Confectioners’ Sugar: Just enough sweetness to balance the cocoa without overpowering it.
- 1 cup Whipped Topping: Adds stability and extra creaminess, helping the mousse hold its shape.
- 3.9 oz Chocolate Fudge Instant Pudding Mix (dry): Instantly infuses chocolate richness and thickens the mousse.
- Chocolate bowls (homemade): These cups are the ultimate edible vessel, providing that satisfying crisp contrast.
- Sprinkles (optional): For a fun, colorful finish that’s as delightful to look at as it is to eat.
How to Make Easy Chocolate Mousse with Chocolate Cups Recipe
Step 1: Prepare the Chocolate Cups
Let’s start by crafting those fabulous chocolate cups that will hold your mousse. Melt baking chocolate or chocolate chips in short bursts of 30 seconds in the microwave, stirring between intervals to avoid scorching. When silky smooth, grab a pastry brush and paint the inside of your silicone baking molds. This thin shell will become your edible bowl.
Step 2: Chill and Harden the Chocolate Cups
Pop the painted molds into the refrigerator for about 10 minutes so the chocolate firms up. Then, give them a second coat for sturdiness and place the molds in the freezer for at least an hour. This ensures your chocolate cups are solid and won’t melt quickly once filled, giving you that satisfying crunch with every spoonful.
Step 3: Whip the Heavy Cream
While the cups are chilling, whip your heavy cream until you see soft peaks forming. This step is crucial—it’s what gives the mousse that light, fluffy body. The key is to stop whipping as soon as the peaks appear to avoid turning it into butter.
Step 4: Combine Ingredients for the Mousse
In a separate bowl, gently fold the confectioners’ sugar and dry chocolate fudge pudding mix into the whipped cream. Once combined, carefully incorporate the whipped topping for extra smoothness and a hint of sweetness. This gentle folding keeps the mousse airy and luscious rather than dense.
Step 5: Fill the Chocolate Cups and Chill
Now the fun part—spoon or pipe the mousse into your perfectly hardened chocolate cups. For best results, chill the filled cups in the refrigerator for at least 15 minutes before serving. This short rest allows the mousse to set beautifully and marry flavors.
How to Serve Easy Chocolate Mousse with Chocolate Cups Recipe
Garnishes
Adding a little flair to your dessert can elevate it instantly. Consider sprinkling colorful nonpareils, a light dusting of cocoa powder, or even a few fresh berries on top. The contrast of texture and color makes each serving a work of art and adds a fresh note that pairs surprisingly well with the rich chocolate.
Side Dishes
Pair your mousse cups with delicate, complementary treats such as crisp biscotti or vanilla shortbread cookies. Their crunchiness contrasts wonderfully against the mousse’s silkiness. A small scoop of raspberry sorbet on the side can bring a refreshing tartness that balances all the sweetness perfectly.
Creative Ways to Present
For an extra special touch, try placing the mousse cups on small doilies atop elegant dessert plates. Or line them up on a wooden board for a rustic-chic vibe if you’re entertaining guests. You can even layer mousse and sprinkles alternately in clear mini jars for a grab-and-go party snack that looks irresistible.
Make Ahead and Storage
Storing Leftovers
If you have leftover mousse or chocolate cups, keep them refrigerated in an airtight container for up to two days. The mousse maintains its fluffy texture while the chocolate cups stay crisp as long as humidity is low. Avoid leaving them uncovered to prevent sogginess.
Freezing
You can freeze the mousse separately in a freezer-safe container for up to a month. When you’re ready to serve, thaw it in the refrigerator overnight. It’s best to fill the chocolate cups only after thawing to preserve their delicate texture and prevent cracking.
Reheating
Since this dessert is best enjoyed cold, reheating isn’t recommended. However, if the chocolate cups get too cold and brittle, let them sit at room temperature for about 10 minutes before serving. This softens them just enough for easy biting without compromising the snap.
FAQs
Can I make the chocolate cups ahead of time?
Absolutely! These chocolate cups hold up really well when stored properly. Just keep them in an airtight container in a cool place or the freezer until you’re ready to fill them.
What type of chocolate is best for melting?
Semi-sweet or bittersweet chocolate chips work beautifully because they melt evenly and provide a rich, balanced flavor for the cups without being too sweet.
Is there a dairy-free alternative for the mousse?
You can substitute heavy cream and whipped topping with coconut cream and a dairy-free whipped topping to create a vegan-friendly version. Just make sure to adjust the sweetness accordingly.
How long does it take to set the mousse in the cups?
Chilling the mousse-filled cups for about 15 to 30 minutes in the refrigerator is usually enough for it to firm up while staying deliciously creamy.
Can I use store-bought chocolate cups instead?
Definitely! Store-bought chocolate cups save time and still taste amazing, but making your own adds a homemade charm and allows you to control thickness and flavor intensity.
Final Thoughts
There’s something truly special about creating and enjoying the Easy Chocolate Mousse with Chocolate Cups Recipe. It’s a combination of simplicity, elegance, and pure comfort in every bite. Whether you’re surprising loved ones or just treating yourself, this dessert promises a happy chocolate experience that’s as fun to make as it is to eat. Give it a try—you’ll be making it again and again!
Print
Easy Chocolate Mousse with Chocolate Cups Recipe
- Prep Time: 5 minutes
- Cook Time: 15 minutes
- Total Time: 20 minutes (plus chilling/freezing time)
- Yield: 10-12 servings
- Category: Dessert
- Method: No-Cook
- Cuisine: American
Description
Delight in this easy-to-make chocolate mousse served in elegant chocolate cups. Combining rich chocolate fudge pudding with fluffy whipped cream creates a luscious dessert that’s both impressive and simple to prepare. Perfect for special occasions or a fancy treat, topped with colorful sprinkles for a festive touch.
Ingredients
Chocolate Mousse
- 2 cups Heavy Cream
- ¼ cup Confectioners’ Sugar
- 1 cup Whipped Topping
- 3.9 oz Chocolate Fudge Instant Pudding Mix (dry)
Chocolate Cups
- Baking Chocolate or Chocolate Chips (amount sufficient to coat molds, about 8 oz)
- Sprinkles for garnish
Instructions
- Prepare Chocolate Cups: Melt the baking chocolate or chocolate chips in a microwave-safe bowl by heating in 30-second intervals, stirring between each, until fully melted and smooth.
- Coat Silicone Molds: Using a pastry brush, paint the inside of silicone baking molds with the melted chocolate to form the cup shape. Refrigerate for about 10 minutes to allow the first layer to harden.
- Build Cup Layers: Remove molds from fridge and apply a second layer of melted chocolate to ensure sturdy cups. Place the molds in the freezer for at least one hour until the chocolate shells are solid and firm.
- Make the Mousse: Whip the heavy cream and confectioners’ sugar in a mixing bowl until soft peaks form. In a separate bowl, combine the whipped topping with the dry chocolate fudge instant pudding mix and fold this into the whipped cream gently, creating a light and fluffy mousse.
- Assemble the Dessert: Carefully remove the hardened chocolate cups from the silicone molds. Spoon or pipe the prepared chocolate mousse into each chocolate cup, filling them generously.
- Add Finishing Touches: Decorate the mousse-filled chocolate cups with sprinkles or any preferred garnish to add color and festive appeal. Chill the assembled desserts briefly if needed before serving.
Notes
- Use high-quality chocolate for the cups to ensure a rich flavor and sturdy texture.
- If you don’t have silicone molds, small balloon molds or candy molds can be alternatives.
- Ensure the mousse is folded gently to maintain its fluffy texture.
- This dessert can be prepared a day in advance and kept refrigerated covered with plastic wrap.
- For a dairy-free variation, substitute heavy cream and whipped topping with coconut cream and dairy-free whipped topping, respectively.


