
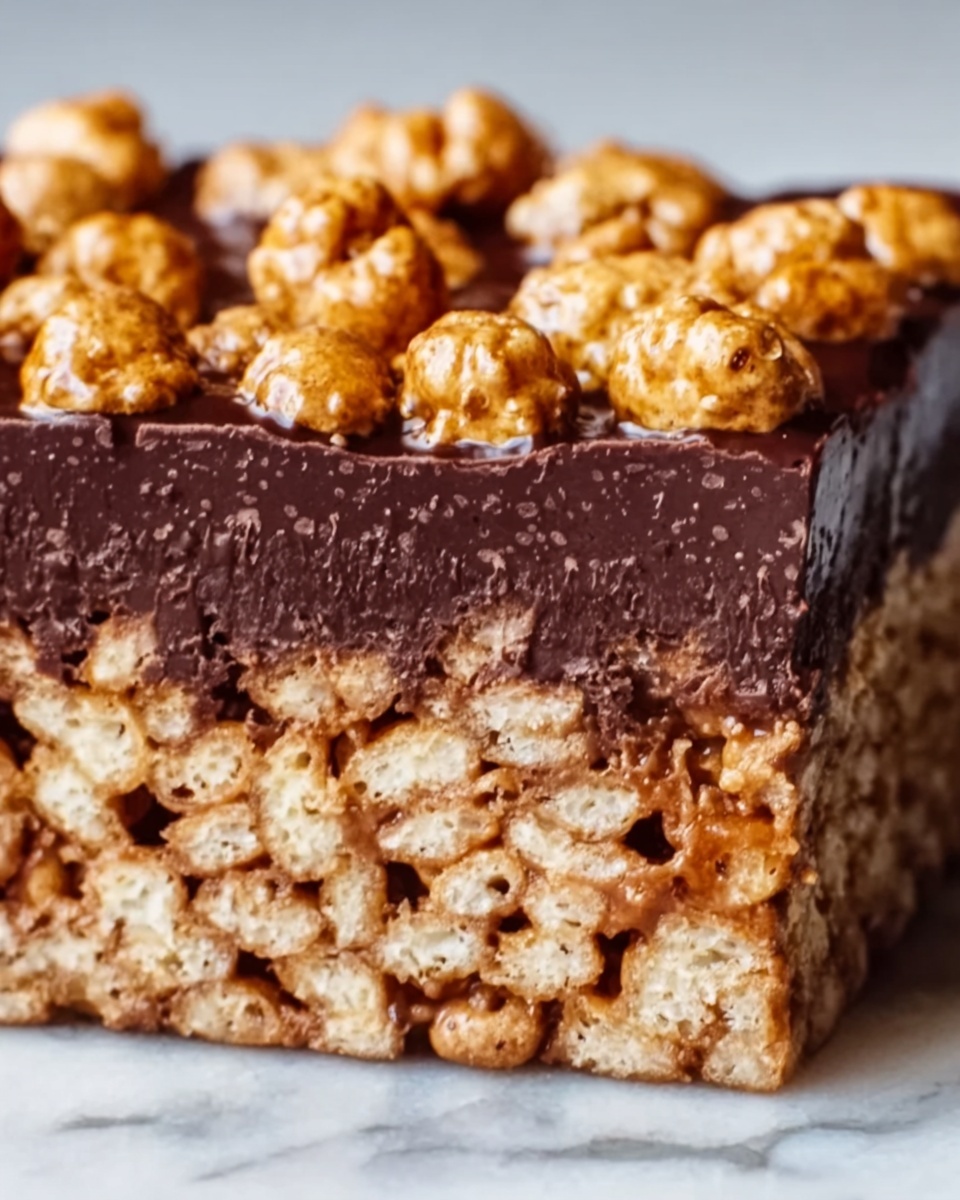
If you are craving a sweet treat that requires no oven time but delivers on rich, indulgent flavor, this No-Bake Milk Chocolate Coconut Slice Recipe is your new best friend. With a delightful blend of buttery biscuit base, chewy shredded coconut, and a luscious milk chocolate topping, it comes together effortlessly yet tastes like a decadent dessert from a fancy bakery. Whether you need a quick fix for unexpected guests or a simple dessert to satisfy your chocolate and coconut cravings, this slice will charm you with every bite.
Ingredients You’ll Need
The beauty of this No-Bake Milk Chocolate Coconut Slice Recipe lies in its simplicity; just a handful of pantry staples that combine to create robust flavors and textures. Each ingredient plays an essential role, from the crunchy base to the silky chocolate crown, ensuring every mouthful is perfectly balanced.
- Shredded coconut: Use sweetened for extra sweetness or unsweetened for a more natural flavor and chewy texture.
- Digestive biscuits: Crushed into fine crumbs, they provide a crisp and sturdy base for the slice.
- Unsalted butter: Melted to bind the mixture and add richness without overpowering other ingredients.
- Sweetened condensed milk: Adds creamy sweetness and helps hold the slice together firmly.
- Vanilla extract: Just a teaspoon will elevate the flavors with its warm, aromatic hint.
- Sea salt: A pinch to enhance the sweetness and balance the rich chocolate topping.
- Milk chocolate chips: The star of the topping, melting smoothly and delivering a luscious chocolate finish.
- Coconut oil: Helps melt the chocolate smoothly and adds subtle coconut flavor.
How to Make No-Bake Milk Chocolate Coconut Slice Recipe
Step 1: Prepare the Biscuit and Coconut Base
Start by mixing the shredded coconut and crushed digestive biscuits in a large bowl. This combo forms the perfect textured foundation — crunchy yet chewy with bursts of tropical coconut flavor that promise to delight your palate.
Step 2: Make the Mixture
In a separate bowl, whisk together the melted butter, sweetened condensed milk, vanilla extract, and sea salt. Then pour this silky mixture over your coconut and biscuit mixture. Stir thoroughly until every crumb is coated and sticky. This step is crucial to ensure your slice holds together well once chilled.
Step 3: Press the Mixture into the Pan
Line an 8 by 8-inch square pan with parchment paper, then transfer your combined mixture in. Press it down firmly so the base is compact and even. This creates a sturdy platform for the smooth milk chocolate topping. Pop the pan in the fridge while you prepare the luscious chocolate layer.
Step 4: Make the Chocolate Topping
Place your milk chocolate chips and coconut oil into a microwave-safe bowl. Heat in short 20-second bursts, stirring between intervals until the chocolate is fully melted and silky smooth. The coconut oil ensures a glossy finish and a subtle tropical hint that complements the base beautifully.
Step 5: Top the Slice with Chocolate
Pour the melted milk chocolate evenly over the chilled coconut and biscuit base, spreading it gently with a spatula. This creates that irresistible glossy, smooth top layer that makes this slice look as incredible as it tastes.
Step 6: Chill and Set
Refrigerate your creation for at least 2 to 3 hours to let the chocolate firm up and the slice set fully. This step is essential to achieve the perfect texture where every bite holds together with a delightful contrast of creamy chocolate and crunchy coconut base.
Step 7: Serve
After chilling, lift the slice out of the pan using the parchment edges. Cut into squares or bars, and enjoy this wonderfully indulgent treat with friends or family. The No-Bake Milk Chocolate Coconut Slice Recipe never fails to bring smiles and satisfied sighs around the table.
How to Serve No-Bake Milk Chocolate Coconut Slice Recipe

Garnishes
Enhance your slice with a sprinkle of toasted coconut flakes or a light dusting of cocoa powder for added texture and visual appeal. You can also add chopped nuts or a drizzle of white chocolate for a contrasting look and taste, elevating this simple treat into something extra special.
Side Dishes
This rich dessert pairs wonderfully with a dollop of freshly whipped cream or a scoop of vanilla ice cream. The cool creaminess balances perfectly with the dense, chocolate-coconut slice, offering guests a delightful harmony of temperatures and flavors.
Creative Ways to Present
For a charming presentation, place the slices on a rustic wooden board alongside fresh berries or edible flowers. Alternatively, stack the slices layered between parchment paper for an inviting picnic treat or gift option that looks as lovely as it tastes.
Make Ahead and Storage
Storing Leftovers
Leftover slices keep beautifully in an airtight container in the refrigerator for up to five days. Storing them chilled ensures the slice retains its texture and the chocolate topping remains firm and glossy, so every piece tastes freshly made.
Freezing
You can freeze individual slices wrapped tightly in plastic wrap and placed in a freezer-safe container for up to two months. Thaw in the fridge overnight before serving to maintain the integrity of the biscuit base and smooth chocolate layer.
Reheating
This is best served chilled, so reheating isn’t necessary. However, if you prefer a softer texture, briefly bring to room temperature or lightly warm in your hand for a minute or two—just avoid heating fully so the chocolate doesn’t melt completely.
FAQs
Can I use unsweetened coconut?
Absolutely! Unsweetened shredded coconut provides a less sweet but wonderfully natural flavor, balancing the overall sweetness from the condensed milk and chocolate.
What if I don’t have digestive biscuits?
Any plain, mildly sweet biscuit or cookie will work just fine. Graham crackers or tea biscuits make good substitutes without changing the slice’s texture greatly.
Is it possible to use dark chocolate instead of milk chocolate?
Yes! Dark chocolate is a delicious alternative that gives a richer, slightly more bitter contrast to the sweetness inside. Just adjust sweetness levels according to your preference.
How long does it need to chill before serving?
At least 2 to 3 hours in the fridge is ideal to allow the chocolate to fully set and the base to firm up, ensuring perfect slices every time.
Can I make this recipe vegan?
To make a vegan version, swap out butter for a plant-based margarine, use dairy-free condensed milk alternatives, and choose vegan chocolate chips. The texture might vary slightly but it will still be delicious!
Final Thoughts
This No-Bake Milk Chocolate Coconut Slice Recipe has a special way of turning simple ingredients into an irresistible treat that feels like a celebration in every bite. Its ease of preparation paired with the luxurious combination of coconut and milk chocolate makes it an all-time favorite to keep on hand. I truly hope you give it a try—it’s the kind of dessert that will bring joy and smiles to everyone you share it with.
Print
No-Bake Milk Chocolate Coconut Slice Recipe
- Prep Time: 15 minutes
- Cook Time: 0 minutes
- Total Time: 3 hours 15 minutes
- Yield: 12 servings
- Category: Dessert
- Method: No-Cook
- Cuisine: Western
Description
This No-Bake Milk Chocolate Coconut Slice is a deliciously easy dessert combining a crunchy biscuit and coconut base with a smooth, creamy milk chocolate topping. With just a few simple ingredients and no oven needed, it’s perfect for a quick treat or a sweet addition to your dessert tray. The combination of shredded coconut and digestive biscuits creates a satisfying texture that’s perfectly complemented by the rich chocolate layer.
Ingredients
Base
- 2 cups shredded coconut (sweetened or unsweetened, depending on your preference)
- 1 1/2 cups digestive biscuits (or any plain biscuits), crushed
Binding Mixture
- 1/2 cup unsalted butter, melted
- 1/2 cup sweetened condensed milk
- 1 tsp vanilla extract
- 1/4 tsp sea salt
Chocolate Topping
- 1 1/2 cups milk chocolate chips (or chopped milk chocolate)
- 2 tbsp coconut oil (for melting the chocolate)
Instructions
- Prepare the Biscuit and Coconut Base: In a large bowl, combine the shredded coconut and crushed biscuits. Mix them thoroughly to evenly distribute both ingredients.
- Make the Mixture: In a separate bowl, whisk together the melted butter, sweetened condensed milk, vanilla extract, and sea salt until well combined. Pour this wet mixture over the dry coconut and biscuit mix and stir until everything is evenly coated and sticky.
- Press the Mixture into the Pan: Line an 8×8 inch square pan with parchment paper. Transfer the combined mixture into the pan and use the back of a spoon or your hands to press it down firmly and evenly, creating a compact base. Place the pan in the refrigerator to chill and set while you prepare the chocolate topping.
- Make the Chocolate Topping: In a small microwave-safe bowl, combine the milk chocolate chips and coconut oil. Microwave in 20-second intervals, stirring each time, until the chocolate is fully melted and smooth.
- Top the Slice with Chocolate: Pour the melted milk chocolate over the chilled coconut and biscuit base. Use a spatula to spread the chocolate evenly across the surface for a smooth topping.
- Chill and Set: Return the pan to the refrigerator and let it chill for at least 2 to 3 hours, or until the chocolate hardens and the slice is fully set.
- Serve: Once chilled, remove from the pan using the parchment paper edges. Cut the dessert into squares or bars and enjoy the creamy chocolate and coconut flavors.
Notes
- You can use either sweetened or unsweetened shredded coconut depending on your sweetness preference.
- Digestive biscuits can be substituted with any plain, slightly sweet biscuits or graham crackers.
- For a dairy-free version, consider using vegan butter, coconut condensed milk alternatives, and dairy-free chocolate.
- To melt chocolate smoothly, avoid overheating; stir frequently in short bursts to prevent burning.
- Store the slice in an airtight container in the fridge for up to 5 days.
- Allow the slice to come to room temperature for a few minutes before serving for softer chocolate texture.


