
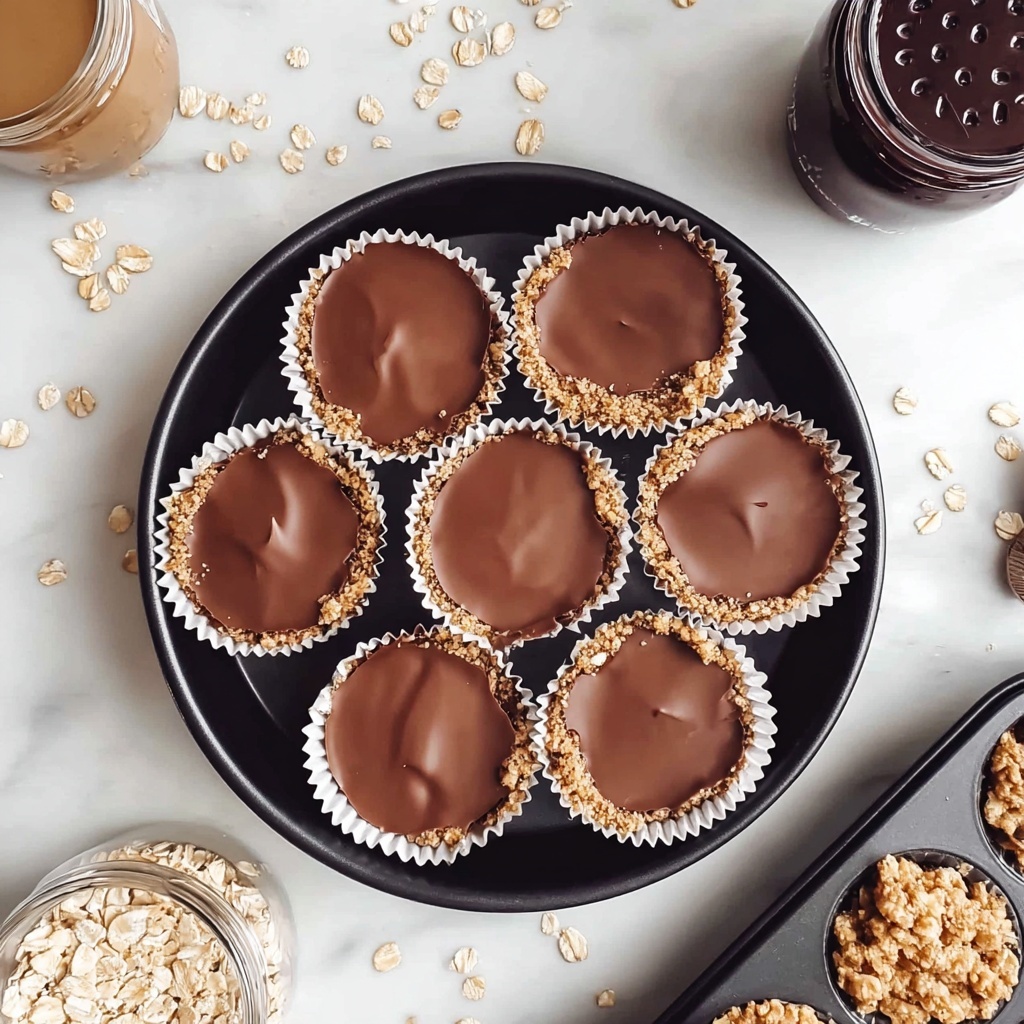
If you’re looking for a delightful treat that’s both easy and satisfying, this No Bake Peanut Butter Oat Cups Recipe is going to become your new favorite snack. Combining creamy peanut butter with wholesome oats and a hint of honey, these cups offer a perfect balance of natural sweetness and rich texture without ever needing to turn on the oven. Whether you want a quick energy boost or a comforting bite during the afternoon, these no-bake delights are passionately simple and wonderfully nourishing.

Ingredients You’ll Need
The beauty of the No Bake Peanut Butter Oat Cups Recipe lies in its straightforward ingredients that come together effortlessly. Each item contributes uniquely: peanut butter lends a creamy richness, honey adds just the right touch of sweetness, oats provide a hearty chew, and chocolate chips bring a playful pop of flavor. Let’s take a look at the essentials that make these cups irresistible.
- 1 cup peanut butter: Choose creamy or crunchy based on your texture preference; it’s the key binding ingredient.
- 1/4 cup honey: Acts as a natural sweetener and helps hold the mixture together.
- 1 teaspoon vanilla extract: Enhances the overall flavor with a warm, aromatic note.
- 2 cups rolled oats: Adds a satisfying chew and fiber-packed goodness.
- 1/4 cup chocolate chips: Delivers bursts of melty sweetness throughout every bite.
- 1/4 cup milk: Makes the mixture easier to stir and binds the ingredients into a thick, sticky consistency.
How to Make No Bake Peanut Butter Oat Cups Recipe
Step 1: Mix the wet ingredients
Start by combining one cup of peanut butter, a quarter cup of honey, and a teaspoon of vanilla extract in a medium mixing bowl. Stir them together until you get a smooth and creamy blend—this mixture is the flavorful foundation of your cups.
Step 2: Incorporate the oats
Next, add two cups of rolled oats to the peanut butter mixture. Stir thoroughly to coat every oat with that lovely peanut butter and honey goodness. This is where the texture starts coming together, promising a chewy, satisfying bite.
Step 3: Fold in the chocolate chips
Once the oats are mixed, gently fold in a quarter cup of chocolate chips. Distributing them evenly ensures that each bite has little pockets of delicious melted chocolate, bringing that extra wow factor.
Step 4: Add milk and combine
Pour a quarter cup of milk into the bowl to help bring everything together. Keep stirring the mixture until it becomes thick and sticky—this perfect consistency will make shaping the cups easy and mess-free.
Step 5: Prepare and fill the muffin tin
Line a muffin tin with paper liners or lightly grease it to prevent sticking. Then, spoon the oat and peanut butter mixture into each cup, dividing it evenly. Press the mixture firmly with the back of a spoon to compact the cups so they hold their shape after chilling.
Step 6: Chill and set
Place the filled muffin tin into your refrigerator and chill for at least one hour. This step is crucial as it lets the ingredients meld together and the cups firm up, making them easy to remove and ready to enjoy.
Step 7: Serve and store
Once they’re set, carefully remove the cups from the tin and peel off any liners if used. Your delicious No Bake Peanut Butter Oat Cups Recipe is now ready to share or stash in the fridge!
How to Serve No Bake Peanut Butter Oat Cups Recipe
Garnishes
Add an extra touch of flair and flavor by topping your oat cups with a light drizzle of melted chocolate, a sprinkle of chopped peanuts, or even a dusting of sea salt. These little accents can transform your simple cups into an eye-catching and gourmet treat.
Side Dishes
Pair your peanut butter oat cups with fresh fruit like sliced bananas or juicy berries for a refreshing contrast. A cup of hot tea or cold milk also complements the rich and chewy texture beautifully, making for a well-balanced snack or light dessert.
Creative Ways to Present
For a fun twist, serve these cups in mini cupcake liners arranged on a platter at your next gathering, or stack them in a mason jar for a grab-and-go snack option. You can even customize by stirring in dried fruits or seeds for added texture and flavor variations.
Make Ahead and Storage
Storing Leftovers
Keep any leftover No Bake Peanut Butter Oat Cups Recipe in an airtight container in your refrigerator. They stay fresh and delicious for up to one week, perfect for quick snacking or a boost anytime you need it.
Freezing
If you want to preserve these cups for longer, freeze them in a single layer on a baking sheet first, then transfer them to a freezer-safe container or bag. Frozen, they last up to two months and thaw quickly for an anytime treat.
Reheating
These no-bake treats are best enjoyed chilled, but if you prefer a softer texture, leave them at room temperature for a few minutes before eating. Avoid microwaving as it may cause the peanut butter to separate or the chocolate to melt unpredictably.
FAQs
Can I use crunchy peanut butter instead of creamy?
Absolutely! Crunchy peanut butter will add an extra layer of texture to your oat cups, giving each bite a delightful nutty crunch alongside the oats.
Is there a substitute for honey in this recipe?
Yes, you can swap honey for maple syrup or agave nectar to keep it naturally sweet, but keep in mind these alternatives might slightly change the flavor profile.
Can I make these cups vegan?
Definitely! Use a plant-based milk like almond or oat milk, and replace honey with maple syrup or another vegan sweetener to keep everything vegan-friendly.
How do I ensure the cups hold together well?
Pressing the mixture firmly into the muffin cups and chilling them properly is key. Also, using enough peanut butter and honey helps bind everything tightly.
Can I add other mix-ins to the oat cups?
Of course! Feel free to customize by adding chopped nuts, dried fruits, seeds, or even shredded coconut to mix up flavors and textures to your liking.
Final Thoughts
Trust me, once you try this No Bake Peanut Butter Oat Cups Recipe, you’ll wonder how you ever lived without it. It’s such a rewarding snack that’s easy to make, packed with flavor, and perfect for sharing. So go on, whip up a batch today and enjoy the cozy comfort and deliciousness wrapped in every bite!
Print
No Bake Peanut Butter Oat Cups Recipe
- Prep Time: 0h 10m
- Cook Time: 0h 0m
- Total Time: 1h 10m
- Yield: 12 cups
- Category: Snack
- Method: No-Cook
- Cuisine: American
- Diet: Vegetarian
Description
These No Bake Peanut Butter Oat Cups are a quick and easy no-cook snack packed with wholesome oats, creamy peanut butter, and a touch of sweetness from honey and chocolate chips. Perfect for a healthy treat or grab-and-go breakfast, they require no baking and set firmly in the refrigerator.
Ingredients
Wet Ingredients
- 1 cup peanut butter
- 1/4 cup honey
- 1 teaspoon vanilla extract
- 1/4 cup milk
Dry Ingredients
- 2 cups rolled oats
- 1/4 cup chocolate chips
Instructions
- Mix Wet Ingredients: In a medium-sized mixing bowl, combine 1 cup of peanut butter, 1/4 cup of honey, and 1 teaspoon of vanilla extract, stirring thoroughly to create a smooth blend.
- Add Oats: Stir in 2 cups of rolled oats to the peanut butter mixture, ensuring all oats are evenly coated with the peanut butter and honey mixture.
- Incorporate Chocolate Chips: Fold 1/4 cup of chocolate chips into the oat mixture, distributing them evenly for bursts of chocolate in every bite.
- Add Milk: Pour in 1/4 cup of milk to help bind the ingredients together, stirring until the mixture is thick and sticky.
- Prepare Muffin Tin: Line a muffin tin with paper liners or lightly grease it to prevent sticking.
- Fill Muffin Cups: Spoon the mixture evenly into each muffin cup, pressing down firmly with the back of a spoon to compact and shape the cups.
- Chill: Place the muffin tin in the refrigerator and chill for at least 1 hour until the cups are set and firm.
- Unmold and Store: Remove the cups from the muffin tin, peel off paper liners if used, and store in an airtight container in the fridge for up to one week.
Notes
- You can substitute almond or cashew butter for peanut butter if preferred.
- Use maple syrup or agave nectar instead of honey for a vegan option.
- For extra texture, add chopped nuts or dried fruit along with the oats.
- If mixture is too dry, add a splash more milk to achieve desired consistency.
- Keep refrigerated to maintain firmness and freshness.
