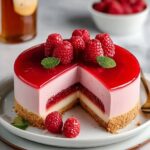
Description
This Pink Velvet Raspberry Cheesecake is a no-bake dessert featuring a buttery biscuit base, a creamy pink raspberry-infused filling, and a glossy raspberry topping. Perfectly balanced with fresh raspberries, lemon juice, and a hint of vanilla, this cheesecake is chilled to set, delivering a luscious and elegant treat that serves 8 to 10 slices.
Ingredients
Scale
Base
- 150g digestive biscuits (or graham crackers)
- 75g unsalted butter, melted
Filling
- 300g full-fat cream cheese, softened
- 100g icing sugar
- 200ml double cream (heavy cream)
- 150g fresh raspberries
- 1 tsp vanilla extract
- Juice of ½ lemon
- Pink food coloring (gel-based), optional
Raspberry Purée
- 150g fresh raspberries
- 1 tsp lemon juice
- 1 tbsp water
Topping
- 100g fresh raspberries
- 2 tbsp icing sugar
- 1 tsp lemon juice
- 1 tbsp water
- Optional: gelatine or agar-agar for firmness
Instructions
- Prepare the Base: Crush the digestive biscuits into fine crumbs using a food processor or a rolling pin. Mix the crumbs thoroughly with melted unsalted butter. Press the mixture firmly and evenly into the base of an 8-inch springform pan. Place it in the fridge to chill and set for 30 minutes.
- Make Raspberry Purée: In a small saucepan, combine 150g fresh raspberries with the lemon juice and water. Heat gently and simmer until the raspberries break down completely. Pass the mixture through a fine sieve to remove seeds, creating a smooth purée. Allow it to cool to room temperature.
- Make the Filling: Beat the softened cream cheese until smooth and creamy. Gradually add icing sugar, vanilla extract, and lemon juice, blending well. In a separate bowl, whip the double cream until soft peaks form. Gently fold the whipped cream into the cream cheese mixture to maintain the airiness. Then carefully fold in the cooled raspberry purée and pink food coloring, if using, until the mixture is evenly colored and consistent.
- Assemble the Cheesecake: Pour the prepared filling evenly over the chilled biscuit base and smooth the top with a spatula. Cover and refrigerate the cheesecake for at least 6 hours, preferably overnight, to allow it to set firmly.
- Add the Topping: In a saucepan, gently heat 100g fresh raspberries with icing sugar, lemon juice, and water until the raspberries are softened. Strain the mixture through a sieve to remove seeds. If desired, dissolve gelatine or agar-agar in a little warm water and mix it into the strained raspberry sauce to help it set as a gelatinous topping. Allow the topping to cool slightly before pouring it gently over the chilled cheesecake, then return the cheesecake to the fridge.
- Final Touch: Once the raspberry topping has set completely, carefully remove the cheesecake from the springform pan. Decorate the top with fresh raspberries or whipped cream swirls as preferred. Serve chilled for the best texture and flavor.
Notes
- For a firmer filling, add a teaspoon of dissolved gelatine or agar-agar into the filling before folding in the raspberry purée.
- Use full-fat cream cheese and double cream for the creamiest texture.
- Make sure the raspberry purée is fully cooled before adding to prevent the filling from becoming too soft.
- Gel-based food coloring offers a vibrant pink hue without thinning the filling consistency.
- The cheesecake improves in flavor after overnight chilling, so prepare in advance if possible.
- For a gluten-free version, substitute digestive biscuits with gluten-free crackers.