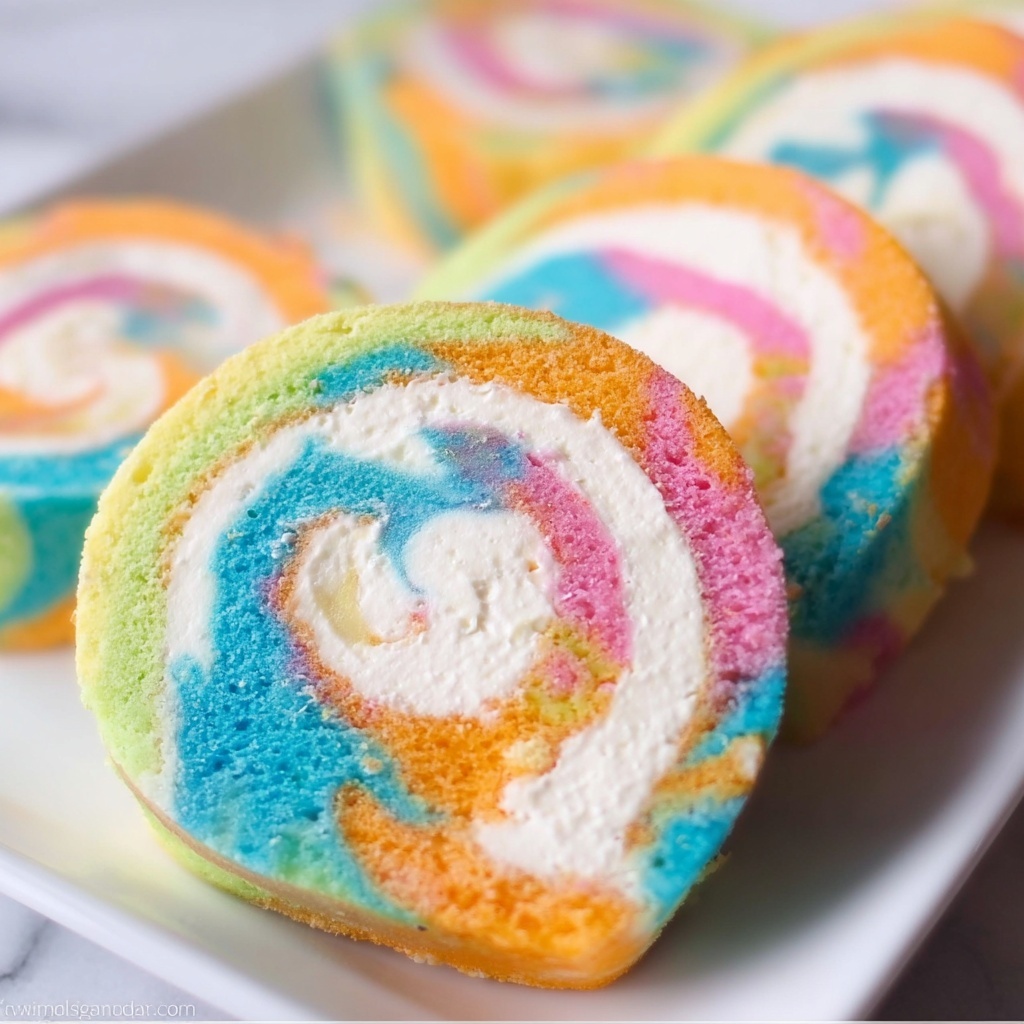
Get ready to brighten up your dessert table with this unforgettable Tie-Dye Pinwheel Cake with Bright Neon Colors Recipe! This fun and visually stunning cake is not only a feast for the eyes but also a delight to the taste buds. With its vibrant swirls of neon colors and fluffy texture, this cake turns any occasion into a celebration. The bright hues and the classic pinwheel design make it perfectly playful and uniquely inviting — it’s truly a showstopper dessert you won’t want to miss.
Ingredients You’ll Need
Preparing this Tie-Dye Pinwheel Cake with Bright Neon Colors Recipe is a breeze thanks to a handful of simple yet essential ingredients. Each one plays a vital role in creating that light, fluffy texture and bright, cheerful swirls that define this cake.
- White cake mix: The base of your cake providing a tender crumb and subtle sweetness.
- Neon food dye colors: Six vibrant shades that bring the cake’s signature tie-dye effect to life.
- Butter (1/2 cup, softened): Adds richness and helps create a smooth, creamy frosting.
- Vanilla (1 tsp): Enhances the flavor with a warm, aromatic touch.
- Powdered sugar (3 cups): Essential for creating a silky, sweet frosting.
- Milk (3-4 tbsp): Used to adjust frosting consistency for easy spreading.
How to Make Tie-Dye Pinwheel Cake with Bright Neon Colors Recipe
Step 1: Prep Your Oven and Pan
Kick things off by preheating your oven to 325ºF to ensure it’s just right when your cake batter is ready. Meanwhile, prepare your jelly roll pan by generously greasing it with shortening and dusting it with flour. This step might feel small, but it’s the secret to your cake sliding out perfectly without sticking.
Step 2: Mix the Batter and Add Color
Next, whip up the white cake mix according to the box instructions — simple and foolproof! Once your batter is ready, divide it evenly into six bowls. This part is where the magic begins: add one neon food dye color to each bowl, mixing until the hue is consistently bright and vivid. These colors are what transform the cake into an edible work of art.
Step 3: Create the Tie-Dye Effect
Transfer each colored batter into its own ziplock bag, snipping a tiny corner to use as a piping bag. Start squeezing the batters in a diagonal stripe pattern across the prepared pan, layering color by color. Don’t worry if you have leftover batter; fill in any gaps to ensure even coverage. Once filled, gently shake the pan to level the batter, then take a toothpick and swirl through the colors to create that mesmerizing tie-dye look.
Step 4: Baking and Cooling
Bake your colorful masterpiece for about 18 minutes until it’s set and springy to the touch. After baking, let it cool in the pan for 20 minutes to make handling easier. The cooling time also helps your cake maintain its shape for the rolling process — a key step for those signature pinwheel slices.
Step 5: Roll and Cool the Cake
Place a clean towel on a flat surface and sprinkle it lightly with flour. Flip the warm cake onto the towel, then dust a bit more flour on top and cover with another towel. Starting from one end, roll the cake up tightly with both towels. This gentle rolling shapes the cake itself and prevents cracking later. Leave it rolled until completely cool, which makes frosting and final rolling easier and neater.
Step 6: Make the Frosting
While the cake cools, beat softened butter and vanilla extract together until creamy. Gradually add powdered sugar, mixing well, and then add milk little by little until you reach a smooth, spreadable consistency. This frosting will add a luscious, sweet contrast that pairs perfectly with the vivid layers of the cake.
Step 7: Frost and Roll the Cake Again
Carefully unroll the cooled cake, spread the frosting evenly over the surface, then use the towel to help you roll the cake back up tightly. Wrapping the cake with the towel one more time keeps it secure and helps the frosting set evenly inside the roll.
Step 8: Chill and Slice
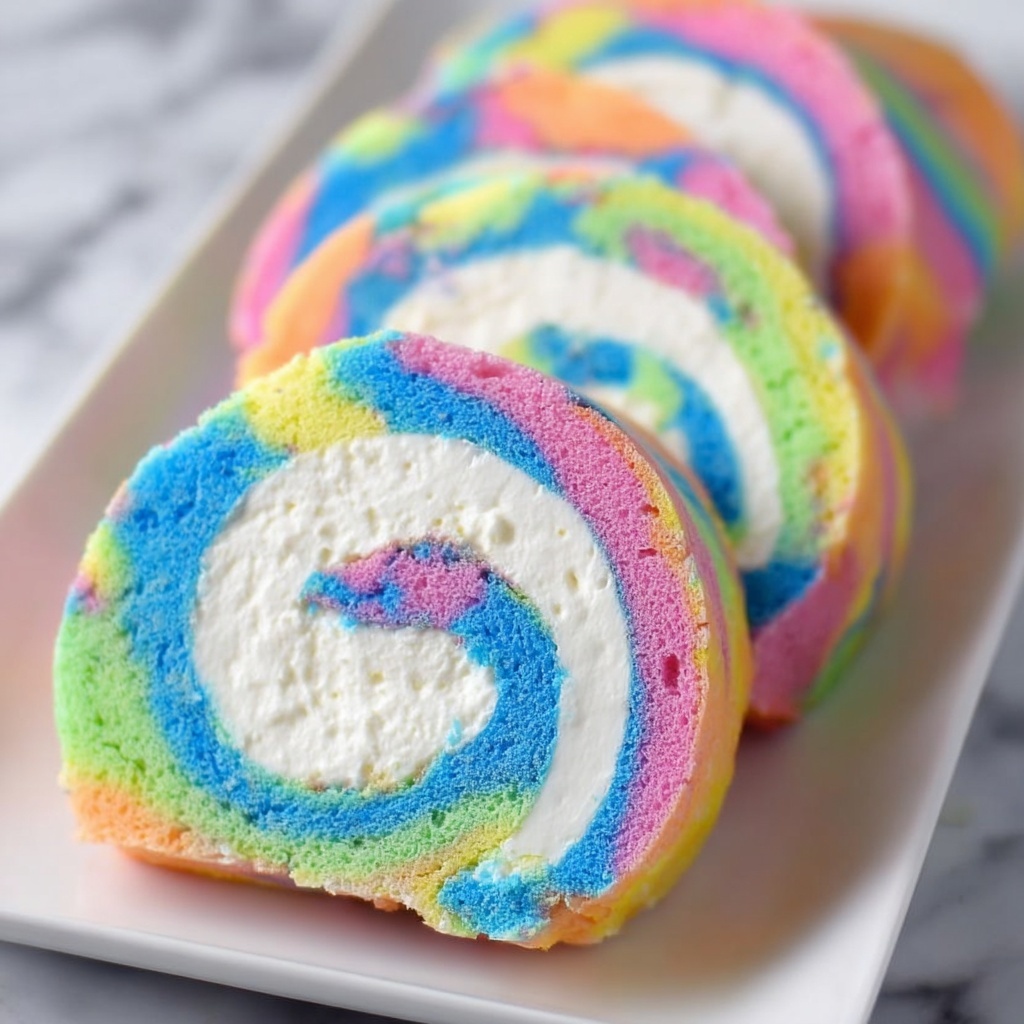
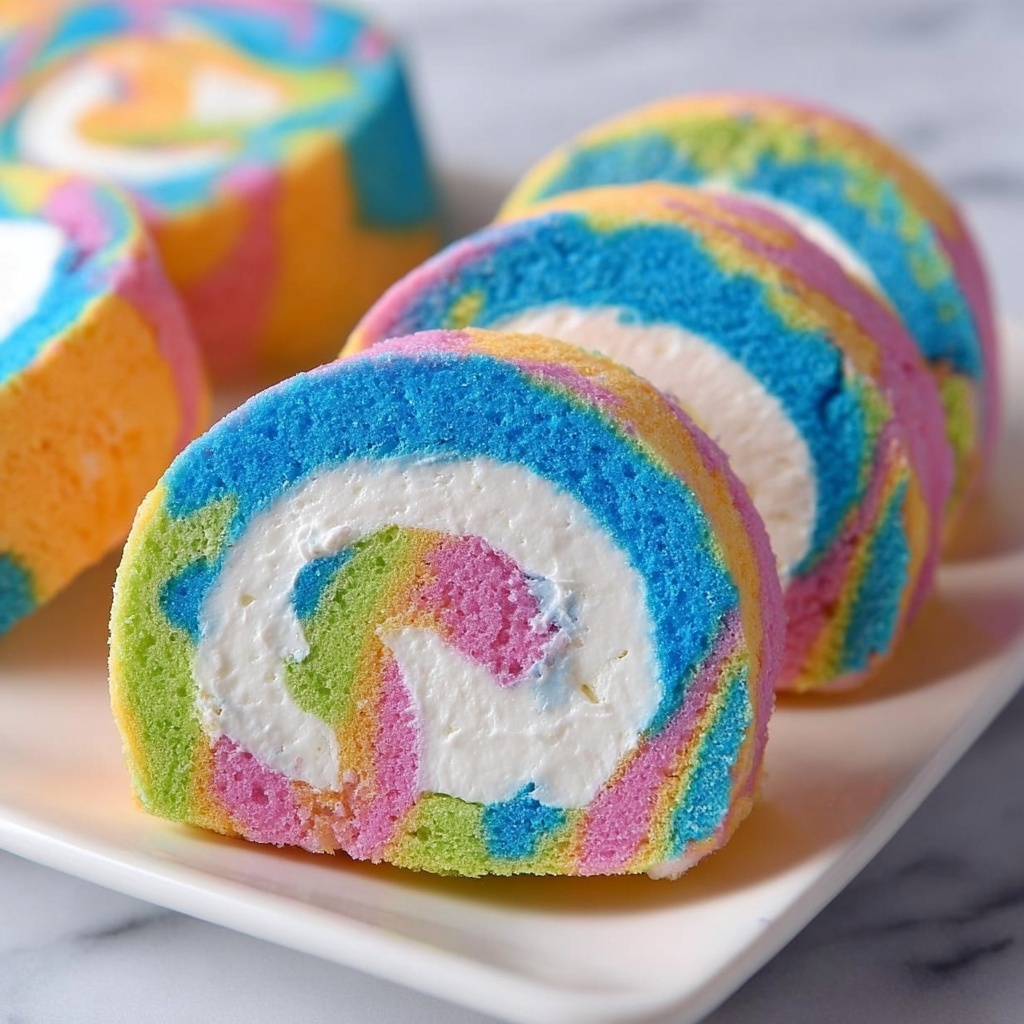
Pop the rolled cake into the freezer for about four hours to firm up. Once chilled, remove the towel wrap and slice into 12 bright, beautiful pinwheels. Each slice reveals a colorful spiral that’s as delightful to see as it is to eat.
How to Serve Tie-Dye Pinwheel Cake with Bright Neon Colors Recipe
Garnishes
Add extra fun with whimsical garnishes like edible glitter, colorful sprinkles, or even fresh berries for a pop of natural color. These little touches not only enhance the cake’s appearance but bring a delightful textural contrast that your guests will appreciate.
Side Dishes
Consider pairing your vibrant tie-dye cake with simple sides like a scoop of vanilla ice cream or a light whipped cream. These creamy companions complement the cake’s sweetness without overpowering those dazzling neon hues you worked so hard to create.
Creative Ways to Present
For a truly memorable presentation, serve your pinwheel slices on a bright platter or arrange them in a circular pattern to mimic the tie-dye swirl. You could also place each slice in colorful cupcake liners for easy, individual servings that instantly bring smiles to any party.
Make Ahead and Storage
Storing Leftovers
Wrap leftover slices tightly in plastic wrap or store them in an airtight container in the refrigerator. The cake stays moist and fresh for up to 4 days, making it perfect for enjoying later without losing any of its charm or flavor.
Freezing
You can freeze whole rolled cakes or individual slices by wrapping them well in plastic wrap and aluminum foil. When stored properly, your Tie-Dye Pinwheel Cake with Bright Neon Colors Recipe will maintain its texture and taste for up to 2 months in the freezer.
Reheating
Since this cake is best enjoyed chilled or at room temperature, avoid reheating it. Simply allow frozen slices to thaw completely in the refrigerator before serving to keep that tender crumb and creamy frosting intact.
FAQs
Can I use homemade cake batter instead of box mix?
Absolutely! While the box mix keeps things simple and consistent, a homemade white cake batter works wonderfully too. Just be sure it’s a batter that bakes up light and fluffy to showcase those neon colors perfectly.
What kind of food coloring works best for this cake?
Gel or paste neon food dyes give the brightest, most vibrant colors without altering the batter’s consistency. Liquid dyes can work but may thin the batter slightly, so use sparingly for the best tie-dye effect.
How can I prevent the cake from cracking when rolling?
Rolling the cake while it’s still warm and moist is key. Using towels dusted with flour helps keep the cake from sticking and cracking. Also, roll it gently and tightly to train the cake to hold its pinwheel shape when cooled.
Is this recipe suitable for kids’ parties?
Definitely! Kids will love the bright colors and fun swirls, and the easy-to-eat pinwheel slices make it great for little hands. Plus, the vibrant neon palette adds excitement to any celebration.
Can I make the frosting ahead of time?
You sure can! Make the frosting a day ahead and keep it refrigerated in an airtight container. Just bring it to room temperature and give it a quick whisk before spreading on the cake for the best texture.
Final Thoughts
This Tie-Dye Pinwheel Cake with Bright Neon Colors Recipe is truly one of those dazzling desserts that’s as joyful to make as it is to eat. Perfect for parties, celebrations, or anytime you want to brighten your day, it combines whimsy, flavor, and a splash of color in every bite. So don your apron, grab your colorful dyes, and dive into this joyful baking adventure—you’re in for a deliciously vibrant treat that everyone will rave about!
Print
Tie-Dye Pinwheel Cake with Bright Neon Colors Recipe
- Prep Time: 10 minutes
- Cook Time: 18 minutes
- Total Time: 28 minutes plus 4 hours chilling
- Yield: 12 Pinwheel slices
- Category: Dessert
- Method: Baking
- Cuisine: American
Description
This vibrant Tie Dye Pinwheel Cake is a colorful twist on a classic rolled sponge cake. Featuring a bright, multi-colored batter swirled to create a stunning tie-dye effect, it is layered with a smooth vanilla buttercream frosting and rolled into perfect pinwheels. Ideal for parties or festive occasions, this cake combines fun aesthetics with delightful flavor and a soft, moist texture.
Ingredients
Cake Batter
- 1 white cake mix (including ingredients called for on the box)
- 6 neon food dye colors
Frosting
- 1/2 cup butter, softened
- 1 tsp vanilla extract
- 3 cups powdered sugar
- 3–4 tbsp milk
Instructions
- Preheat Oven: Preheat your oven to 325ºF to prepare for baking the cake.
- Prepare Pan: Grease a jelly roll pan with shortening and lightly dust with flour to prevent sticking. Set aside.
- Make Cake Batter: Prepare the white cake mix according to the package directions.
- Divide Batter: Evenly separate the cake batter into six bowls.
- Add Color: Add a different neon food dye color to each bowl and mix well until the color is uniform.
- Fill Piping Bags: Transfer each colored batter into separate ziplock bags and cut a small corner off each for piping.
- Create Pattern: Pipe diagonal strips of each colored batter onto the prepared pan, filling it completely. Use leftover batter to fill gaps if needed.
- Even Batter: Gently shake the pan to level out the batter evenly.
- Make Swirls: Use a toothpick to draw swirls through the batter creating the tie-dye effect.
- Bake Cake: Bake the cake for 18 minutes or until set. Remove from oven and allow it to cool for 20 minutes.
- Prepare Towel: Place a clean towel on a flat surface and sprinkle it with flour.
- Flip Cake: Carefully invert the cake out of the pan onto the floured towel.
- Flour Cake Top: Sprinkle a small amount of flour over the cake’s top surface and cover it with another towel.
- Roll Cake: Starting from one end, roll the cake up tightly with the towel on each side and set it aside to cool completely in the rolled shape.
- Unroll Cake: Once cooled, gently unroll the cake from the towel.
- Prepare Frosting: Beat softened butter and vanilla extract together until creamy.
- Add Sugar and Milk: Gradually add powdered sugar and 3-4 tablespoons of milk to reach desired frosting consistency.
- Frost Cake: Spread the frosting evenly over the unrolled cake surface.
- Roll with Frosting: Carefully roll the cake back up using a towel to help guide it into a tight roll.
- Wrap and Chill: Wrap the rolled cake tightly in the towel, then place it in the freezer for 4 hours to set.
- Slice and Serve: Remove from freezer, unwrap, slice into 12 pinwheels, and serve to enjoy this colorful dessert.
Notes
- Ensure the jelly roll pan is properly prepared with shortening and flour to prevent sticking.
- Don’t overbake the cake to keep it soft and pliable for rolling.
- Rolling the cake while warm helps prevent cracking.
- Use a sharp serrated knife when slicing to maintain clean pinwheel shapes.
- The frosting consistency can be adjusted by adding more or less milk.
- You can substitute neon food dyes with gel food coloring for more vibrant colors.


