
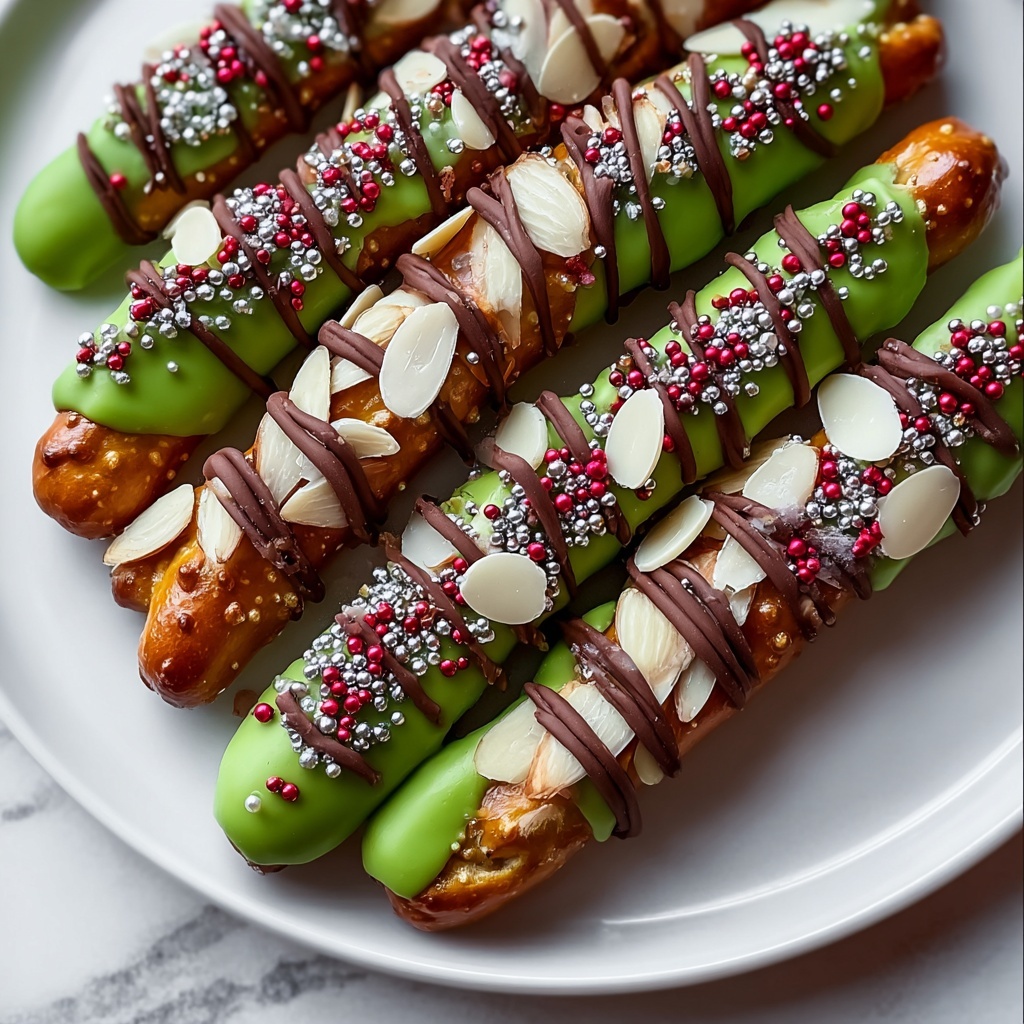
If you’re on the hunt for a spooky, fun, and utterly delicious treat that will wow both kids and adults alike, you’ve got to try this Witch Finger Pretzel Rods Recipe. These creepy-cute snacks combine the perfect crunch of pretzels with the creamy sweetness of white chocolate dyed green, finished off with an almond “fingernail” that’s as eerie as it is tasty. Perfect for Halloween parties or any time you want to add a playful twist to your snack table, this recipe is simple enough for beginners but impressive enough to steal the show.
Ingredients You’ll Need
Gathering the ingredients for this Witch Finger Pretzel Rods Recipe is a breeze, and each component plays a crucial role in creating that perfect balance of texture, flavor, and spooky charm. From the salty crunch of the pretzel rods to the smooth, tinted chocolate and those iconic almond fingernails, every ingredient brings something fun to the table.
- Large pretzel rods: These form the sturdy “finger” base and provide a satisfying crunch with every bite.
- White chocolate or candy melts: This melts smoothly to coat the pretzels and takes food coloring beautifully for that eerie green glow.
- Green food coloring: Just a few drops transform the white chocolate into witchy green, setting the spooky tone.
- Whole almonds: Pressed onto the chocolate tip, these create an authentic-looking fingernail that’s both edible and fun.
- Red gel icing: Used to draw knuckle lines, adding a creepy, realistic touch.
- Optional black gel icing: For extra detailing, giving the witch fingers even more character and dimension.
How to Make Witch Finger Pretzel Rods Recipe
Step 1: Prepare Your Workspace
Start by lining a baking sheet with parchment paper — this makes cleanup quick and keeps your pretzel rods from sticking once dipped. It’s a small prep step that makes the entire process smoother.
Step 2: Melt the White Chocolate
Place your white chocolate or candy melts in a microwave-safe bowl. Heat it in 30-second bursts, stirring well after each interval. The goal is to have perfectly smooth, fully melted chocolate without burning it, as this will give your fingers a flawless coating.
Step 3: Add the Green Food Coloring
With your chocolate melted, stir in a few drops of green food coloring until the mixture reaches the perfect witchy hue. This step is key for turning your pretzels into eerie, eye-catching witch fingers that are great fun to munch on.
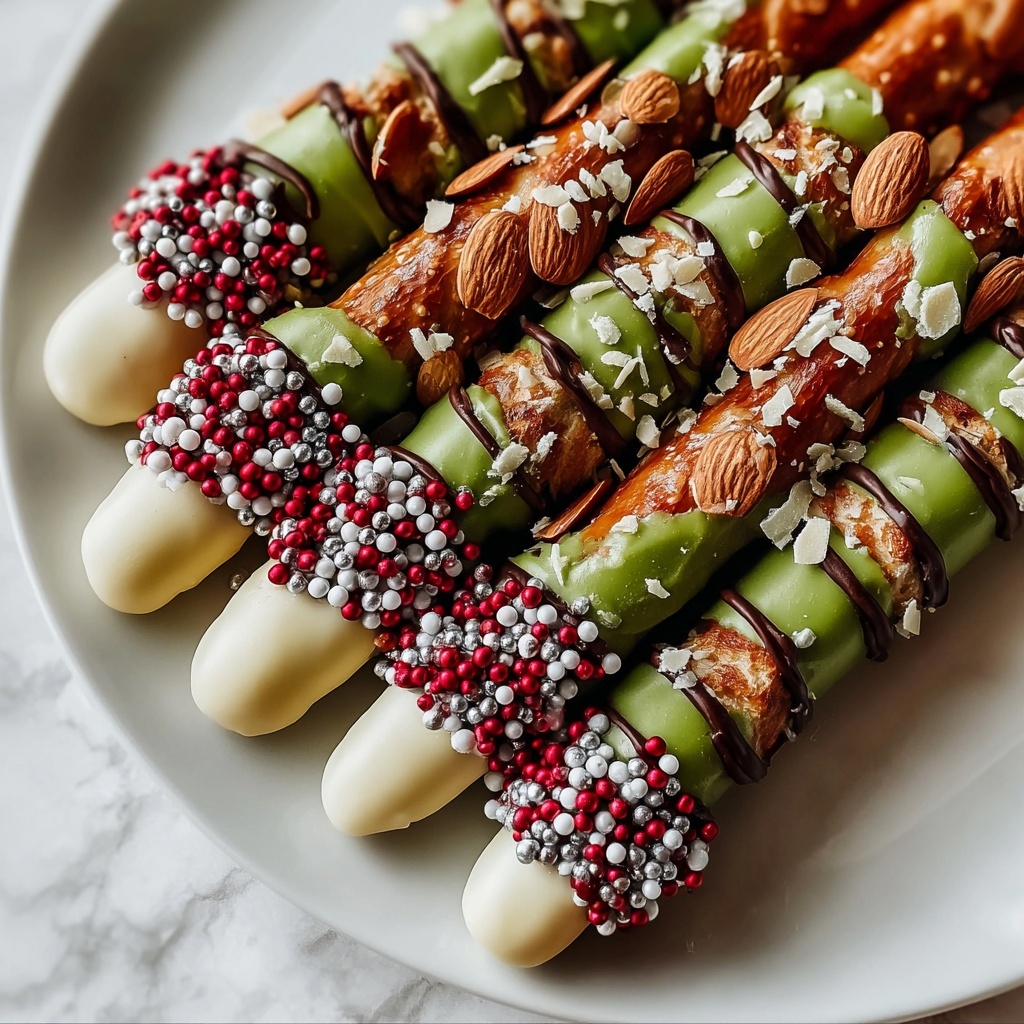
Step 4: Dip the Pretzel Rods
Carefully dip each pretzel rod into the green chocolate, covering about two-thirds of its length to resemble a finger shape. Let the excess chocolate drip off gently — you don’t want globs, just a nice even coat. Then, place each dipped rod on your lined baking sheet.
Step 5: Apply the Almond Fingernails
Before the chocolate starts to set up, press a whole almond onto the tip of each pretzel rod. This almond acts as the finger’s “nail,” giving the Witch Finger Pretzel Rods Recipe that unmistakable spooky detail.
Step 6: Let the Chocolate Set
Allow your dipped pretzels to harden completely. Pop them into the refrigerator for about 10-15 minutes if you want to speed things along — patience here pays off with a nice firm coating.
Step 7: Add Red Icing Details
Grab your red gel icing and draw a knuckle line just below the almond nail. This subtle detail creates a realistic, creepy effect reminiscent of a ghoulish finger — perfect for Halloween vibes.
Step 8: Optional Black Icing Touches
If you’re feeling extra creative, use black gel icing to add additional knuckle lines or cracks. It’s a simple way to add depth and eeriness, making these Witch Finger Pretzel Rods Recipe creations even more eye-catching.
Step 9: Allow Icing to Dry
Let the icing dry fully before handling or serving. This ensures your decorations stay intact and your witch fingers look their absolute best when you unveil them.
How to Serve Witch Finger Pretzel Rods Recipe
Garnishes
To elevate your presentation, scatter some candy corn or mini pumpkins around your platter for an extra festive feel. Dusting the pretzel rods lightly with edible glitter or sprinkles can also add a magical sparkle that the kids will adore.
Side Dishes
Witch Finger Pretzel Rods pair fantastically with other themed treats such as pumpkin-spiced popcorn, caramel apples, or a bowl of glowing green punch. These combos offer a wonderful array of flavors and textures for party guests to enjoy together.
Creative Ways to Present
For a dramatic reveal, stick the finished pretzel rods upright in a foam base decorated like a graveyard or cauldron. Wrapping them individually in clear cellophane tied with a ribbon makes perfect party favors or classroom treats that will enchant everyone.
Make Ahead and Storage
Storing Leftovers
Keep your Witch Finger Pretzel Rods Recipe fresh by storing them in an airtight container at room temperature. This will preserve the crunch of the pretzels and prevent the chocolate from blooming or melting in warm conditions.
Freezing
If you want to save these tasty treats for later, they freeze well. Wrap them loosely in parchment paper and place them in an airtight freezer bag. When ready to eat, thaw at room temperature to keep all the textures just right.
Reheating
There’s no need to reheat these finger treats since they’re best enjoyed cold or at room temperature. Reheating may cause the chocolate to melt and lose its crisp finish, so just let them thaw gently and enjoy.
FAQs
Can I use dark or milk chocolate instead of white?
Absolutely! While white chocolate works best for coloring, dark or milk chocolate can offer a richer flavor if you want a different look. Keep in mind that coloring darker chocolate is more challenging, so you may want to leave it natural.
What if I don’t have whole almonds?
You can substitute with other nut types or even candy-coated chocolate pieces shaped like nails. Even small oval-shaped candies work well to mimic the fingernail effect.
How long do Witch Finger Pretzel Rods stay fresh?
Stored properly, they stay fresh for up to a week. The pretzels maintain their crunch, and the decorations should remain intact as long as they’re kept away from humidity.
Can kids make this recipe?
This is a fantastic kid-friendly recipe with adult supervision, especially during the chocolate melting part. Kids will love dipping the pretzels and decorating the fingers with icing.
Are these gluten-free?
Standard pretzel rods contain gluten, so for those with gluten sensitivities, look for gluten-free pretzel rods or substitutes to keep this spooky treat safe for everyone.
Final Thoughts
Creating these Witch Finger Pretzel Rods Recipe treats is such a joyous way to dive into festive fun. They’re easy, charmingly spooky, and utterly delicious — a perfect combination for bringing smiles and a little thrill to your snack spread. Give them a try, and watch your friends and family marvel at your magical snack skills!
Print
Witch Finger Pretzel Rods Recipe
- Prep Time: 0h 15m
- Cook Time: 0h 5m
- Total Time: 0h 20m
- Yield: Approximately 20 pretzel rods
- Category: Snack
- Method: Dipping
- Cuisine: American
Description
These Witch Finger Pretzel Rods are a spooky and delicious Halloween treat, perfect for parties or festive snacking. Pretzel rods dipped in green-tinted white chocolate, topped with almond ‘fingernails’, and detailed with red and black icing create a creepy yet tasty finger-like appearance that’s sure to impress.
Ingredients
Ingredients
- 1 bag of large pretzel rods
- 1 cup white chocolate or candy melts
- A few drops of green food coloring
- Whole almonds
- Red gel icing
- Optional: Black gel icing for detailing
Instructions
- Prepare baking sheet: Line a baking sheet with parchment paper to ensure easy cleanup and to prevent sticking when the chocolate sets.
- Melt chocolate: In a microwave-safe bowl, melt the white chocolate or candy melts by heating in 30-second intervals, stirring thoroughly after each until smooth and fully melted.
- Add green color: Mix a few drops of green food coloring into the melted white chocolate until you reach your desired green shade.
- Dip pretzels: Dip each pretzel rod into the green chocolate, covering approximately two-thirds of the rod. Let excess chocolate drip back into the bowl before placing the pretzel on the lined baking sheet.
- Add almond fingernails: Before the chocolate hardens, press a whole almond onto the tip of each dipped pretzel to mimic a fingernail.
- Set chocolate: Allow the chocolate coating to completely set. For faster setting, place the baking sheet in the refrigerator.
- Decorate knuckle lines: Using red gel icing, draw lines just below the almond to resemble knuckles or finger joints for a realistic finger look.
- Add optional details: If desired, use black gel icing to create additional knuckle lines or accents for extra spooky detail.
- Dry completely: Let the icing dry fully before serving or displaying your Witch Finger Pretzel Rods to avoid smudging.
Notes
- You can substitute white chocolate with candy melts for easier melting and coating.
- If green food coloring isn’t available, you can mix blue and yellow to create green tones.
- Refrigerating the dipped pretzels helps the chocolate set faster and prevents smudging when decorating.
- These treats can be made a day ahead and stored in an airtight container to maintain freshness.
- Use gel icing to create precise and vibrant details that stay intact once dried.


